STATUS AND INTERRUPTS
Status registers indicate the detection of faults or events. The status registers can be channel bit-mapped or event bit-mapped. An example of a channel bit-mapped register is the BIT status register, and an example of an event bit-mapped register is the FIFO status register.
For those status registers that allow interrupts to be generated upon the detection of the fault or the event, there are four registers associated with each status: Dynamic, Latched, Interrupt Enabled, and Set Edge/Level Interrupt.
Dynamic Status: The Dynamic Status register indicates the current condition of the fault or the event. If the fault or the event is momentary, the contents in this register will be clear when the fault or the event goes away. The Dynamic Status register can be polled, however, if the fault or the event is sporadic, it is possible for the indication of the fault or the event to be missed.
Latched Status: The Latched Status register indicates whether the fault or the event has occurred and keeps the state until it is cleared by the user. Reading the Latched Status register is a better alternative to polling the Dynamic Status register because the contents of this register will not clear until the user commands to clear the specific bit(s) associated with the fault or the event in the Latched Status register. Once the status register has been read, the act of writing a 1 back to the applicable status register to any specific bit (channel/event) location will “clear” the bit (set the bit to 0). When clearing the channel/event bits, it is strongly recommended to write back the same bit pattern as read from the Latched Status register. For example, if the channel bit-mapped Latched Status register contains the value 0x0000 0005, which indicates fault/event detection on channel 1 and 3, write the value 0x0000 0005 to the Latched Status register to clear the fault/event status for channel 1 and 3. Writing a “1” to other channels that are not set (example 0x0000 000F) may result in incorrectly “clearing” incoming faults/events for those channels (example, channel 2 and 4).
Interrupt Enable: If interrupts are preferred upon the detection of a fault or an event, enable the specific channel/event interrupt in the Interrupt Enable register. The bits in Interrupt Enable register map to the same bits in the Latched Status register. When a fault or event occurs, an interrupt will be fired. Subsequent interrupts will not trigger until the application acknowledges the fired interrupt by clearing the associated channel/event bit in the Latched Status register. If the interruptible condition is still persistent after clearing the bit, this may retrigger the interrupt depending on the Edge/Level setting.
Set Edge/Level Interrupt: When interrupts are enabled, the condition on retriggering the interrupt after the Latch Register is “cleared” can be specified as “edge” triggered or “level” triggered. Note, the Edge/Level Trigger also affects how the Latched Register value is adjusted after it is “cleared” (see below).
-
Edge triggered: An interrupt will be retriggered when the Latched Status register change from low (0) to high (1) state. Uses for edge-triggered interrupts would include transition detections (Low-to-High transitions, High-to-Low transitions) or fault detections. After “clearing” an interrupt, another interrupt will not occur until the next transition or the re-occurrence of the fault again.
-
Level triggered: An interrupt will be generated when the Latched Status register remains at the high (1) state. Level-triggered interrupts are used to indicate that something needs attention.
Interrupt Vector and Steering
When interrupts are enabled, the interrupt vector associated with the specific interrupt can be programmed with a unique number/identifier defined by the user such that it can be utilized in the Interrupt Service Routine (ISR) to identify the type of interrupt. When an interrupt occurs, the contents of the Interrupt Vector registers is reported as part of the interrupt mechanism. In addition to specifying the interrupt vector, the interrupt can be directed (“steered”) to the native bus or to the application running on the onboard ARM processor.
Interrupt Trigger Types
In most applications, limiting the number of interrupts generated is preferred as interrupts are costly, thus choosing the correct Edge/Level interrupt trigger to use is important.
Example 1: Fault detection
This example illustrates interrupt considerations when detecting a fault like an “open” on a line. When an “open” is detected, the system will receive an interrupt. If the “open” on the line is persistent and the trigger is set to “edge”, upon “clearing” the interrupt, the system will not regenerate another interrupt. If, instead, the trigger is set to “level”, upon “clearing” the interrupt, the system will re-generate another interrupt. Thus, in this case, it will be better to set the trigger type to “edge”.
Example 2: Threshold detection
This example illustrates interrupt considerations when detecting an event like reaching or exceeding the “high watermark” threshold value. In a communication device, when the number of elements received in the FIFO reaches the high-watermark threshold, an interrupt will be generated. Normally, the application would read the count of the number of elements in the FIFO and read this number of elements from the FIFO. After reading the FIFO data, the application would “clear” the interrupt. If the trigger type is set to “edge”, another interrupt will be generated only if the number of elements in FIFO goes below the “high watermark” after the “clearing” the interrupt and then fills up to reach the “high watermark” threshold value. Since receiving communication data is inherently asynchronous, it is possible that data can continue to fill the FIFO as the application is pulling data off the FIFO. If, at the time the interrupt is “cleared”, the number of elements in the FIFO is at or above the “high watermark”, no interrupts will be generated. In this case, it will be better to set the trigger type to “level”, as the purpose here is to make sure that the FIFO is serviced when the number of elements exceeds the high watermark threshold value. Thus, upon “clearing” the interrupt, if the number of elements in the FIFO is at or above the “high watermark” threshold value, another interrupt will be generated indicating that the FIFO needs to be serviced.
Dynamic and Latched Status Registers Examples
The examples in this section illustrate the differences in behavior of the Dynamic Status and Latched Status registers as well as the differences in behavior of Edge/Level Trigger when the Latched Status register is cleared.
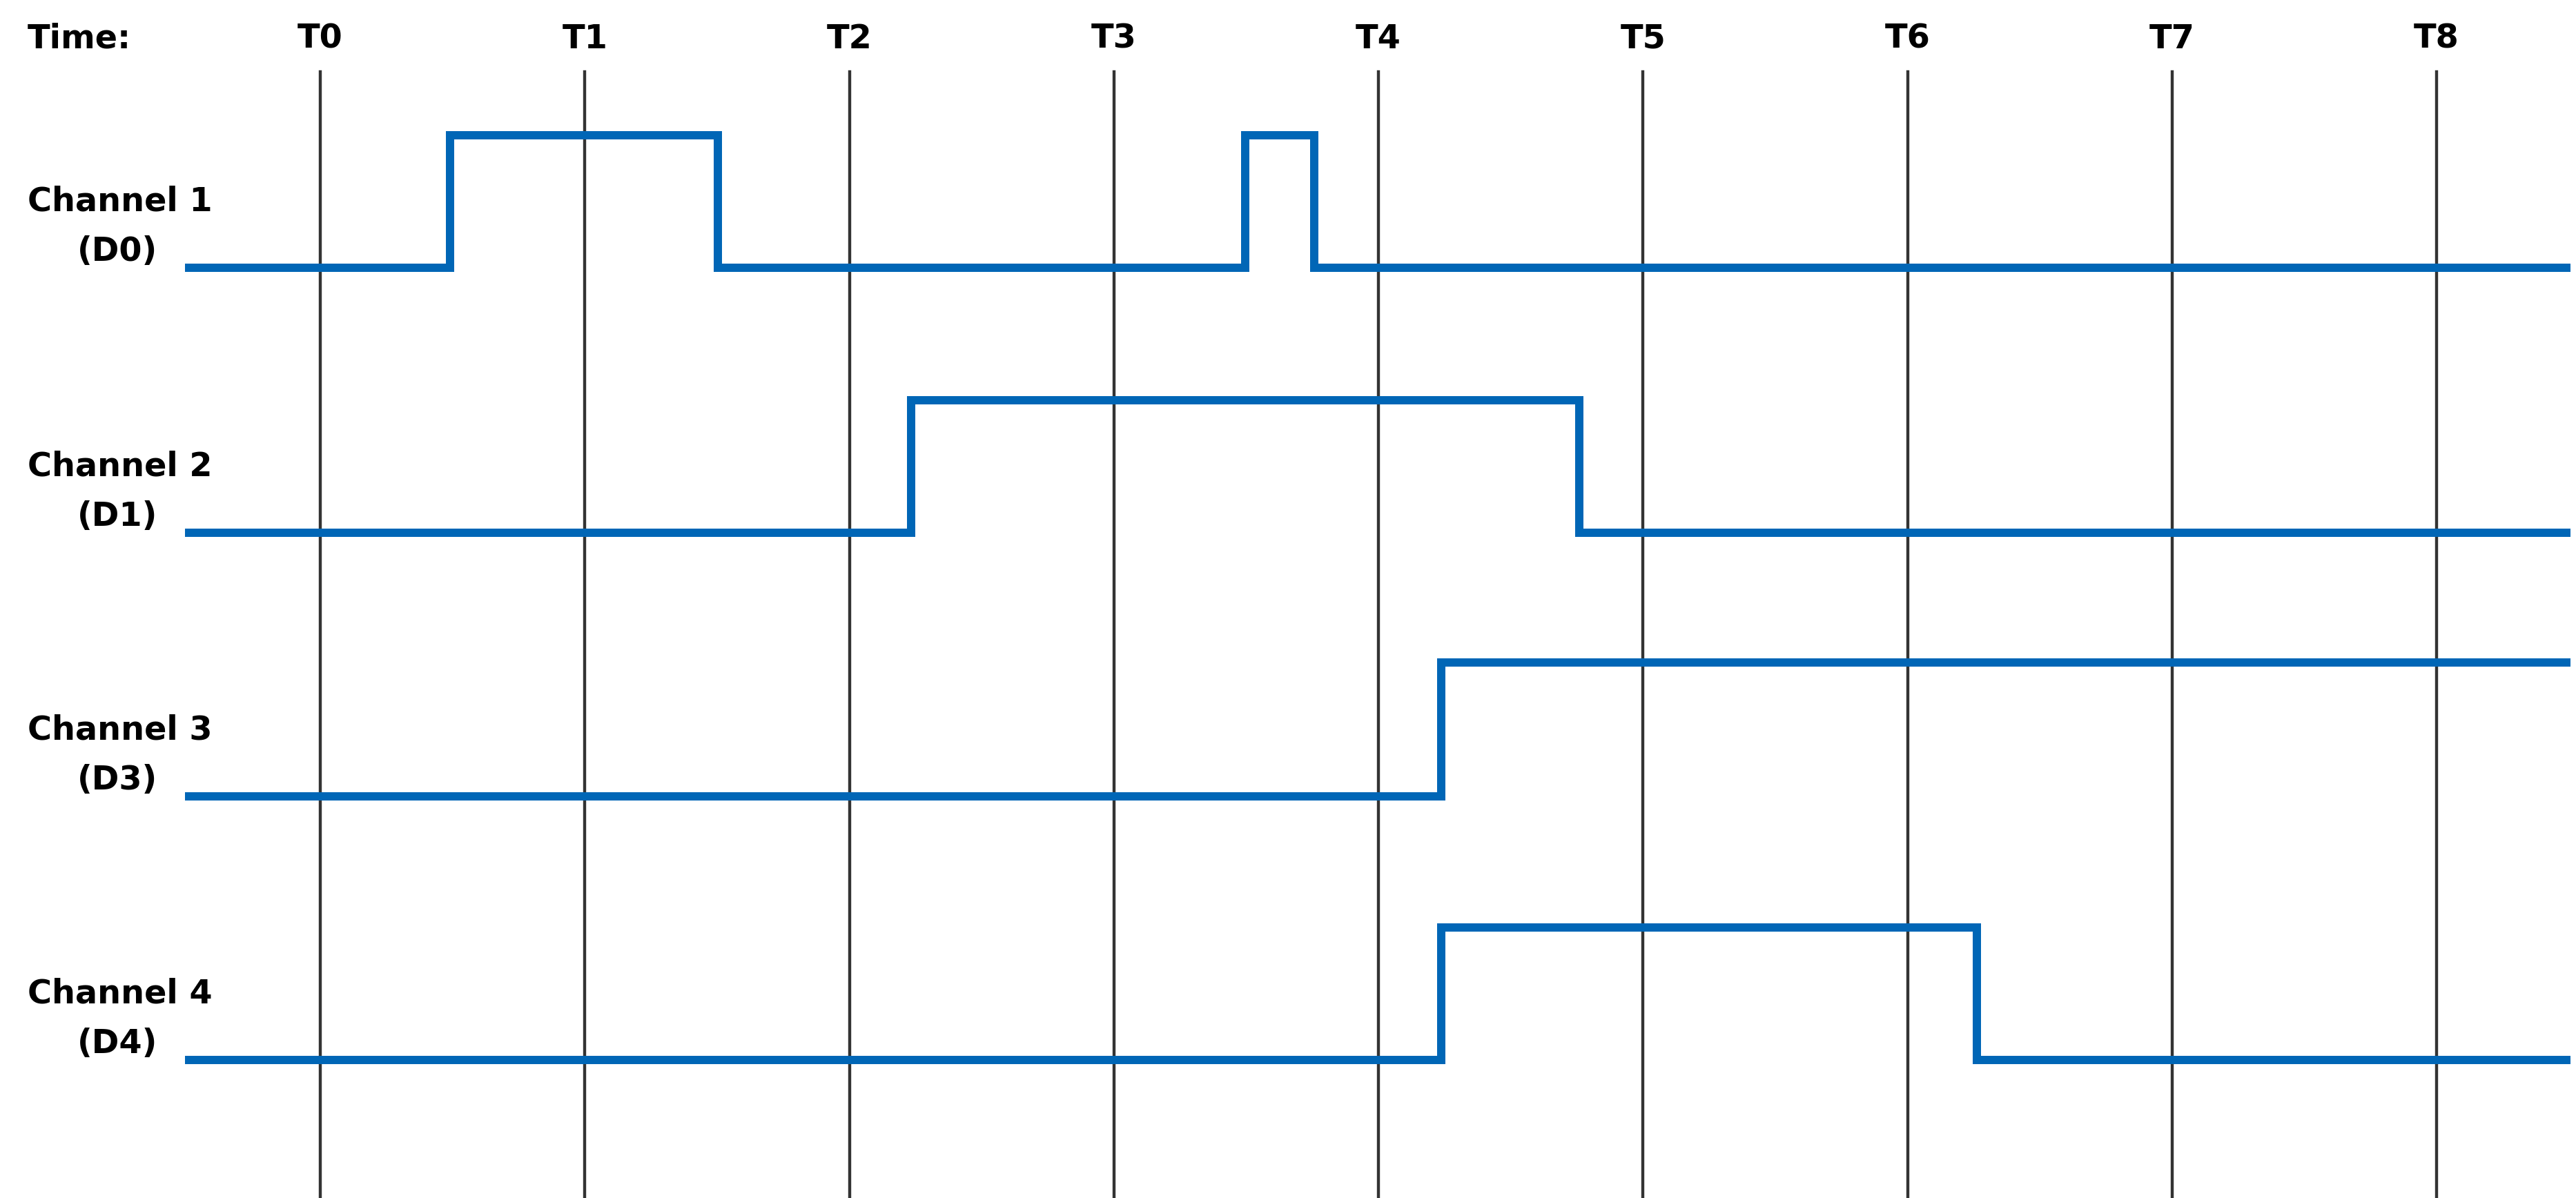
Figure 1. Example of Module's Channel-Mapped Dynamic and Latched Status States
| No Clearing of Latched Status | Clearing of Latched Status (Edge-Triggered) | Clearing of Latched Status (Level-Triggered) | ||||
| Time | Dynamic Status | Latched Status | Action | Latched Status | Action | Latched |
| T0 | 0x0 | 0x0 | Read Latched Register | 0x0 | Read Latched Register | 0x0 |
| T1 | 0x1 | 0x1 | Read Latched Register | 0x1 | 0x1 | |
| T1 | 0x1 | 0x1 | Write 0x1 to Latched Register | Write 0x1 to Latched Register | ||
| T1 | 0x1 | 0x1 | 0x0 | 0x1 | ||
| T2 | 0x0 | 0x1 | Read Latched Register | 0x0 | Read Latched Register | 0x1 |
| T2 | 0x0 | 0x1 | Read Latched Register | 0x0 | Write 0x1 to Latched Register | |
| T2 | 0x0 | 0x1 | Read Latched Register | 0x0 | 0x0 | |
| T3 | 0x2 | 0x3 | Read Latched Register | 0x2 | Read Latched Register | 0x2 |
| T3 | 0x2 | 0x3 | Write 0x2 to Latched Register | Write 0x2 to Latched Register | ||
| T3 | 0x2 | 0x3 | 0x0 | 0x2 | ||
| T4 | 0x2 | 0x3 | Read Latched Register | 0x1 | Read Latched Register | 0x3 |
| T4 | 0x2 | 0x3 | Write 0x1 to Latched Register | Write 0x3 to Latched Register | ||
| T4 | 0x2 | 0x3 | 0x0 | 0x2 | ||
| T5 | 0xC | 0xF | Read Latched Register | 0xC | Read Latched Register | 0xE |
| T5 | 0xC | 0xF | Write 0xC to Latched Register | Write 0xE to Latched Register | ||
| T5 | 0xC | 0xF | 0x0 | 0xC | ||
| T6 | 0xC | 0xF | Read Latched Register | 0x0 | Read Latched | 0xC |
| T6 | 0xC | 0xF | Read Latched Register | 0x0 | Write 0xC to Latched Register | |
| T6 | 0xC | 0xF | Read Latched Register | 0x0 | 0xC | |
| T7 | 0x4 | 0xF | Read Latched Register | 0x0 | Read Latched Register | 0xC |
| T7 | 0x4 | 0xF | Read Latched Register | 0x0 | Write 0xC to Latched Register | |
| T7 | 0x4 | 0xF | Read Latched Register | 0x0 | 0x4 | |
| T8 | 0x4 | 0xF | Read Latched Register | 0x0 | Read Latched Register | 0x4 |
Interrupt Examples
The examples in this section illustrate the interrupt behavior with Edge/Level Trigger.
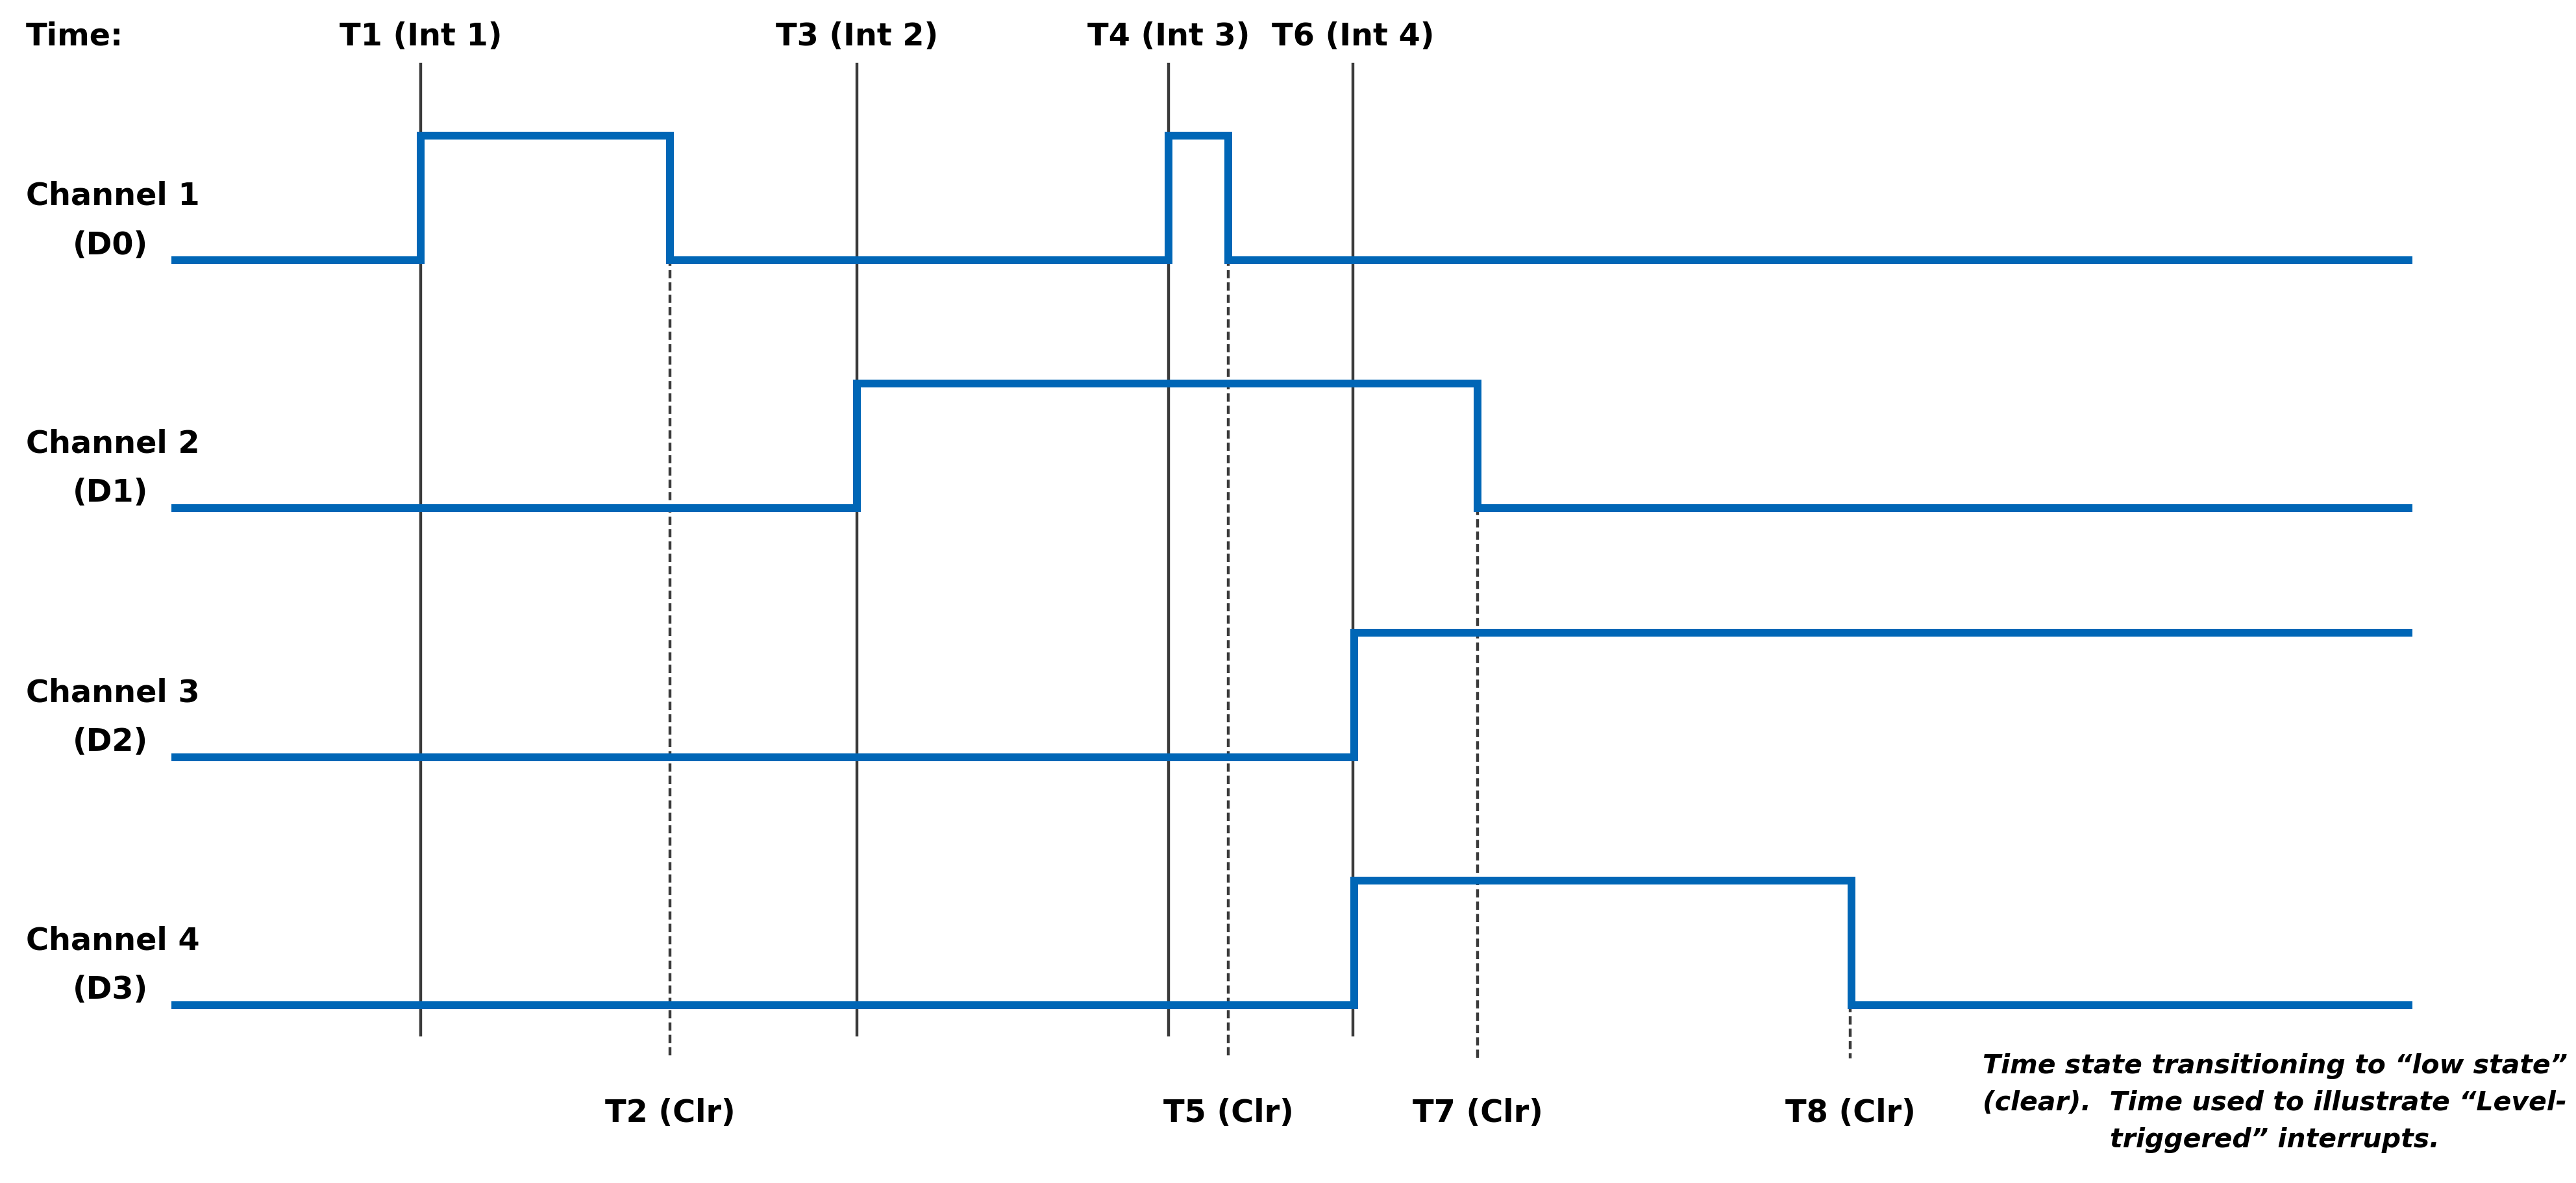
Figure 2. Illustration of Latched Status State for Module with 4-Channels with Interrupt Enabled
| Time | Latched Status (Edge-Triggered - Clear Multi-Channel) | Latched Status (Edge-Triggered - Clear Single Channel) | Latched Status (Level-Triggered - Clear Multi-Channel) | |||
| Action | Latched | Action | Latched | Action | Latched | |
| T1 (Int 1) | Interrupt Generated Read Latched Registers | 0x1 | Interrupt Generated Read Latched Registers | 0x1 | Interrupt Generated Read Latched Registers | 0x1 |
| T1 (Int 1) | Write 0x1 to Latched Register | Write 0x1 to Latched Register | Write 0x1 to Latched Register | |||
| T1 (Int 1) | 0x0 | 0x0 | Interrupt re-triggers Note, interrupt re-triggers after each clear until T2. | 0x1 | ||
| T3 (Int 2) | Interrupt Generated Read Latched Registers | 0x2 | Interrupt Generated Read Latched Registers | 0x2 | Interrupt Generated Read Latched Registers | 0x2 |
| T3 (Int 2) | Write 0x2 to Latched Register | Write 0x2 to Latched Register | Write 0x2 to Latched Register | |||
| T3 (Int 2) | 0x0 | 0x0 | Interrupt re-triggers Note, interrupt re-triggers after each clear until T7. | 0x2 | ||
| T4 (Int 3) | Interrupt Generated Read Latched Registers | 0x1 | Interrupt Generated Read Latched Registers | 0x1 | Interrupt Generated Read Latched Registers | 0x3 |
| T4 (Int 3) | Write 0x1 to Latched Register | Write 0x1 to Latched Register | Write 0x3 to Latched Register | |||
| T4 (Int 3) | 0x0 | 0x0 | Interrupt re-triggers Note, interrupt re-triggers after each clear and 0x3 is reported in Latched Register until T5. | 0x3 | ||
| T4 (Int 3) | 0x0 | 0x0 | Interrupt re-triggers Note, interrupt re-triggers after each clear until T7. | 0x2 | ||
| T6 (Int 4) | Interrupt Generated Read Latched Registers | 0xC | Interrupt Generated Read Latched Registers | 0xC | Interrupt Generated Read Latched Registers | 0xE |
| T6 (Int 4) | Write 0xC to Latched Register | Write 0x4 to Latched Register | Write 0xE to Latched Register | |||
| T6 (Int 4) | 0x0 | Interrupt re-triggers Write 0x8 to Latched Register | 0x8 | Interrupt re-triggers Note, interrupt re-triggers after each clear and 0xE is reported in Latched Register until T7. | 0xE | |
| T6 (Int 4) | 0x0 | 0x0 | Interrupt re-triggers Note, interrupt re-triggers after each clear and 0xC is reported in Latched Register until T8. | 0xC | ||
| T6 (Int 4) | 0x0 | 0x0 | Interrupt re-triggers Note, interrupt re-triggers after each clear and 0x4 is reported in Latched Register always. | 0x4 | ||
REVISION HISTORY
| Motherboard Manual - Status and Interrupts Revision History | ||
| Revision | Revision Date | Description |
| C | 2021-11-30 | C08896; Transition manual to docbuilder format - no technical info change. |
| DOCS.NAII REVISIONS | |
| Revision Date | Description |
| 2026-03-02 | Formatting updates to document; no technical changes. |
| 2026-05-18 | Fixed formatting issues from conversion to new doc site format. |
| 2026-05-19 | Fixed minor formatting issue with Interrupt Examples table structure (removed extraneous cell). |
| 2026-07-15 | Revised image files for image quality. |