You have NAI hardware powered up on a bench and you’re ready to get your application running on it. This page covers everything that sits between “powered board” and “running application” — cabling, network reachability, terminal access, and (for cross-compile targets) file transfer onto the board.
Two development flows. NAI boards fall into two broad categories for embedded development, and the path you follow below depends on which one you have:
Cross-compile flow — Most NAI boards (ARM/PetaLinux, VxWorks, Deos) run an embedded OS that doesn’t host a full development environment. You build your application on a separate dev PC, transfer the executable to the board, and launch it from a serial console. This is the ARM flow that the bulk of this page describes.
Onboard Linux x86 flow — NAI Intel SBCs 68INT5, 68INT6, 68INT6H (Ubuntu) and 75INT2 (CentOS) run a full graphical Linux desktop on the board itself. Development happens on the board — install the SSK there, build there, run there. No cross-compile, no file transfer, no serial-only console. Jump to Onboard Linux x86 for this simpler flow.
If you’re not sure which sub-section below applies to your setup, read The Workflow first — it is OS-agnostic and explains the steps every dev environment shares.
The Workflow
Every NAI hardware bring-up follows the same six conceptual phases, regardless of which operating system runs on the board. Recognizing which phase you’re in helps you find the right sub-section below — and the right page to jump to if you get stuck.
Power & physical link. The board is powered and connected to your host. For most NAI products this means an ethernet cable for data and a serial cable (or USB-to-serial adapter) for the console. Some configurations replace ethernet with direct PCIe (e.g., the 79G5) or VME.
Network reachability. The board has a known IP address that your host can reach. On ARM/VxWorks boards, NAI stores the IP in motherboard EEPROM and the utility naiMBEEPROMUtil is how you read or change it — see naiMBEEPROMUtil quick reference. On onboard Linux x86 boards (68INT5/6/6H, 75INT2) this phase is just standard Linux network configuration via NetworkManager or nmcli/ip.
Terminal access. For the cross-compile flow, you open a serial terminal session to the board’s console — TeraTerm on Windows, minicom on Linux, or PuTTY. NAI’s standard settings (115200 / 8 / None / 1 / None) are in Serial terminal settings. The console is how you’ll log in, navigate the filesystem, and watch your app’s output later. Onboard Linux x86 boards use the local desktop’s terminal application instead (or SSH from another host); the serial console is optional on those.
File transfer. This phase applies to the cross-compile (ARM/VxWorks/Deos) flow only. Your built ELF lives on your dev PC and you move it onto the board’s filesystem — for PetaLinux this is typically WinSCP over SCP/SFTP, or Vitis’s Remote System Explorer if you’re already in the IDE; for VxWorks it’s FTP/TFTP; Deos uses a different model entirely (image-based deploy). On onboard Linux x86 boards the build happens on the board, so there is no transfer step.
Execution. On the cross-compile flow, the transferred file is marked executable and launched — on PetaLinux this is chmod 777 then ./your_app.elf. On onboard Linux x86 there is no transfer step and CMake typically already marks the output executable, so you just run ./your_app from where it was built. Either way, the launch step itself lives in Running Applications from the Target — this page hands off at the moment your binary is on the board and your terminal is open.
Observation. The app prints its output back to your serial terminal. You confirm it ran, interact with any menus it presents, and either continue developing or move on to ESP2 / sample apps for the next phase of your work.
The software stack
Before the tool-by-tool table, it helps to see how the pieces relate — because two things are easy to conflate: the tools that build your application (which live on your dev PC) and the layers your application runs on (which live on, or reach, the board). They are separate concerns.
BUILD TIME (your dev PC) IDE + toolchain — Vitis / Xilinx SDK · Wind River Workbench · OpenArbor · Visual Studio · CMake │ builds your executable, then steps out of the picture ▼RUN TIME (on, or reaching, the board) Your application │ links against ▼ NAI SSK — naibrd_* libraries (1.x / 2.x) │ sits on ▼ Board Support Package (BSP) — board- and OS-specific layer │ runs on ▼ Operating system — PetaLinux · VxWorks · Deos · Windows · Linux x86 │ controls ▼ NAI hardware — SBC + I/O modules
IDE + toolchain — build-time only. The IDE (Vitis, Xilinx SDK, Wind River Workbench, OpenArbor, or Visual Studio) and the toolchain it drives — compiler, linker, and, for SSK 2.x, a CMake toolchain file — turn your source into an executable. Once it’s built, they’re out of the picture; they don’t run on the board.
Your application — the program you write, which links against the SSK.
NAI SSK — the naibrd_* library you call to talk to the hardware. Ships in 1.x and 2.x generations — see Choosing the Right SSK.
BSP — the board- and OS-specific layer that lets the SSK reach a particular board on a particular OS.
Operating system and hardware — what everything ultimately runs on.
Note
Where the BSP lives — it can look like two different things. In the SSK 2.x PetaLinux / Linux packages the BSP ships inside the SSK (base/nai_bsp/) and is compiled as part of your build. For VxWorks and Deos, the same board layer is instead installed into the IDE (Wind River Workbench, OpenArbor) and built there. It’s the same role in the stack — just delivered differently depending on the OS.
Which versions go together. The IDE and SSK generation are pinned to the OS on the board. For the Xilinx flow specifically, the IDE was renamed from Xilinx SDK to Vitis across versions — it’s the same tool in that slot, not a different one:
The tools below apply primarily to the cross-compile (ARM/VxWorks/Deos) flow. On onboard Linux x86 boards, you work in the board’s own desktop environment with whatever Linux tools you prefer — file manager, terminal, GCC, CMake — so the IDE / transfer / serial-console rows below are not load-bearing for that flow.
Tool
What it is
Where it runs
Phase(s)
NAI SSK (1.x / 2.x)
NAI’s Software Support Kit — the library APIs (naibrd_*) your application links against to talk to NAI hardware.
Linked into your app on the dev PC for cross-compile; built and linked on the board itself for onboard Linux x86.
Built in SDG, used at phase 5-6
Xilinx Vitis / SDK
The IDE you build your ELF in for ARM Linux / PetaLinux targets (cross-compile).
Dev PC.
4-5 (build artifact)
Wind River Workbench
The IDE for VxWorks 7 targets (cross-compile).
Dev PC.
4-5 (build artifact)
Visual Studio (with CMake)
The IDE for Windows-host applications targeting NAI boards over ethernet.
Dev PC (Windows).
4-5 (build artifact)
DDC-I OpenArbor
The IDE for Deos targets (cross-compile).
Dev PC.
4-5 (build artifact)
PetaLinux
The embedded Linux that runs on NAI ARM boards.
Board.
1-6 (it’s the OS)
Ubuntu / CentOS (onboard)
The full Linux desktop that ships on NAI Intel SBCs (68INT5/6/6H run Ubuntu; 75INT2 runs CentOS). The SSK is built and run on the board itself.
Board.
1-6 (it’s the OS)
TeraTerm (or minicom / PuTTY)
The serial terminal application that gives you a console to the board (cross-compile flow).
Dev PC.
3, 5-6
WinSCP (or scp / Vitis RSE)
File-transfer client that copies your ELF from dev PC to board over SCP/SFTP. Cross-compile only — not used in the onboard Linux x86 flow.
Dev PC.
4
naiMBEEPROMUtil
Board-side utility that reads and writes the motherboard EEPROM, including IP/network settings. Used on ARM/VxWorks/Deos targets; onboard Linux x86 uses standard OS network config instead.
Board.
2
NAI Ethernet Listener
The board-side process that accepts NAI ethernet protocol connections from a host (ESP2, your application on a Windows or Linux dev PC, etc.). Default ports are TCP/UDP 52801 and 52802 — see Ethernet How-to FAQ. On ARM/PetaLinux boards the listener auto-starts at boot based on the EEPROM OpMode Listeners at Startup field; on onboard Linux x86 boards (Ubuntu/CentOS) the SSK image ships a listener application that the user starts manually.
Board.
5-6 (host-side connections)
Set up your dev environment
PetaLinux / ARM Linux
This is the full inline procedure for NAI ARM Linux boards running PetaLinux — the ARM cross-compile flow. If you’re on a different OS, see Onboard Linux x86 (for Intel SBCs running an onboard Ubuntu/CentOS desktop), VxWorks, Deos, or Windows host / CMake below. The steps below assume you’ve already finished the Software Development Guide and have a built .elf on your dev PC.
1. Cable up power, ethernet, and serial
Place the motherboard into its chassis (or, for a bare-board development setup, mount it on a bench fixture) and connect:
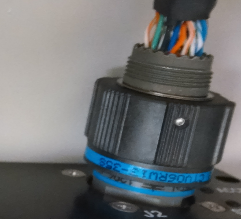
Power — using NAI’s MIL-DTL-38999 power cable, or via a benchtop power supply on the banana-jack ends.
Ethernet — RJ-45 to your host network. Most NAI ARM boards have two ethernet ports (eth0 / eth1); start with eth0.
Serial — DB-9 or USB-to-serial cable to your host PC’s serial port.
For exact connector pinouts and cable part numbers, see Connectors and Cabling Info. For a development setup with breakout access to module I/O, NAI’s 44-pin breakout boards are documented on the same page.
Note
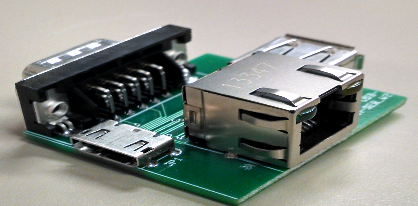
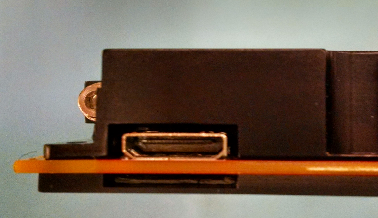
Serial + ethernet via the HDMI connector on ARM target boards. Most NAI ARM target boards expose their serial console and primary ethernet through the HDMI connector on the front of the unit. For ruggedized ARM enclosures, both ports are routed to a MIL connector instead.
HDMI connector (left); MIL connector on ruggedized enclosures (right).
NAI ships a small adapter board that breaks the HDMI side out into a standard DB-9 serial port and an RJ-45 ethernet jack — that’s what your serial and ethernet cables connect to. Power off the target board until the adapter is wired in. The USB-A connector on the adapter board is not supported by the ARM target board.
2. Open a serial terminal
Launch your terminal program (TeraTerm on Windows, minicom on Linux, or PuTTY). Configure it with NAI’s standard serial settings — see Serial terminal settings below. Once the board has power, you should see boot messages stream across the terminal within a few seconds. If you don’t, return to step 1 and check the serial cable.
Detailed minicom setup (Linux dev host)
If you’re running your terminal program on a Linux dev host, here is the install + configuration walkthrough:
$ sudo yum install minicom$ dmesg | grep tty # list available serial ports$ sudo minicom -s /dev/<port> # launch minicom config
In minicom’s configuration menu:
Serial port setup — set Serial Device to the port name found via dmesg | grep tty, leave Calling Program and Callout Program empty, set Bps/Par/Bits to 115200 8N1, Hardware Flow Control to No, Software Flow Control to No.
Save setup as _dev_ttyUSB0 (or whatever port name applies).
Modem and dialing — every setting from A to H should be empty.
Exit, then power cycle the board.
If you are on Windows, TeraTerm or PuTTY configured against the standard settings table below will work without any of the above setup.
3. Confirm or set the board’s IP
NAI ARM boards store their IP, subnet mask, gateway, and MAC addresses in motherboard EEPROM. The naiMBEEPROMUtil utility — preinstalled on the board’s PetaLinux image — reads and writes those values.
Check what’s currently configured. From the serial console after the board boots, log in as root (password root) and run:
root@68arm2-bsp:~# naiMBEEPROMUtil version
You should see version output similar to:
===================== MBCore =================================================== ExecutionContext: Platform ARM-P0 ULTRASCALE+ Master Linux Application Built For Target: 68ARM2 Application Name: naiMBEEPROMUtil Application Revision: 1.0 Application Build DateTime: May 22 2025 10:26:58 ...---------------------------------------------------------------------------------
To display the full EEPROM contents including the configured IP:
Change the IP if needed. Use the set form for whichever field you need to update:
root@68arm2-bsp:~# naiMBEEPROMUtil set EthA_IPv4Address 192.168.1.16root@68arm2-bsp:~# naiMBEEPROMUtil set EthA_IPv4SubnetMask 255.255.255.0root@68arm2-bsp:~# naiMBEEPROMUtil set EthB_IPv4Address 192.168.2.16root@68arm2-bsp:~# naiMBEEPROMUtil set EthB_IPv4SubnetMask 255.255.255.0
The new values take effect on the next system reset (shutdown -r now).
Warning
Do not use naiMBEEPROMUtil to erase the EEPROM or modify any fields other than IP/subnet/gateway. The MAC addresses and platform metadata stored in EEPROM are required for the board to function — overwriting them can brick the board.
Confirm reachability from your host. After the board reboots, from your dev PC:
> ping 192.168.1.16
Once ping succeeds, you have everything you need for phase 4 (file transfer).
4. Build the ELF on your dev PC
You did this in the Software Development Guide. The output is a .elf file in your project’s Debug/ (or Release/) folder — for example naiapp_mod_ad_basic_ops.elf.
If you haven’t built yet, go back to the SDG before continuing. For an end-to-end PetaLinux build walkthrough, see the PetaLinux 2023 build steps in the Software Development Guide 2.x. For PetaLinux 2018 see the 2018 build steps — the build process is similar with version-specific UI differences noted at the bottom of this section.
5. Transfer the ELF to the board
Two methods. Pick the one that fits your workflow:
Method A: WinSCP (recommended for most workflows).
WinSCP is a free SCP/SFTP client for Windows. Once your board’s IP is reachable from your dev PC:
Open WinSCP. Create a new session with:
File protocol: SFTP (or SCP — either works)
Host name: the board’s IP (e.g., 192.168.1.16)
Port: 22
User name:root
Password:root
Click Login. WinSCP opens a two-pane file browser — your dev PC on the left, the board’s filesystem on the right.
Navigate the right pane to /home/root/ (or /tmp/ if you prefer ephemeral storage that clears on reboot).
Drag your .elf file from the left pane into the right pane. Transfer is a few seconds for a typical sample app.
Method B: Vitis Remote System Explorer (in-IDE alternative).
If you’re already in Vitis and want to avoid context-switching to a separate file-transfer tool:
Show Vitis RSE steps
In Vitis, switch to the Remote System Explorer perspective (top-right corner; or Window → Perspective → Open Perspective → Other → Remote System Explorer).
Right-click in the blank area → New → Connection… → SSH Only. Enter the board’s IP and credentials.
Navigate to Root/home/root on the remote connection.
Right-click → Export from Project → select your project’s Debug/ folder → check the .elf file → Finish.
PetaLinux 2018 vs PetaLinux 2023 — what’s different. The two SDK generations use different versions of Xilinx’s IDE (Xilinx SDK 2018.2 vs Vitis Classic 2023.2) and different SSK packages. The conceptual workflow is identical — the differences are entirely in menu paths, project-import wizards, and environment-variable setup inside the IDE. If you’re on PetaLinux 2018, follow Importing and Building Sample Applications (PetaLinux 2018.2) for the IDE-specific steps; if you’re on 2023, follow Importing and Building Sample Applications (PetaLinux 2023.2). Either way, the transfer + terminal + launch portions of the workflow on this page apply unchanged.
Onboard Linux x86
This sub-section applies to NAI Intel SBCs that run a full Linux desktop directly on the board — currently the 68INT5, 68INT6, and 68INT6H (Ubuntu), and the 75INT2 (CentOS, SSK 1.x). On these boards there is no cross-compile, no ELF transfer, and no serial-only console — the board is its own development environment. The flow is significantly simpler than the ARM/PetaLinux flow above.
How the six phases map:
Power & physical link (phase 1) — Connect power, an ethernet cable for network access (helpful for downloading packages or git clone-ing the SSK), and a keyboard, mouse, and display via HDMI/DisplayPort. You can attach a serial cable for boot diagnostics if you want, but day-to-day work is from the desktop GUI.
Network reachability (phase 2) — Standard Linux networking. Configure IP via the board’s NetworkManager GUI applet, nmcli, or ip from a terminal. naiMBEEPROMUtil is not used here.
Terminal access (phase 3) — Open the desktop’s terminal application (GNOME Terminal, xterm, etc.). If you’d rather work from your own dev PC you can SSH into the board, but a serial console is not required.
File transfer (phase 4) — Not applicable. The SSK source, your application code, and your built binary all live on the board’s filesystem. You can git clone the SSK, copy it from a USB drive, or download a package — none of these are the “host-to-board ELF transfer” step from the ARM flow.
Execution (phase 5) — Run the binary directly from the board’s terminal: ./your_app. No chmod step is needed if CMake’s build already marked the output executable (it usually does).
Observation (phase 6) — Output appears in the same terminal you launched the app from.
Build the SSK on the board. Copy the SSK package onto the board (USB stick, SCP from your dev PC, or download from naii.com via the desktop browser), unzip it somewhere under your home directory, then follow NAI SSK CMake Build Guide for Linux — the same CMake build instructions used for any x86_64 Linux host. The linux_x86-64.cmake toolchain is the default.
ESP2 runs natively too. NAI’s Embedded Soft Panel 2 ships native Linux builds for Ubuntu and CentOS, so it can run directly on these boards alongside your own applications. See ESP2 Quick Start for the walkthrough; the install path on the board is the same as on any Linux host.
Important
Start the NAI ethernet listener if you’re connecting from a host. Unlike ARM/PetaLinux boards (where the listener auto-starts at boot via the EEPROM OpMode Listeners at Startup field), onboard Linux x86 boards do not run the listener automatically. The Ubuntu and CentOS SSK images ship a listener application that you start manually from the board’s terminal. If you don’t run it, ESP2 from a remote PC or an application on a host dev PC will be unable to reach the board’s modules even though ping works. See the listener row in Tools at a glance and the troubleshooting row for the symptom. (For applications running locally on the board itself this is not required.)
VxWorks
NAI’s VxWorks 7 support uses Wind River Workbench as the IDE and ships a board-specific BSP (e.g., naiNIU3A) that you copy into your Workbench installation. Instead of producing a standalone ELF for transfer, the VxWorks workflow builds a complete VxWorks Image Project (the OS image) plus separate downloadable kernel modules for NAI BSP, NAI BRD, and your application. These are loaded onto the target via Wind River’s deployment mechanisms.
How the six phases map to VxWorks:
Power & physical link (phase 1) — same as PetaLinux. See step 1.
Network reachability (phase 2) — VxWorks reads its IP from the boot parameters configured in Workbench / the VxWorks bootloader rather than from NAI EEPROM. naiMBEEPROMUtil does not apply.
Terminal access (phase 3) — same serial settings as PetaLinux (see Serial terminal settings). The VxWorks shell takes the place of the Linux shell.
File transfer (phase 4) — typically FTP or TFTP for module/image downloads, or via Workbench’s target-connection dialog. There is no chmod-style mark-executable step; the file format already encodes executability.
Execution (phase 5) — kernel modules are loaded via the VxWorks shell or Workbench’s “Download” action; the application’s entry point is then called from the shell.
Observation (phase 6) — output streams to the same serial console.
For the full VxWorks workflow — BSP installation, VSB and VIP project creation, kernel-module project setup, sample app deployment — see NAI VxWorks 7 Quick-Start Guide.
Deos
NAI’s Deos support uses DDC-I’s OpenArbor IDE and ships a kismet workspace (deos_kismet) containing NAI’s libraries and sample apps configured as Deos projects. Deos is a partition-based RTOS, so the deployment model is fundamentally different from PetaLinux: there is no “drop an ELF and run.” Instead, you build a composite image (composite.darc) that bundles the kernel, configuration, and application code — that image is what gets loaded onto the target.
How the six phases map to Deos:
Power & physical link (phase 1) — same as PetaLinux. See step 1.
Network reachability (phase 2) — set via U-Boot environment variables on the target (setenv ipaddr <value>; setenv serverip <value>; saveenv). OpenArbor’s lwip.config separately stores the platform’s IP for the IDE’s connection. naiMBEEPROMUtil does not apply.
File transfer (phase 4) — composite image is loaded via OpenArbor’s Target Manager and “Update Target Load” — not via SCP.
Execution (phase 5) — applications run as Deos partition dependencies; adding a sample app means adding it as a dependency on the platform project, rebuilding the image, and reloading with “Force Cold Start” checked.
Observation (phase 6) — output streams to the serial console; some Deos apps also surface through OpenArbor’s Status Monitor and Video Stream tools.
This sub-section applies when your application runs on a Windows host PC and reaches the NAI board over ethernet or via direct PCIe (e.g., 79G5, 79C3). The “transfer + chmod + launch” model of phases 4-6 does not apply the same way — your app runs on the host, and what you’re doing is configuring the host to find the board.
How the six phases map:
Power & physical link (phase 1) — same as PetaLinux (or PCIe slot insertion for 79G5/79C3). See step 1.
Network reachability (phase 2) — if you’re using ethernet, the board still needs an IP set via naiMBEEPROMUtil (or via the board’s master-controller path); see step 3. For PCIe-connected boards, this phase doesn’t apply — the host enumerates the card via the PCI bus.
Terminal access (phase 3) — you may still want a serial terminal for board diagnostics during bring-up, but day-to-day operation is from the Windows host directly. NAI’s standard serial settings apply (Serial terminal settings).
File transfer (phase 4) — not applicable. Your application is a Windows executable; it stays on the host.
Execution (phase 5) — run the Windows executable directly from Visual Studio or from the command line. The NAI SSK library is linked into your app and handles board communication via the configured transport (ethernet TCP, PCI, VME).
Observation (phase 6) — your app’s output appears in the Visual Studio console or wherever you launched it from.
For environment setup (CMake invocation, Visual Studio solution generation, sample-app builds, project-from-scratch walkthrough), see Windows CMake Quick-Start Guide.
Important
The board-side NAI ethernet listener must be running. Your Windows application reaches the board via the NAI ethernet protocol, which requires a listener process on the board. On ARM/PetaLinux boards the listener auto-starts at boot (controlled by the EEPROM OpMode Listeners at Startup field — see Software Development Guide for the naiMBEEPROMUtil walkthrough). On onboard Linux x86 boards (68INT5/6/6H, 75INT2) the listener does not auto-start; the user must launch the listener application that ships with the SSK image manually from the board’s terminal. See Tools at a glance and the troubleshooting table for the “can ping but can’t connect” symptom.
Reference
Serial terminal settings
These are NAI’s standard serial-console settings. They apply to every NAI ARM Linux, VxWorks, and Deos board unless the specific hardware manual says otherwise.
Setting
Value
Baud rate
115200
Data bits
8
Parity
None
Stop bits
1
Flow control
None
These settings work in TeraTerm on Windows, minicom on Linux, PuTTY on either, and any other terminal program that exposes the same fields. If you see garbled characters on the console after the board powers up, the most common cause is a baud-rate mismatch — re-check this table first.
naiMBEEPROMUtil quick reference
naiMBEEPROMUtil is a board-side utility (preinstalled on NAI ARM Linux PetaLinux images) for reading and writing motherboard EEPROM — the persistent store for the board’s IP, MAC, and platform metadata. Run it from the board’s serial console as root.
Command
Purpose
naiMBEEPROMUtil version
Print utility and BSP version info
naiMBEEPROMUtil formatteddisplay
Print all EEPROM fields in a human-readable layout
naiMBEEPROMUtil set EthA_IPv4Address <ip>
Set the IP address on ethernet port A
naiMBEEPROMUtil set EthA_IPv4SubnetMask <mask>
Set the subnet mask on port A
naiMBEEPROMUtil set EthA_IPv4Gateway <ip>
Set the gateway on port A
naiMBEEPROMUtil set EthB_IPv4Address <ip>
Set the IP address on ethernet port B
naiMBEEPROMUtil set EthB_IPv4SubnetMask <mask>
Set the subnet mask on port B
Changes take effect on the next system reset.
Warning
Do not modify fields other than the IP / subnet / gateway entries. The EEPROM also stores MAC addresses and platform metadata required for the board to boot — corrupting those can brick the board.
The symptoms below are most common in the cross-compile (ARM/VxWorks/Deos) flow, where the transfer-and-launch handoff between dev PC and board introduces the most failure modes. On onboard Linux x86 boards, the typical issues reduce to the usual Linux ones (missing libraries, build errors, permissions) and are best debugged with dmesg, lsmod, and the build log directly.
Common symptoms and where to look
Symptom
Likely cause
Where to check
Host can’t ping the board after boot
IP is not set in EEPROM, or set to a different subnet from the host
chmod returns “permission denied” or “read-only filesystem”
You’re logged in as a non-root user, or the target directory is on a read-only mount
Log in as root; transfer to /home/root/ or /tmp/ instead
Host application or ESP2 can ping the board but can’t open a NAI connection (timeouts or “connection refused” from the host side)
The board-side NAI ethernet listener isn’t running, or it’s running on different ports than the host is targeting
On ARM/PetaLinux boards the listener auto-starts at boot — check naiMBEEPROMUtil formatteddisplay and confirm OpMode Listeners at Startup is non-zero and the four OpMode TCP/UDP Port values match what your host is using. On onboard Linux x86 boards (68INT5/6/6H, 75INT2) the listener is not automatic; the SSK image ships a listener application that must be started manually each boot. See Ethernet How-to FAQ for the default ports.
Where to go next
You’ve covered the connection and transfer steps. Continue along the intended docs path:
ESP2 Quick Start — NAI’s Embedded Soft Panel 2 is a host-side GUI that lets you exercise modules on your board without writing any code. This is the easiest way to confirm your hardware is working end-to-end before you run your own applications.
Running Applications from the Target — The launch step (chmod and ./your_app.elf), how to read output, and advanced run modes like running from boot or via startup scripts.
Opening a Software Handle to Your Board — When you start writing your own applications instead of running the NAI sample apps, this is where you’ll learn how to open a handle to the board programmatically (instead of relying on the sample-app menu prompts).
Sample App Guides — Function-by-function walkthroughs of every NAI sample application, with code snippets you can lift into your own project.