NAI VxWorks 7 Quick-Start Guide
Overview
This document describes how to build NAI’s Software Support Kit (SSK) 2.x in the Wind River Workbench IDE and deploy a VxWorks image to your target hardware.
Environment Setup
The NAI Software Support Kit currently supports the following versions of VxWorks 7:
- SR660
- 22.09
- 23.03
- 23.09
- 24.03
The SSK is intended for use with the Wind River Workbench development environment. Please contact Wind River with any questions about obtaining a VxWorks license or installing Wind River Workbench.
Building and Running a Project
Note
The following guide uses the NIU3A as an example. Replace NIU3A in the instructions with the name of your board where applicable, eg. 68ARM2. If you are using an Intel-based board, eg. 68INT6, please check your software package or contact NAI for alternative instructions.
NIU3A BSP (VxWorks 7)
This section will cover the installation of the NIU3A BSP and the creation of a VxWorks Source Build project.
Install NIU3A BSP (VxWorks 7)
The first step in configuring the NAI VxWorks 7 BSP is to copy the BSP files to the appropriate directory. The supplied BSP folder is named naiNIU3A:
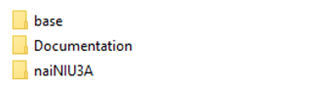
The base folder contains the NAI Library and its BSP files, along with the source of the samples for the NIU3A and its functions modules. The documentation folder contains the NAI Library documentation for each function call in the SSK.
Once the naiNIU3A BSP has been located, copy the folder in the following directory:
For VxWorks 7 SR660:
$(WIND_BASE)/pkgs_v2/os/board/xilinx/
For VxWorks 7 (22.09 - 24.03):
$(WIND_BASE)/source/os/arch/arm/board/Xilinx/
Create Source Code Build (VxWorks 7)
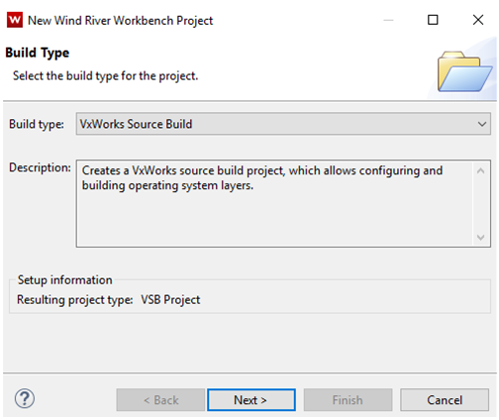
Now with the NIU3A BSP source copied into the appropriate directory a VSB project can be created. Open Workbench and select File → New → Wind River Workbench Project. Under Built Type select VxWorks Source Build and click the Next> button.
Note
Screenshots may differ based on version of VxWorks/Workbench being used.
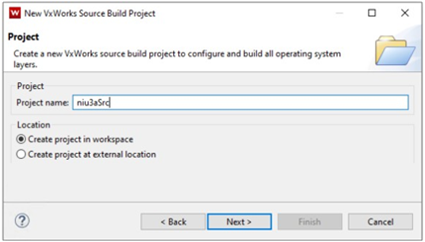
Give the VxWorks Source Build project a name and click the Next> button.
In the next window, base the VSB on a VxWorks 7 board support package, and the BSP as naiNIU3A_1_0_0_0 as the fill in options. Click Link in sources to project check box if you want all VxWorks kernel source copied to your project. Click the Finish button to complete the project creation.

Note
Screenshots may differ based on version of VxWorks/Workbench being used.
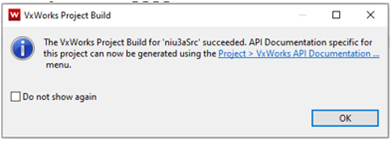
Once the Project Setup Window finishes creating the project (window closes), right-click on VSB project and select Build Project.
Once the VSB has been built, projects for NAI BSP / NAI BRD, and VIP can be created.
PROJECT CREATION (VxWorks 7)
In this section we will cover the creation of the VxWorks image project, and a downloadable kernel module project for the NAIBRD, NAI BSP and the sample applications. NAI BSP is a collection of drivers to interface to NAI hardware and VxWorks 7. In the BSP that was installed earlier is an archive of NAI BSP object code.
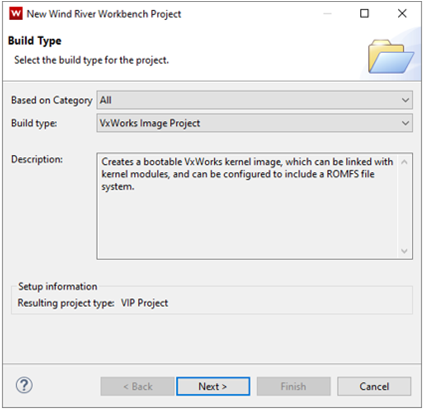
Create a VxWorks Image Project (VxWorks 7)
Create new VxWorks image project by selecting File → New → Wind River Workbench Project. Under Build Type select VxWorks image project and click Next>.
Note
Screenshots may differ based on version of VxWorks/Workbench being used.
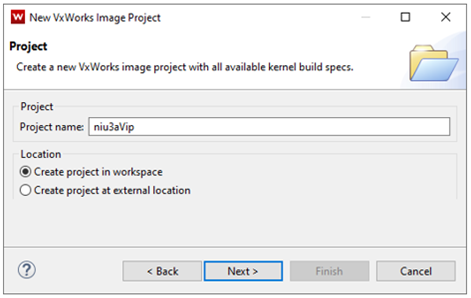
Give VxWorks Image Project at name and click Next>.
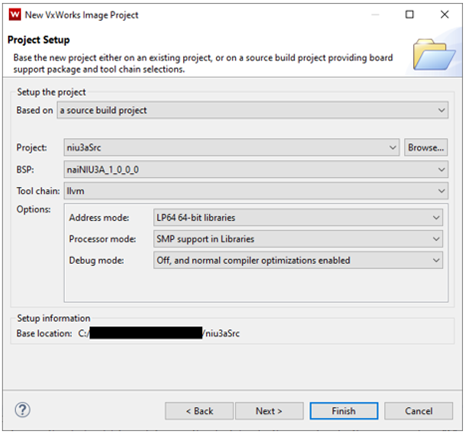
Base the VxWorks Image Project on source build project you built earlier. Make sure BSP and source project name is correct, then click Next>.
Note
Screenshots may differ based on version of VxWorks/Workbench being used.
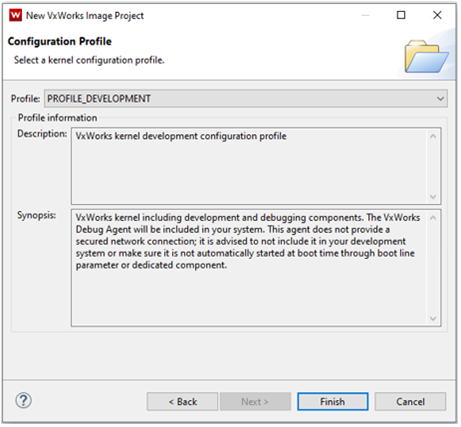
It is recommended to use PROFILE_DEVELOPMENT when creating a project in a development phase. Click Finish to complete the project creation process.
Note
Screenshots may differ based on version of VxWorks/Workbench being used.
VIP Kernel Configuration (VxWorks 7)
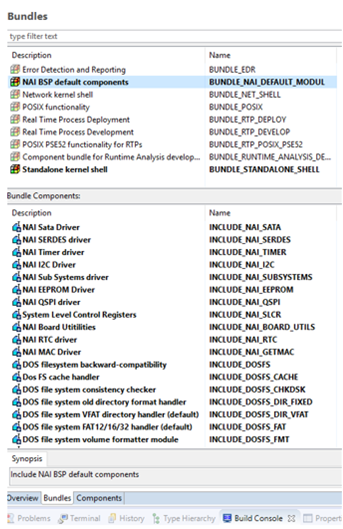
After Workbench creates the VIP, double click Kernel Configuration in the project. For convenience under the Bundles tab there is NAI BSP default components.
Add the NAI BSP default components bundle to include the NAI BSP in entirety. Standalone kernel shell adds useful components for development as well.
Note
Screenshots may differ based on version of VxWorks/Workbench being used.
At this point we need to create a DKM of NAIBRD and the NAI_BSP before continuing onto building the niu3aVip.
DKM For NAIBSP and NAIBRD (VxWorks 7)
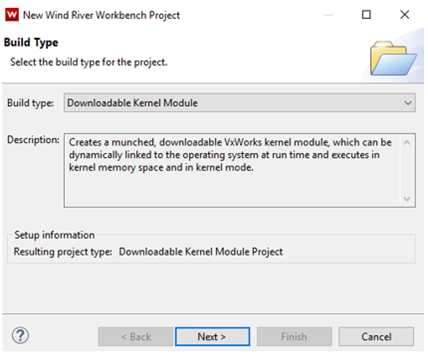
Create a Downloadable Kernel Module project by clicking on File → New → Wind River Workbench Project then click Next>.
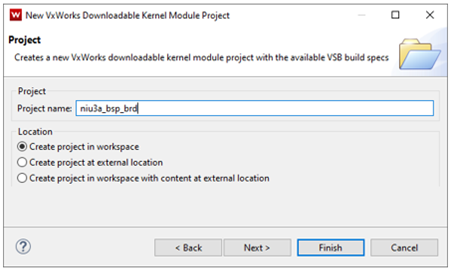
Give project at name, then click Next>.
Note
Screenshots may differ based on version of VxWorks/Workbench being used.
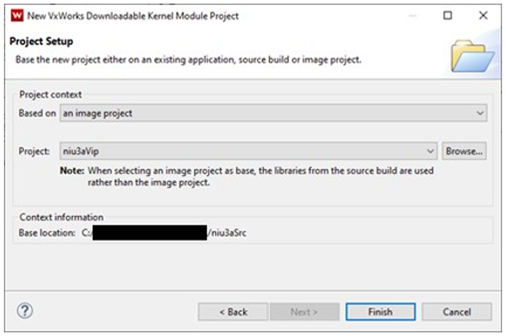
Base project on VxWorks image project (niu3aVip), click Finish.
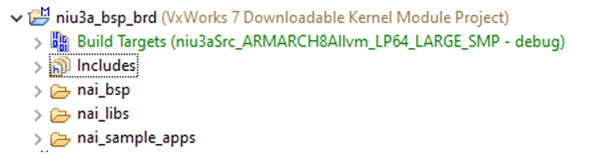
Delete dkm.c that was automatically created and add the nai_bsp, nai_libs and nai_sample_apps folders (located in the base folder) into DKM project.
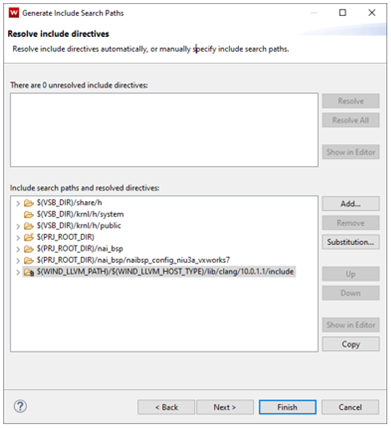
Right-click on DKM project and select Rebuild Project. If this is the first time this project is built you will be prompted to Generate the include paths. Generate the includes by clicking the Generate Includes… button, followed by the Next> button.
To resolve include paths, add the following paths to the DKM project:
$(PRJ_ROOT_DIR)
$(PRJ_ROOT_DIR)/nai_bsp
$(PRJ_ROOT_DIR)/nai_bsp/naibsp_config_niu3a_vxworks7
Note
Screenshots may differ based on version of VxWorks/Workbench being used.
Click Finish and build NAI BSP, NAI Library and samples (NAIBRD) DKM project.
Add NAI BSP Project to VIP (VxWorks 7)
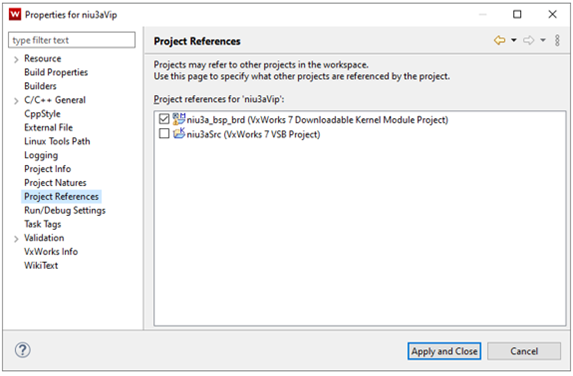
Now that the niu3a_bsp_brd project has been completed we will need to switch back to the niu3aVip project. Add the niu3a_bsp_brd project as a project reference to the niu3aVip by right-clicking on niu3aVip project and selecting Properties. Next, select Project Reference and click on the check box for the niu3a_naibsp project. Click on Apply and Close.
Note
Screenshots may differ based on version of VxWorks/Workbench being used.
Configure VIP Paths (VxWorks 7)
In niu3aVip VxWorks Image Project right-click on project, click Properties followed by Build Properties then select the Paths tab. Add the three paths below referencing the niu3a_bsp_brd project:
<PATH_TO_NIU3A_BSP_BRD_PROJECT >/nai_bsp/naibsp_config_niu3a_vxworks7
<PATH_TO_NIU3A_BSP_BRD_PROJECT>/nai_bsp
<PATH_TO_NIU3A_BSP_BRD_PROJECT>
Note
*replace <PATH_TO_NIU3A_BSP_BRD_PROJECT> with actual path to project.
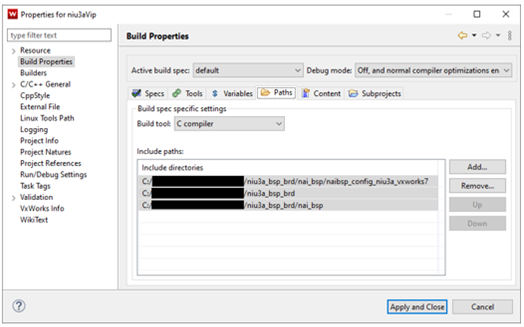
Click the Apply and Close button.
Right-click on niu3aVip project and select Rebuild Project to build the kernel image. At this point the kernel image should be built successfully and is ready to be loaded onto the NIU3A.
BOOTING VXWORKS 7 KERNEL WITH UBOOT (VxWorks 7)
This section will cover booting the newly created VxWorks image file over uboot. There are sections for loading the image via tftp, and from SATA on the NIU3A.
TFTP Booting VxWorks (VxWorks 7)
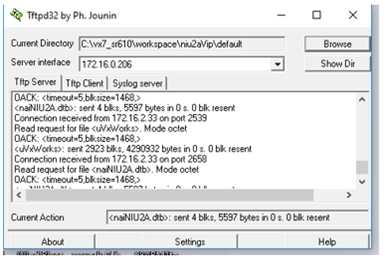
Start a tftp server on host PC. For windows $(WIND_BASE)/host/x86-win32/bin/ tftpd32.exe and browse to directory that contains uVxWorks and naiNIU3A.dtb files.
Note
Screenshots may differ based on version of VxWorks/Workbench being used.
Stop Uboot on the NIU3A by pressing the esc key. Once at the uboot prompt, modify the uboot environment variables to reflect your environment. The VxWorks kernel during boot up will read bootargs variable to get host, target, network mask, as well as username and password for FTP server running on host.
Uboot Environment variables:
ZynqMP> setenv ipaddr 192.168.1.16 ZynqMP> setenv netmask 255.255.255.0
ZynqMP> setenv serverip 192.168.1.5
ZynqMP> setenv vxargs setenv bootargs gem(0,0)host:vxWorks h=192.168.1.5 e=192.168.1.16:ffffff00 u=winner pw=winner f=0x00
ZynqMP> saveenv
To boot VxWorks kernel over network:
ZynqMP> tftpboot 0x05000000 uVxWorks
ZynqMP> tftpboot 0x04000000 naiNIU3A.dtb
ZynqMP> run R5fw && run load_cal && run bmargs && run vxargs
ZynqMP> bootm 0x05000000 - 0x04000000
To automate booting over the network:
ZynqMP> setenv vxBootTftp tftpboot 0x05000000 uVxWorks;tftpboot 0x04000000 naiNIU3A.dtb;bootm 0x05000000 - 0x04000000
ZynqMP> setenv load_fw_vx_tftp echo Loading VxWorks from TFTP… && run R5fw && run load_cal && run vxargs && run vxBootTftp
ZynqMP> setenv bootcmd run load_fw_vx_tftp
ZynqMP> saveenv
On next power cycle of target VxWorks should boot over network automatically.
Booting VxWorks from SATA (VxWorks 7)
The NIU3A supports booting the VxWorks image directly from SATA. Uboot requires a tftp connection to the NIU3A in order to configure the NIU3A to boot a VxWorks image from SATA. Once a tftp connection has been established load the uVxWorks and nai68arm2.dtb file and boot VxWorks on the NIU3A. For more information on booting over tftp, see section “Error! Reference source not found.”.
Write a VxWorks image to SATA and boot image in UBoot
UBoot will need a FAT32 filesystem to boot a VxWorks kernel. After booting VxWorks over a network, retrieve the name of SATA device on the NIU3A, by entering the command ‘devs’. In the example below, the SATA name is “/ata0a”.
→ devs
drv refs name
3 [ 3] /ata0a
9 [ 3] /host.host
0 [ 5] /null
1 [ 5] /ttyS0
2 [ 3] /vxbus
To write to the SATA on NIU3A, the SATA write protection must be disabled. Enter the following at the VxWorks command line: → naiSetSataWriteProtect 0
Then to format for FAT32:
→ dosFsVolFormat “/ata0a”,0x20
Formatting /ata0a for DOSFS
Instantiating /ata0a as rawFs, device = 0x20001
Formatting…Retrieved old volume params with %100 confidence:
Volume Parameters: FAT type: FAT32, sectors per cluster 64
2 FAT copies, 0 clusters, 10069 sectors per FAT
Sectors reserved 32, hidden 63, FAT sectors 20138
Root dir entries 0, sysId (null), serial number c500000
Label:” ” …
Disk with 82477647 sectors of 512 bytes will be formatted with:
Volume Parameters: FAT type: FAT32, sectors per cluster 64
2 FAT copies, 1288398 clusters, 10069 sectors per FAT
Sectors reserved 32, hidden 63, FAT sectors 20138
Root dir entries 0, sysId VX5DOS32, serial number c500000
Label:” ” …
OK.
Once the SATA has been formatted copy your naiNIU3A.dtb and uVxWorks to the SATA drive
→ cp “naiNIU3A.dtb”,“/ata0a”
copying file naiNIU3A.dtb → /ata0a/ naiNIU#A.dtb
value = 0 = 0x0
→ cp “uVxWorks”,“/ata0a”
copying file uVxWorks → /ata0a/uVxWorks
Once the naiNIU3A.dtb and uVxWorks have been copied to SATA, the NIU3A can be power cycled to configure Uboot.
Stop Uboot on the NIU3A by pressing the Esc key. Once at the uboot prompt, modify the uboot environment variables to reflect your environment.
Uboot Environment variables:
U-Boot-PetaLinux> setenv ipaddr 192.168.1.16
U-Boot-PetaLinux> setenv netmask 255.255.255.0
U-Boot-PetaLinux> setenv serverip 192.168.1.5
U-Boot-PetaLinux> setenv vxargs “setenv bootargs gem(0,0)host:vxWorks h=192.168.1.5 e=192.168.1.16:ffffff00 u=winner pw=winner f=0x00”
U-Boot-PetaLinux> setenv bootcmd run vxBootCmdSata
U-Boot-PetaLinux> setenv dtbvipbootstart 4000000
U-Boot-PetaLinux> setenv vipbootstart 5000000
ZynqMP> setenv load_fw_vx_qspi “echo Loading VxWorks from SATA… && run R5fw && run load_cal && run vxargs && run vxBootSata”
U-Boot-PetaLinux> setenv vxBootSata “scsi scan && load scsi 0 $vipbootstart} uVxWorks && load scsi 0 ${dtbvipbootstart} naiNIU3A.dtb;bootm $vipbootstart} - ${dtbvipbootstart}”
U-Boot-PetaLinux> saveenv
On next power cycle of target VxWorks should boot from SATA automatically.