NAI UltraScale Deos Quick-Start Guide
Overview
This document describes how to build NAI’s Software Support Kit (SSK) 2.x in DDC-I’s OpenArbor IDE and deploy a Deos image on an UltraScale target.
Environment Setup
Please contact DDC-I to obtain a copy of the DDS(DDC-I Developer Suite). Once installed, launch the OpenArbor IDE to start working with the NAI Software Support Kit.
Building and Running a Project
NAI Software Support Kit Description (Deos)
The NAI SSK contains NAI libraries and code to access all onboard and offboard modules. The SSK contains two folders, one labeled base which contains the NAI libraries and another labeled deos_kismet. This folder contains fully configured workspace containing project files that link to the source code in the base folder for Deos RMA. Below is an overview of the projects available in the deos_kismet folder.
| Project Name | Description (Listed in recommended build order) |
|---|---|
| naibsp | Handles OS and processor-specific routines, implements interface driver code |
| nailib | Defines common utility routines used by other NAI libraries |
| naiether | Defines NAI ethernet protocol to handle NAI commands over ethernet |
| naiif | Defines higher level routines for handling read/write access, invokes naibsp calls |
| naibrd | Defines NAI routines used by NAI sample applications |
| naiapp_common | Defines utility routines used by NAI sample applications |
| naiapp_mod_* | NAI sample application programs for all available modules |
| nai-ultrascale | Deos platform project used to build hyperstart/composite image for NAI 68ARM2, NIU3A, and NIU3E |
Building Deos BSP Package in OpenArbor (Deos)
-
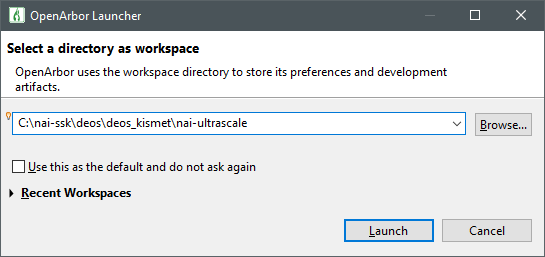
Launch OpenArbor
-
Select the deos/deos_kismet/nai-ultrascale directory in the location of the SSK
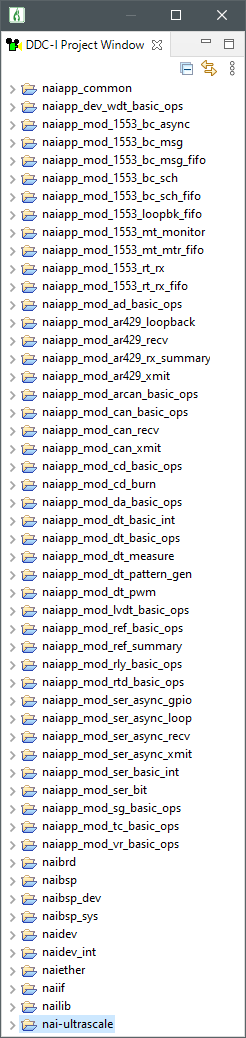
- Once the workspace has been selected, the following projects should be made available to build in the DDCI-Project Window. (Projects may vary depending on system configuration)
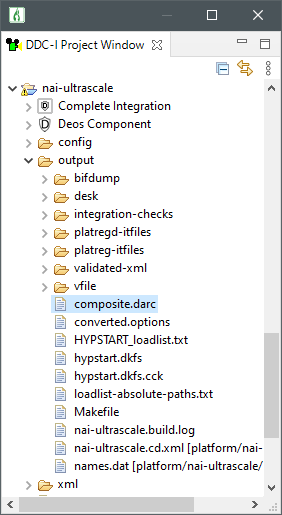
- Building the nai-ultrascale platform project will generate a composite.darc file which contains the kernel, configuration files and application code that will be loaded onto the target system
- Refer to the file uboot_env_vars.md for U-Boot environment variables that need to be set to net-boot Deos on a given platform
Running Other Sample Applications in OpenArbor (Deos)
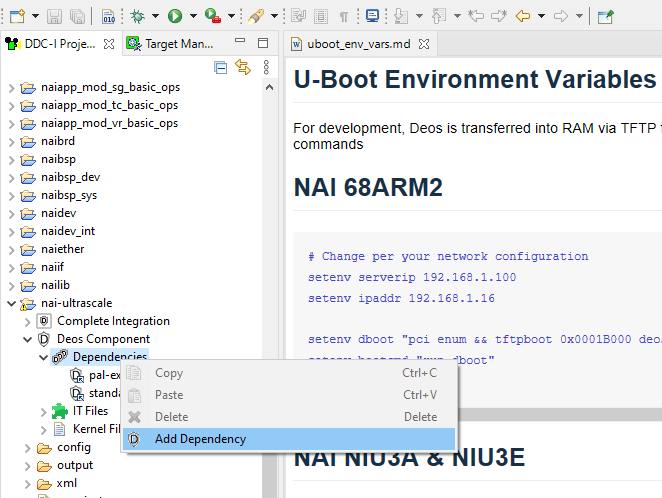
- By default, the only dependency that the nai-ultrascale platform project has is the Deos standard-apps which enable network connection to run tools like the Video Stream and Status Monitor. To run any of the included NAI sample applications, you can add the application as a dependency on the platform project. The Deos image needs to be rebuilt and reloaded.
- Go to the platform project nai-ultrascale and navigate to Deos Component → Dependencies. Right-click and select Add Dependency
- Select the application you would like to integrate with the nai-ultrascale BSP
-
Build all projects
-
In the Target Manager add a connection for the nai-ultrascale platform project
-
Launch the Status Monitor or the Video Stream
-
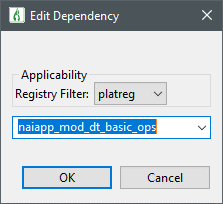
Right-click the Status Monitor or Video Stream and click Update Target Load. Make sure End up in registry is set to platreg if that is where application dependency is. Make sure Force Cold Start is checked
- Deos should now cold start and the new application should be running
Changing Board IP Address (Deos)
- Change the IP address in u-boot via the
ipaddrenvironment variable. Make sure to save the environment via thesaveenvcommand:
setenv ipaddr 192.168.1.16
setenv serverip 192.168.1.100
saveenv- OpenArbor stores information about the platform’s IP address in the lwip.config file.
-
Navigate to the platform project nai-ultrascale → config → lwip.config
-
Change the IP address on the following line:
interface=xilinx-gem:0 192.168.1.16 255.255.255.0- More information can be found in the Deos NAI-UltraScale BSP User Guide.
Speeding Up the Platform Build (Deos)
- To speed up builds and avoid building libraries that should not need to be modified during application development, we can follow a couple steps to point Open Arbor to the location of our built binaries.
-
Open OpenArbor and build all NAI libraries
-
Open a Windows PowerShell instance and run the script named release-me.ps1 with the following arguments
./release-me.ps1 -copyBinaries:$true- This will copy the parts of the “desk tree” in the output directory to a common location that OpenArbor can be pointed to look at
-
In OpenArbor navigate to Window → Preferences → DDC-I → Deos Search Path
-
Click ‘Add’. Change Preference Scope to This Workspace Only and browse to the path that the Power Shell script created: /SSK/deos/deos_kismet/$NAI_Board_Name/built-binaries/desk
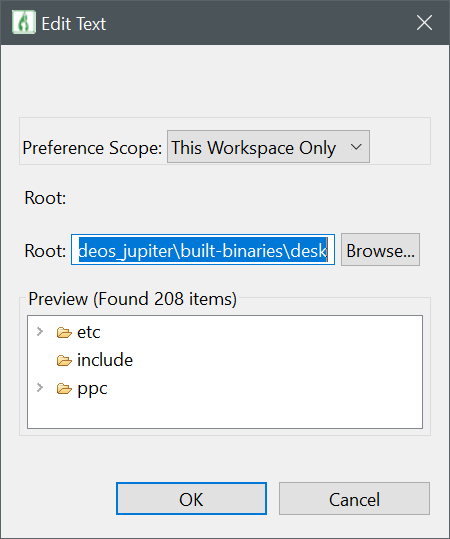
- Hit OK
- Now, if you would like to skip building the NAI libraries you can “Close Project” on any applicable libraries that have been copied. OpenArbor will check the search path to see if it has binaries for those libraries and use them instead
- If you need to debug any NAI libraries or want to navigate source, open up the projects
Deos 653 (Deos)
-
By default, the naibsp library is configured to be used by a Deos RMA process. If the user would like to call the library from a Deos 653 process, the following changes must be made so that naibsp can use the correst Deos Semaphore implementation:
- In the naibsp project, navigate to Deos Component→Dependencies and add deos-653-p1 as a dependency.
- In the naibsp project properties, navigate to DDC-I Options→C Compile→Preprocessor and add a Defined Macro named DEOS653P1. If the application is a C\++ application, the same change will need to be made in the C++ Compile tab.
Creating Projects from Scratch (Deos)
- These steps also demonstrate the process for how to link NAI libraries to your own application the same way that they are referenced in the sample applications. Several of these libraries are required for communication with NAI hardware.
-
Navigate to File→New→DDC-I Executable Project.
-
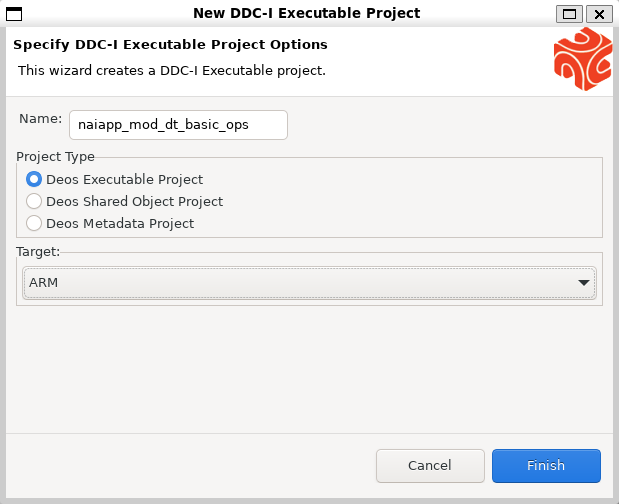
In the New DDC-I Executable Project window, enter a project name. Select Deos Executable Project as the Project Type and the architecture of your board in the Target dropdown.
Note
This guide is targeting the nai-ultrascale platform, so ARM Target is selected. Your board may require you to select Power PC or x86_64.
-
Expand the new project in the DDC-I Project Window, and open the Deos Component→Dependencies tabs.
-
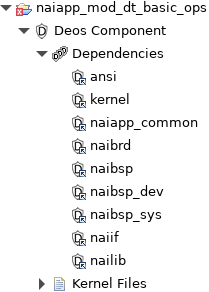
Modify the platform project’s .options file to add the following dependencies:
<depend>ansi</depend>
<depend>kernel</depend>
<depend>naiapp_common</depend>
<depend>naibrd</depend>
<depend>naibsp</depend>
<depend>naibsp_dev</depend>
<depend>naibsp_sys</depend>
<depend>naiif</depend>
<depend>nailib</depend>- The Dependencies tab of your project should now look like the following:
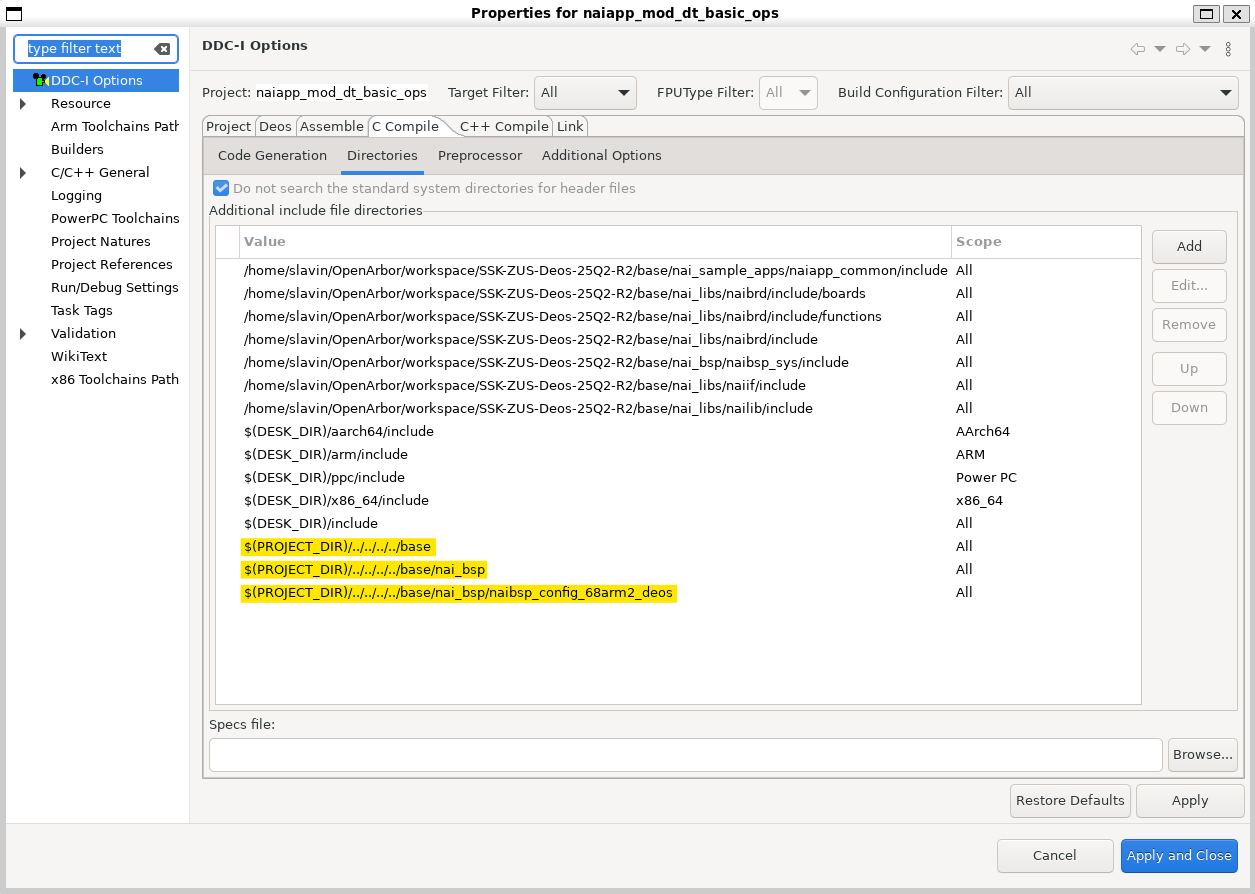
- Right-click on your project and select Preferences→DDC-I Options→C Compile→Directories. Add the following directories to the project:
$(PROJECT_DIR)/../../../../base
$(PROJECT_DIR)/../../../../base/nai_bsp
$(PROJECT_DIR)/../../../../base/nai_bsp/naibsp_config_{BOARD_NAME}_deos
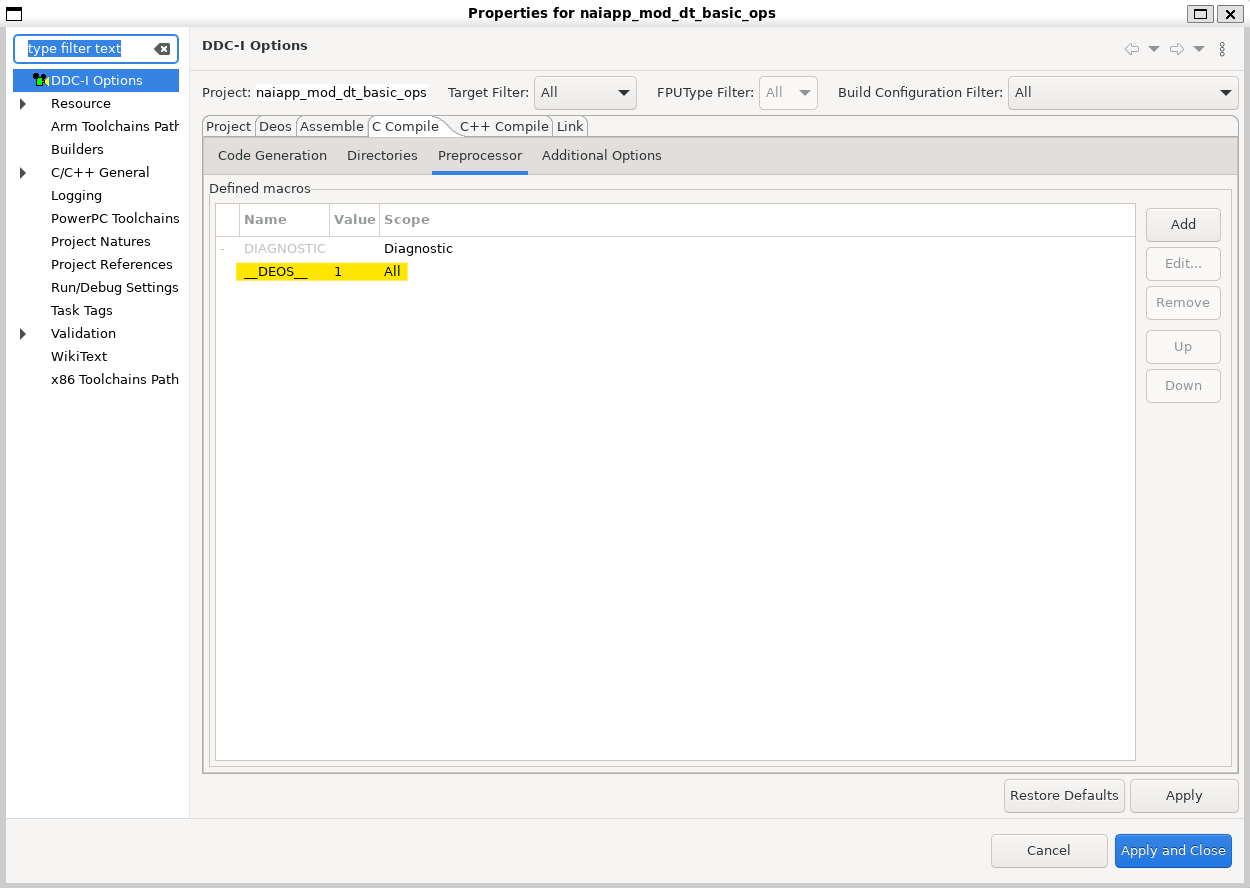
- Switch over to the Preprocessor tab under C Compile. Add a new Defined Macro named \DEOS with a value of 1.
Note
If the application is a C\++ application, the same change will need to be made in the C++ Compile tab.
-
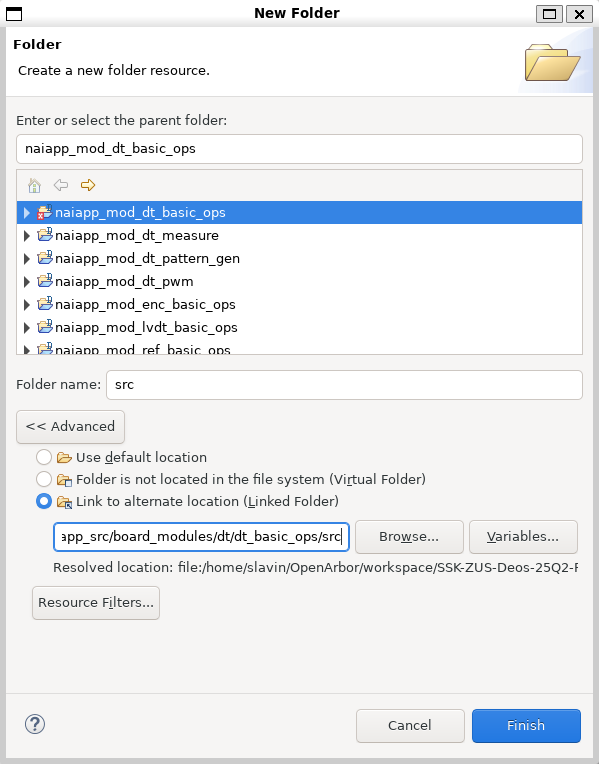
To add a source folder to the project, right-click the project and select New→Folder→Advanced.
-
Select Link to alternate location (Linked Folder) and Browse to the directory of your src folder. Source files for sample applications are located at base/nai_sample_apps/naiapp_src/board_modules/{MOD_NAME}/{PROJECT_NAME}.
- Deos Executable Projects use a process developer XML file to define which process, threads, mutexes, and other resources are allocated to them. You have two options for how to create one for your project:
.. If you are already familiar with process developer xml files and/or aware of which resources you are going to allocate, navigate to File→New→Other→DDC-I→DDC-I Deos Process Developer XML File and use the XML wizard to define your resources.
.. If you are not familiar with process developer xml files or are not sure of which resources are required by naibsp, copy the “xml” folder and included pd.xml file from a project in the same module family and paste it in your project directory. Change the names in the xml file referencing the other project to the name of your project.
- The naibsp project contains a naibsp-resources.pia.xml file which adds memory mapped resources to the integration. Below is a description of what these resources are:
| Resource | Description |
|---|---|
| DMABuffer1 | Used by NAI’s DMA engine, write data to DMA here, or read DMA data from here |
| ModuleInfo | NAI internal use. Needed by naibsp |
| ModuleConfigStatus | NAI internal use. Needed by naibsp |
| MotherboardCommon | NAI internal use. Needed by naibsp |
| ModuleControl | NAI internal use. Needed by naibsp |
| TTLSync | Provides access to 68ARM2 TTL Sync Engine |
| ModuleSpace | NAI internal use. Needed by naibsp |
| PCI[1-5]Mem | PCIe BAR for endpoint cards and their modules |
| ZynqMPCore | UltraScale+ memory regions. Refer to Xilinx UG1087 |
| uart_zus[0,1] | UART UltraScale+ memory regions. Refer to Xilinx UG1087 |
| i2c_zus[0,1] | I2C UltraScale+ memory regions. Refer to Xilinx UG1087 |
| rtc | Real-time-clock UltraScale+ memory regions. Refer to Xilinx UG1087 |
| SWDT_LPD | System Watchdog Timer UltraScale+ memory region. Refer to Xilinx UG1087 |
| SystemTimestampGeneratorSecure | System Timestamp Generator UltraScale+ memory regions. Refer to Xilinx UG1087 |
| SysMon | PL System Monitor UltraScale+ memory regions. Refer to Xilinx UG1087 |
| PSUCSU | PMU Configuration Security Unit UltraScale+ memory regions. Refer to Xilinx UG1087 |
- Some of these memory mapped resources are required for a project to communicate with NAI hardware, while others are only necessary for utilizing certain functionality (e.g. DMABuffer1). These are included in the process developer xml files for the sample applications. If you are creating your own pd.xml file, be sure to add these resources by using the sample applications as a template.
Configuring Interrupts (Deos)
Kismet Deos SSK only
The interrupt configuration step below applies only to the Kismet Deos SSK (the
deos_kismetworkspace this guide covers). On the Jupiter Deos SSK (thedeos_jupiterworkspace), the included interrupt samples build and run as-is — do not add thenaibsp_sys-attach-interruptfeature, as it will cause build errors.
- For systems using NAI interrupts, the
naibsp_sys-attach-interruptfeature must be enabled. This creates an ISR thread whennaibrd_ConnectISR()is called. It increases the thread quota, creates a thread template, and assigns ownership to the responsible interrupt.
- To enable it, add the following to your process developer XML file:
<usedFeatureSet
     name = "naibsp_sys"
     versionRequirement = "none"
     versionNumber = "none"
     featureSetUndefinedAction = "error"
   >
   <usedFeature
        name = "naibsp_sys-attach-interrupt"
      >
      <usedFeatureParameter
           name = "nameOfScheduler"
           value = "default-core-0"
      ></usedFeatureParameter>
      <usedFeatureParameter
           name = "nameOfUsingProcessInstance"
           value = "dt_basic_interrupt_process"
      ></usedFeatureParameter>
   </usedFeature>
</usedFeatureSet>- Add your project as a dependency in the nai-ultrascale project as outlined in Step 3. Right-click the project and select Rebuild Project.