Boot Guide
Deos PPC Boot from Flash
Edit this on GitLab
== NAI Deos NOR Flash Image Guide
== Revision History
| Revision | Revision Date | Description | Author |
|---|---|---|---|
2.0 |
07/27/23 |
Convert word document to Markdown |
VC |
== Table of Contents
== Required Tools
-
TFTP Server
-
Terminal Program
-
Ncat (Downloading via Ethernet)
== NOR Flash Layout
-
On the NAI 6xppc2 boards there is 128MB of NOR flash available with a page size of 128KB. Uboot maps the 128MB of NOR flash to address range 0xE8000000 to 0xF0000000. The current NOR flash layout is as follows:
| Name | Offset | Uboot Addr | Size |
|---|---|---|---|
RCW |
0x00000000 |
0xE8000000 |
0x20000 |
FMAN |
0x00020000 |
0xE8020000 |
0x20000 |
DEOS_DTB |
0x00040000 |
0xE8040000 |
0x20000 |
DEOSBoot |
0x00060000 |
0xE8060000 |
0x20000 |
SPL |
0x01010000 |
0xE9010000 |
0x100000 |
UBOOT |
0x01240000 |
0xE9240000 |
0xC0000 |
Hypstart1 (Operational Mode) |
0x02000000 |
0xEA000000 |
0x1000000 |
Hypstart2 (Debug Mode) |
0x02000000 |
0xEB000000 |
0x1000000 |
SBIT |
0x07F00000 |
0xEFF00000 |
0x100000 |
== Loading of Hyperstart Images Based on GPI Signals
=== GPI Signals
| IN8 | IN7 | IN6 | IN5 | IN4 | IN3 | IN2 | IN1 |
|---|---|---|---|---|---|---|---|
x |
x |
x |
x |
x |
x |
x |
x |
x |
x |
x |
x |
x |
x |
x |
x |
x |
x |
x |
x |
x |
x |
x |
x |
x |
x |
x |
x |
x |
x |
x |
x |
| NVRMO (1=Grounded 0=Open) | Function | Image Loaded |
|---|---|---|
1 (Grounded) |
67PPC2/67G6 Firmware Download |
VxWorks 6.9 Download Application loaded from |
0 (Opened) |
Downloader Mode |
Uboot Image |
0 (Opened) |
Debug Mode |
Hypstart2 Image loaded from NOR Flash |
0 (Opened) |
Operation Mode |
Hyptart Image loaded from NOR Flash |
== Configure TFTP Server Settings
-
With u-boot running on the 6xppc2 board configure the tftp server environment variable to match the system, replace the serverip below with the ip address of the tftp server:
setenv serverip 192.168.1.88
saveenv
== Configure Downloader Mode
-
The NAI downloader mode is used to update DEOS firmware via commands executed in the uboot prompt. Uboot can be configured to direct the prompt to the UART or redirected over Ethernet to a listener on a client PC in order to bypass the need for UART when updating DEOS firmware. By default the 6XPPC2 is configured to direct the uboot prompt to UART but can be changed to redirect over Ethernet or back to UART with the following commands.
Configure Uboot prompt for Ethernet
setenv bootcmd "setexpr downloadflag *0xffdf000c \& 0x40000; setexpr debugflag *0xffdf000c \& 0x20000; if itest 40000 -eq '$downloadflag'; then run nc; elif test 20000; then run dboot_nor_2; else run dboot_nor; fi"
saveenv
Configure Uboot prompt for UART
setenv bootcmd "setexpr downloadflag *0xffdf000c \& 0x40000; setexpr debugflag *0xffdf000c \& 0x20000; if itest 40000 -eq '$downloadflag'; then ; elif test 20000; then run dboot_nor_2; else run dboot_nor; fi"
saveenv
== Updating Deos Firmware Via UART
-
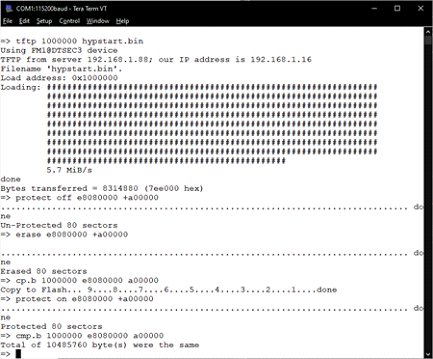
To update the operational mode hyperstart image (hypstart.bin) the following commands should be entered into the uboot prompt via uart. The operational mode hyperstart image is tftp’ed to RAM address 0x1000000 and then copied into NOR Flash offset specified in NOR FLASH LAYOUT section.
tftp 1000000 hypstart.bin
protect off ea000000 +1000000
erase ea000000 +1000000
cp.b 1000000 ea000000 1000000
protect on ea000000 +1000000
cmp.b 1000000 ea000000 1000000

-
To update the debug mode hyperstart image (hypstart2.bin), enter the following commands into the uboot prompt
tftp 1000000 hypstart2.bin protect off eb000000 +1000000 erase eb000000 +1000000 cp.b 1000000 eb000000 1000000 protect on eb000000 +1000000 cmp.b 1000000 eb000000 1000000 -
To update the deosBoot image, enter the following commands into the uboot prompt:
tftp 1000000 6xppc2.dtb protect off E8060000 +20000 erase E8060000 +20000 cp.b 1000000 E8060000 20000 protect on E8060000 +20000 cmp.b 1000000 E8060000 20000 -
To update the deos dtb image, enter the following commands into the uboot prompt:
tftp 1000000 6xppc2.dtb
protect off E8040000 +20000
erase E8040000 +20000
cp.b 1000000 E8040000 20000
protect on E8040000 +20000
cmp.b 1000000 E8040000 20000
== Updating Deos Hyperstart Images Via Ethernet
-
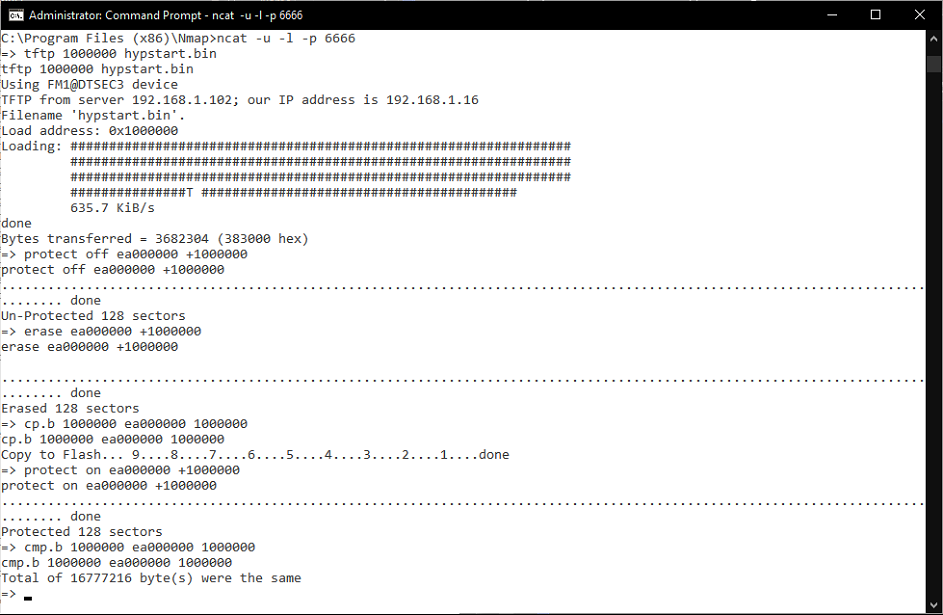
To update DEOS images via ethernet, the uboot tool netconsole can be used which will redirect the serial terminal to a listener client on the network. This IP address can be the same as the one being used for the tftp server described earlier. The following commands should be entered into the uboot prompt, replace ncip with the ip address of the listener:
setenv ncip 192.168.1.88 saveenv -
After configuring the netconsole ip address on the 6XPPC2, open a windows command prompt with admin rights and navigate to the ncat.exe executable. Start ncat up and listen on port 6666 to wait for the console redirect with the following command:
ncat -u -l -p 6666 -
The ncat listener on the client side should be started first before powering on the 6XPPC2 which will attempt to redirect the serial terminal on power on if configured to use netconsole. If the connection is successful then the uboot terminal will become accessible via the ncat command prompt on the client side. From there downloading can be achieved via the same commands described in the section for updating images via uart.

== Configure Uboot Environment to Boot From NoFLash
-
Enter the following commands in the uboot prompt which will change the default boot behavior to select an image to load from NOR flash based on the GPI signal scheme described earlier
setenv bootcmd "setexpr downloadflag *0xffdf000c \& 0x40000; setexpr debugflag *0xffdf000c \& 0x20000; if itest 40000 -eq '$downloadflag'; then ; elif test 20000; then run dboot_nor_2; else run dboot_nor; fi"
setenv dboot_nor "run dboot_dtb_nor; cp.b e8060000 19000 20000; cp.b ea000000 140000 2000000; go 19000 040000"
setenv dboot_nor_2 "run dboot_dtb_nor; cp.b e8060000 19000 20000; cp.b eb000000 140000 2000000; go 19000 040000"
setenv dboot_dtb_nor "cp.b e8040000 040000 20000;fdt addr 040000;fdt boardsetup;fdt resize;run clockfreq;run busfreq;run timebasefreq"
== Changing Hyperstart Image Location/Size
-
Partitions for the hyperstart images may be increased in size or moved to a different NOR flash address as necessary. The restrictions to this are that the other partitions listed in the NOR FLASH LAYOUT besides Hypstart and Hypstart2 cannot be modified and that sizes allocated for a partition must be a multiple of the pages size (128KB).
-
The commands described in (UPDATING HYPERSTART IMAGES VIA UART) to flash the hyperstart images must be updated accordingly with the modified uboot address and size chosen.
-
The uboot boot commands responsible for loading the hyperstart images must be updated with the correct NOR flash location and size. The ubootenv dboot_nor is used for loading the operational hyperstart image and dboot_nor2 is used for loading the debug hyperstart image.
editenv dboot_nor
editenv dboot_nor_2
saveenv
-
For example, if one were to change the hypstart2 image from it’s current offset of 0xEB000000 and size of 0x1000000 to a new offset of 0xEC000000 and size of 0x2000000 the uboot commands to update the flash image would change to the following:
tftp 1000000 hypstart.bin protect off ec000000 +2000000 erase ec000000 +2000000 cp.b 1000000 ec000000 2000000 protect on ec000000 +2000000 cmp.b 1000000 ec000000 2000000 -
Following the same example above, dboot_nor_2 would also have to be updated with the following:
editenv dboot_nor_2
edit: run dboot_dtb_nor; cp.b e8060000 19000 20000; cp.b ec000000 140000 2000000; go 19000 040000
saveenv
Deos Ultrascale Boot from SSD
== NAI Deos SATA Boot Guide
== Revision History
| Revision | Date | Description | Author |
|---|---|---|---|
2.0 |
07/27/23 |
Convert word document to Markdown |
VC |
2.1 |
11/09/23 |
Use ext4 instead of VFAT for SSD filesystem |
TC |
Add note that only 68GP2 supports VFAT |
|||
Update code sections and some images |
|||
Rename "load-composite.darc" to "composite.darc" |
== Table of Contents
== Required Tools
-
NAI Board with SATA drive and the ability to boot both Deos and Linux
-
Already built Deos images: deosBoot.bin and composite.darc
-
Terminal Emulator (Tera Term, Putty, etc.) setup for 115,200 Baud Rate, 8 Data Bits, 1 Stop Bits, no parity
-
File transfer tool (WinSCP, CLI SCP, etc.)
== Prepare SATA Drive on ARM Boards
-
Boot the board and escape to the U-Boot prompt:
Hit any key to stop autoboot: 0 ZynqMP> -
Remove the SATA SSD write protect:
ZynqMP> setenv sataenbl mw.l 0x83C10094 0 ZynqMP> saveenv ZynqMP> run sataenbl -
Boot Petalinux image stored in QSPI:
ZynqMP> run qspiboot -
After Petalinux is finished booting, log in with the default username and password of "root" and "root", respectively, and verify SATA drive is present. Note the drive name returned from this command, in this case "sda":
$ ls -lF /dev/disk/by-id/ total 0 lrwxrwxrwx 1 root root 9 Feb 14 14:43 ata-SM659GEB_CDZ_A0620061901390000016 -> ../../sda lrwxrwxrwx 1 root root 10 Feb 14 14:43 ata-SM659GEB_CDZ_A0620061901390000016-part1 -> ../../sda1 -
The SATA drive comes with a PetaLinux image pre-installed on it. These instructions will allow for the Deos image to be saved on the PetaLinux filesystem. First check to see if the SATA is mounted in the QSPI PetaLinux image.
-
NOTE: NAI 68GP2 PetaLinux only supports the VFAT
mkfscommand. For this board, use VFAT instead of ext4.
$ df -h Filesystem Size Used Available Use% Mounted on devtmpfs 3.8G 4.0K 3.8G 0% /dev tmpfs 3.9G 104.0K 3.9G 0% /run tmpfs 3.9G 92.0K 3.9G 0% /var/volatile /dev/sda1 28.6G 45.7M 27.0G 0% /run/media/sda1 -
-
If the SATA drive was not mounted run the following to mount it:
mkdir -p /run/media/sda1 mount /dev/sda1 /run/media/sda1 -
Create a directory on the SATA to store Deos files:
cd /run/media/sda1 mkdir DEOS -
The SATA drive is now ready for us to copy over our Deos images.
== Copy Deos Boot Files to Drive
-
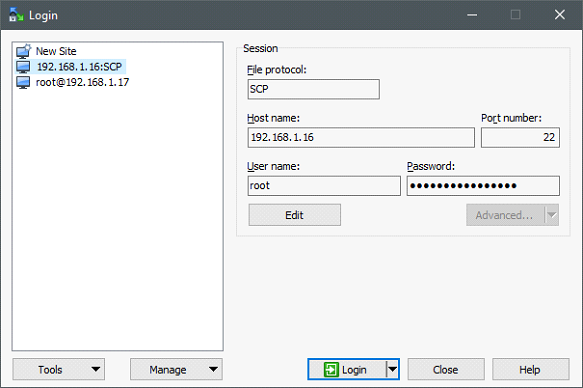
Locate Deos boot image and composite archive that you want to store on the SATA drive. With Linux still running on the target, open WinSCP on the host machine and login to a SCP or FTP session. Host name is the IP address of the target, use the same username and password used to login to Linux.

-
Login and 'Update' host key cache.
-
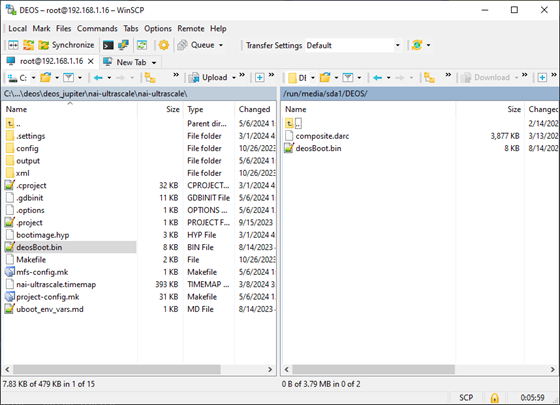
On host side, navigate to where your Deos images are. On the target side, navigate to where the SATA drive has been mounted to (ex.
/run/media/sda1/DEOS). -
Select files: deosBoot.bin and composite.darc, then select 'Upload' to transfer them to the target:

-
Close WinSCP
-
Un-mount drive in Linux:
cd ~/ umount /mnt/sda -
Reset the board and break into U-Boot. Verify the files were persistent.
$ scsi reset

Reset SCSI
scanning bus for devices...
Target spinup took 0 ms.
SATA link 1 timeout.
AHCI 0001.0301 32 slots 2 ports 6 Gbps 0x3 impl SATA mode
flags: 64bit ncq pm clo only pmp fbss pio slum part ccc apst
  Device 0: (0:0) Vendor: ATA Prod.: SM659GEB CDZ Rev: SP60
            Type: Hard Disk
            Capacity: 30208.0 MB = 29.5 GB (61865984 x 512)
$ ls scsi 0 /DEOS
<DIR>       1024 .
<DIR>       1024 ..
         3969244 composite.darc
            8028 deosBoot.bin
== Add U-Boot Environment Variables to Boot From SATA Drive
Follow the instructions below to add the following environment variables in U-Boot. The ping command is needed in order to initialize the network hardware before we jump to Deos.
-
Copy the following environment variables into the U-Boot console to setup SATA boot.
setenv dbootaddr 1b000 setenv hypaddr 20000000 setenv dbootSata ping \${serverip} \&\& scsi scan \&\& load scsi 0 \${dbootaddr} /DEOS/deosBoot.bin \&\& load scsi 0 \${hypaddr} /DEOS/composite.darc \&\& dcache flush \&\& dcache off \&\& go \${dbootaddr} \${hypaddr} saveenv -
If using a NIU3x add the following environment variables into the U-boot console.
setenv load_fw_deos_sata "run cfg_satawp && run load_cal && run R5fw && run dbootSata" setenv bootcmd run load_fw_deos_sata saveenv -
If using a 68ARM2 add the following environment variables into the U-boot console.
setenv load_fw_deos_sata "run cfg_satawp && pci enum && run dbootSata" editenv cfg_satawp edit: setexpr nvmro *0x83c10098 \& 0x4; if itest 4 -eq $nvmro; then mw.l 0x83c10094 1; else mw.l 0x83c10094 0; fi; mw.l 0x83c40160 1; setenv load_fw_linux_sata "echo Loading FW file from SATA... run cfg_satawp && run sataboot" setenv bootcmd run load_fw_deos_sata saveenv -
U-Boot is now configured to boot the Deos image stored on the SATA drive by default. To boot into Deos either power cycle the board or enter in the following to the U-Boot prompt.
boot -
To boot PetaLinux from SATA as the default break into U-Boot and modify the bootcmd variable:
setenv default_bootcmd "run sataboot"
saveenv
