Using NAI SSK 1.x Sample Applications
Edit this on GitLab
Overview
The NAI Software Support Kit (SSK 1.x) ships with sample applications that demonstrate how to configure and operate every supported function module type. Each sample is a standalone C program that connects to an NAI board, selects a module, and exercises one or more naibrd_*() API functions — you can run them as-is for hardware verification or use them as a starting point for your own application.
Before running any sample application, you must download and build the SSK for your platform. Build instructions for all supported environments (Windows, Linux, VxWorks, and ARM Linux) are provided in the SSK 1.x Software Development Guide. A LabVIEW SSK is also available — build instructions for LabVIEW are included in the LabVIEW SSK package itself.
What the Sample Application Guides Cover
Every sample application guide on this site follows a consistent structure:
-
Overview — what the sample demonstrates, which module types it supports, and prerequisites.
-
Board Connection and Module Selection — the shared startup sequence (described below) that all samples use to connect to hardware.
-
Program Structure — entry point, application parameters, and the command loop or operational flow.
-
Functional Sections — detailed walkthrough of each API operation with code snippets extracted from the source, parameter explanations, and module-specific behavior notes.
-
Troubleshooting Reference — common errors, their causes, and suggested resolutions.
-
Full Source — the complete source file in a collapsible block for reference.
The guides are written as practical references for engineers building their own applications. Code snippets focus on the naibrd_*() API calls you need — menu handling and input boilerplate are stripped so you can see exactly what to call and in what order. For hardware-specific specifications (ranges, timing, FPGA revision requirements), each guide directs you to the relevant module manual rather than hardcoding values.
Board Connection Menu
When you launch any sample application, it presents an interactive board connection menu. The application first looks for a saved configuration file (for example, default_DT_BasicOps.txt). If the file exists, the application loads the saved connection settings and connects automatically. If the file does not exist — which is always the case on the first run — the menu appears.
Selecting a System Type
The first question asks what type of system you are connecting to.
-
Nano — a small, rugged multifunction I/O system.

-
SIU — a large rugged system containing multiple open backplane boards.
-
Board — a single board computer.
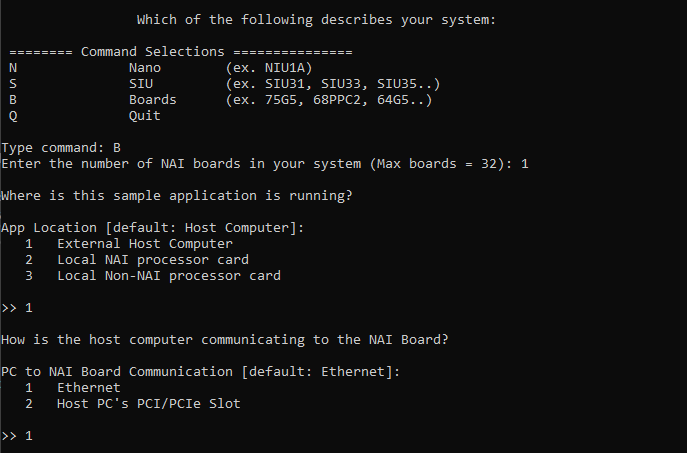
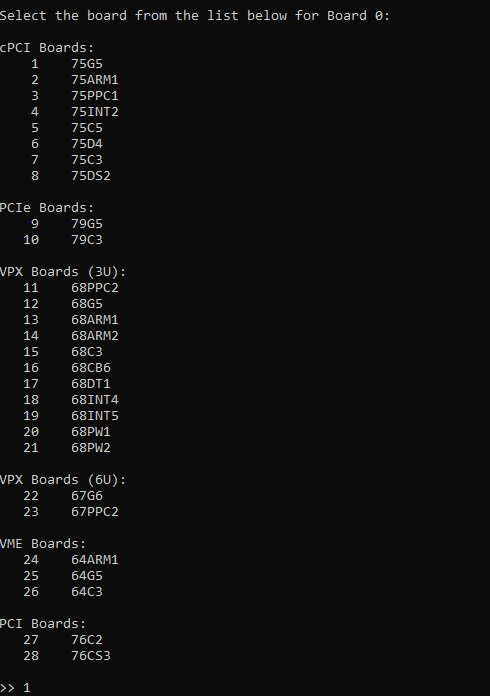
In this example we select Board (B), then choose the specific board type (for example, a 75G5):
Configuring the Connection
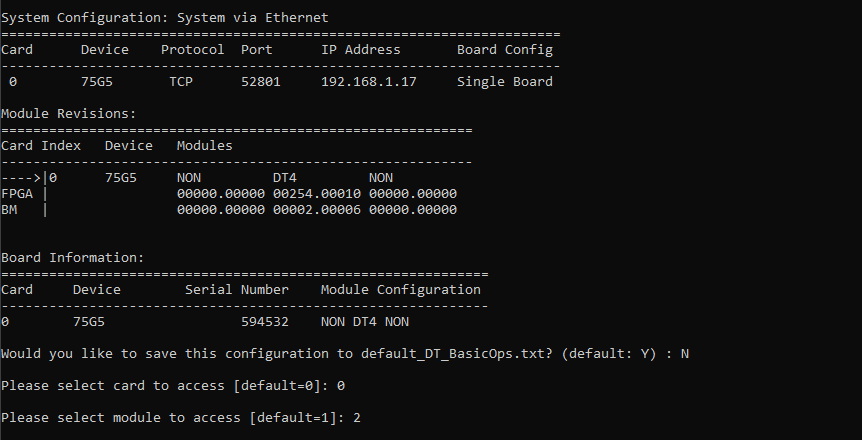
Enter the Ethernet protocol, port type, and IP address of the board:

If the connection parameters are correct, the application connects to the board and presents the module selection menu.
Selecting a Module
Select which module slot you want to work with. The menu shows which module types are installed at each slot:
Working with the Application
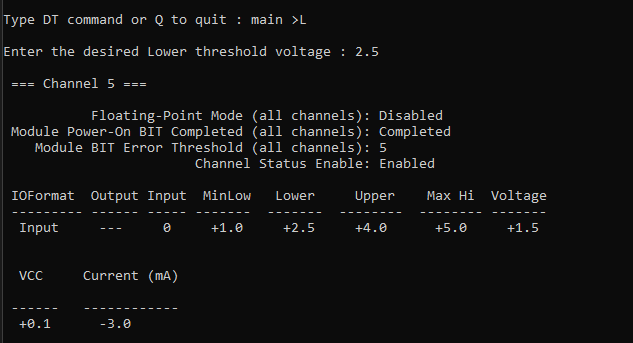
Once connected and a module is selected, the application enters its operational mode. For BasicOps samples, this is an interactive command menu:

Select a command to configure a channel or read data:
Saving Your Configuration
After connecting successfully, you can save your settings. The application writes a configuration file (for example, default_DT_BasicOps.txt) so that the next time you run the same sample, it skips the board menu and connects automatically. You can always delete the configuration file to force the menu to appear again.
|
Note
|
The configuration file is not included with the SSK — it is created when you save your connection settings from the board menu. |
This walkthrough used the DT BasicOps sample as an example, but all sample applications follow the same board connection flow. From here, explore the individual sample application guides for detailed API usage — each guide covers the specific naibrd_*() calls for its module type, including configuration, data transfer, interrupt handling, and diagnostics.
From Samples to Your Own Application
The sample applications use an interactive board connection menu that prompts for system type, board, and module slot each time you run them. This is convenient for exploration and testing, but when you deploy your own application you will typically want to connect to a known hardware configuration automatically — without user interaction.
To make this transition, replace the naiapp_RunBoardMenu() call in the sample’s startup code with direct board access API calls that open a connection to your specific board and module. The Connecting to Boards guide documents the full set of board access functions and connection types available (Ethernet, PCI/PCIe, on-board), along with code examples for each. The module-specific API calls demonstrated in the sample application guides remain the same — only the connection setup changes.
If you want to run a deployed application directly on an NAI single board computer, SIU, or NIU without a host PC terminal, consult the Running Applications from the Target guide for instructions on loading and launching your executable on the target system.