NAI ARM Linux Quick-Start Guide (PetaLinux 2023)
Overview
This document describes how to set up your environment and cross-compile NAI’s Software Support Kit (SSK) 2.x to be run on a PetaLinux 2023.2 target.
Environment Setup
Required Tools (PetaLinux 2023.2)
- Vitis Classic 2023.2
- NAI Library Package
- Terminal Program (Teraterm)
Downloading Xilinx (PetaLinux 2023.2)
-
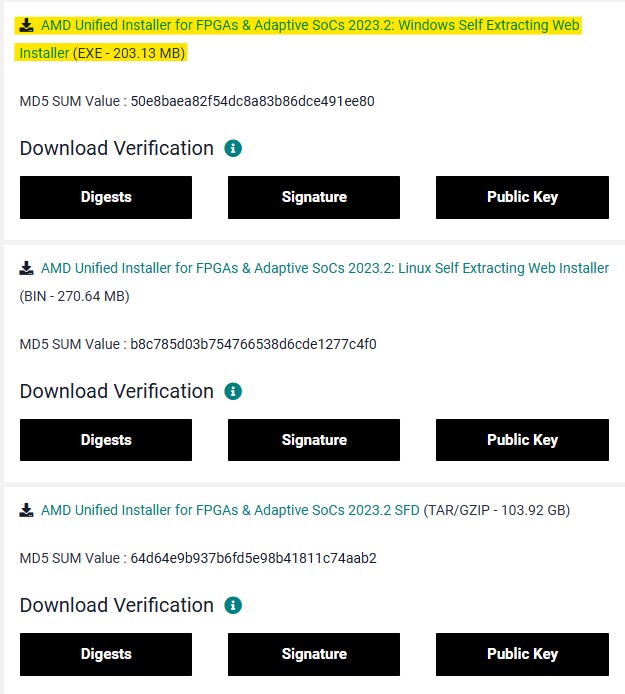
Head to the Xilinx website archive section.
-
Click the 2023.2 tab to expand it.
-
Select the Windows Self Extracting Web Installer to begin download, then run the installer. The tool that will be used for development is Vitis Classic 2023.2, which is included in the Xilinx unified installation.
Building and Running a Project
Importing and Building Sample Applications (PetaLinux 2023.2)
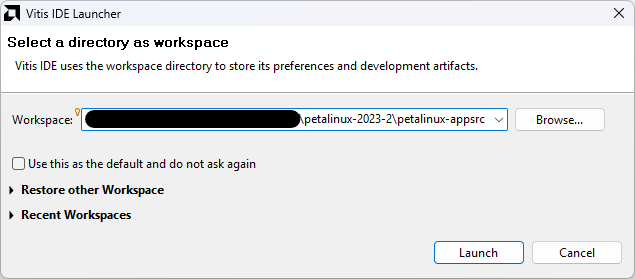
- Run Vitis Classic 2023.2 and select the following folder from the NAI library package as your workspace:
- PACKAGE_LOCATION\petalinux-2023-2\petalinux-appsrc
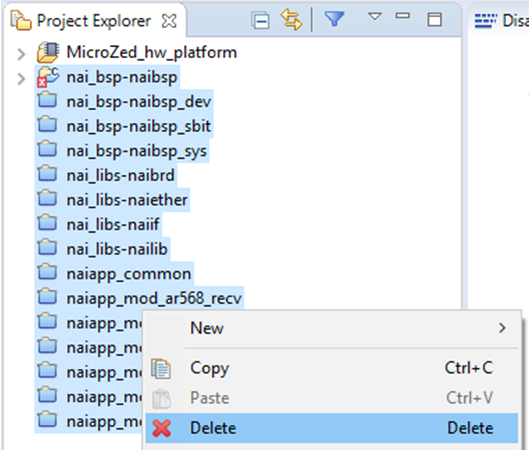
- If there are already projects when you load the workspace, select them all, right-click, and select “Delete”. Do NOT select “Delete project contents on disk”.
-
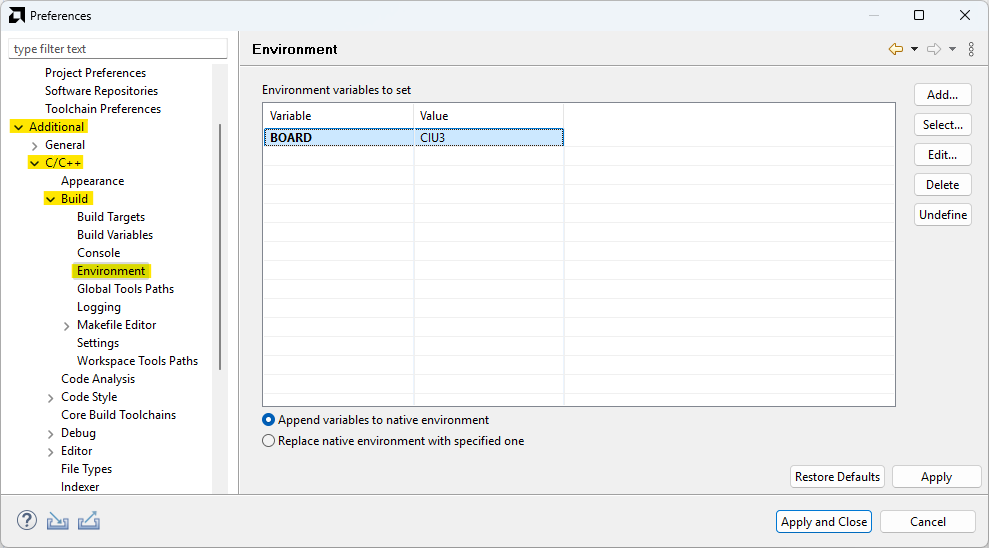
Navigate to “Window”→”Preferences”. In the Preferences window, navigate to the “Additional”→”C/C++”→“Build”→“Environment” tab.
-
Create an environment variable named “BOARD” and set the value to the name of the board configuration you wish to build for (e.g. “CIU3”, “NIU3C”, etc.). Then select “Apply and Close”.
- Import NAI projects by selecting “File” → “Import” → “Eclipse workspace or zip file” from the toolbar:

- Select “Next” and then select the workspace directory as the root directory:
- PACKAGE_LOCATION\petalinux-2023-2\petalinux-appsrc
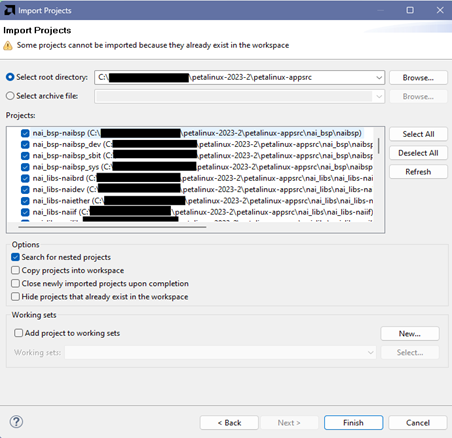
- Select “Finish” to add NAI libraries and sample code projects to the workspace.
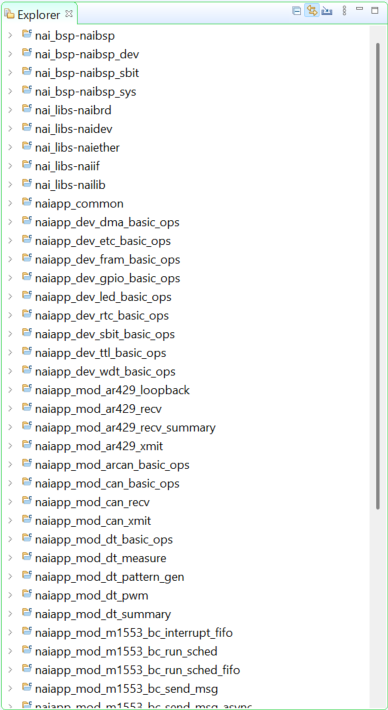
- Your Project Explorer should now look similar to this:
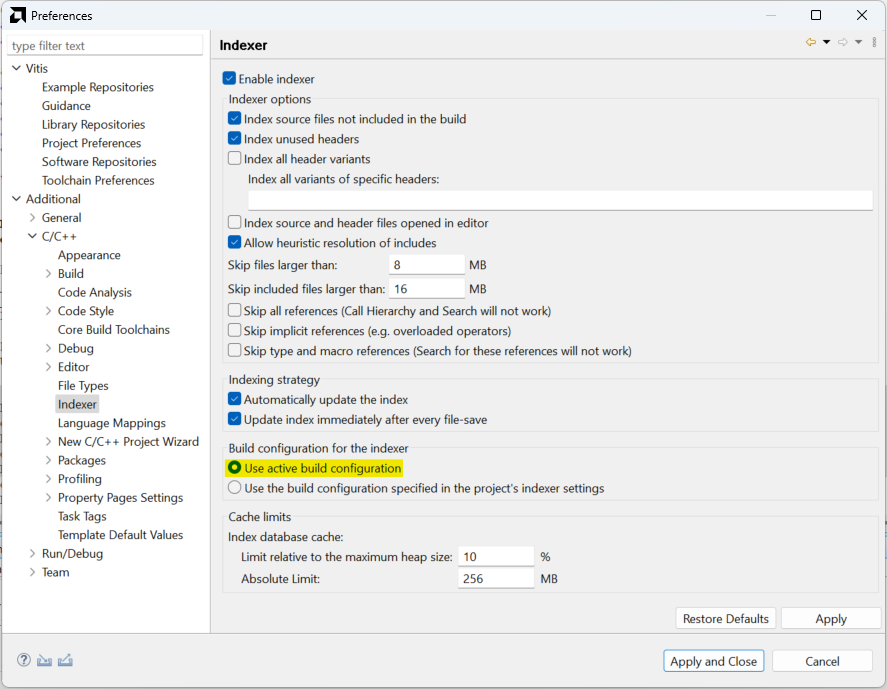
- Select “Window"→"Preferences” from the Vitis toolbar and set the Indexer to “Use active build configuration” and select “OK”.
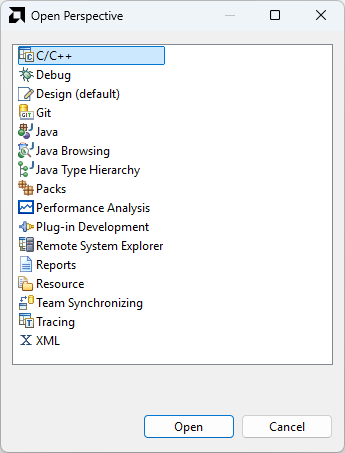
- Select “Window"→"Open Perspective” in the Vitis toolbar, and select “C/C++“.
- Select the projects that you wish to build, right-click, click “Build Configurations"→"Set Active"→"Debug/Release” depending on the desired build type.
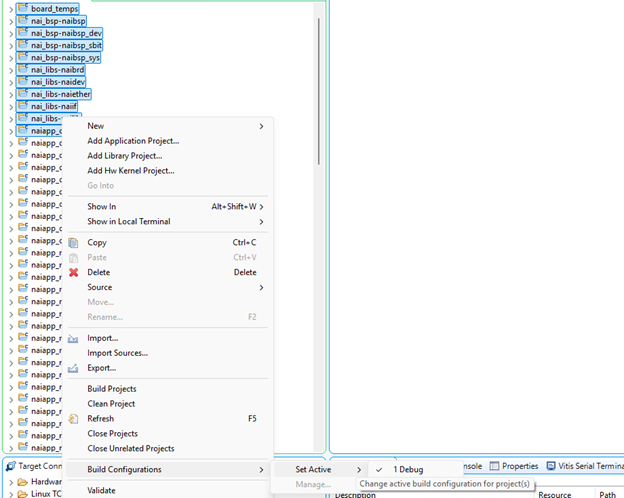
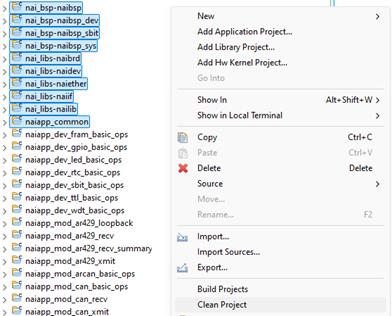
- Select all the library projects (nai_bsp projects, nai_libs projects, naiapp_common), right-click, and select “Clean Project”. Then right-click and select “Build Project”.
- Select a module sample project to Clean then Build which will generate an elf executable that can be run on the processor board.
Creating a New Hello World Application (PetaLinux 2023.2)
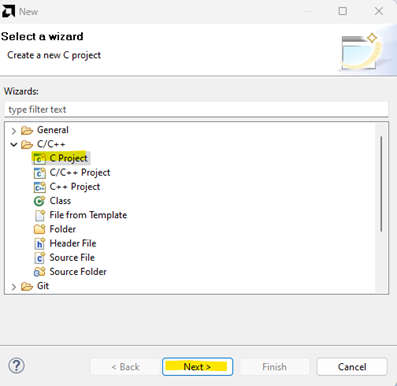
- Navigate to “File"→"New"→"Other” to get to the New Project wizard and select “C/C++"→"C Project”.
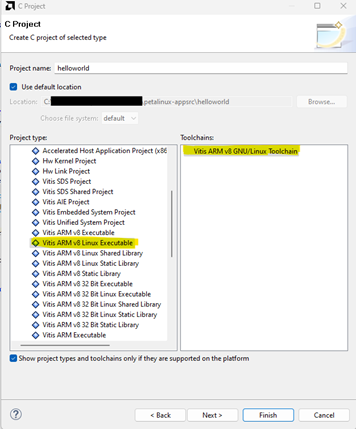
- Provide a name for the project, select “Vitis ARM v8 Linux Executable” under “Project type:” and “Vitis ARM v8 GNU/Linux/Toolchain” under “Toolchains”. Then click “Finish” when complete.
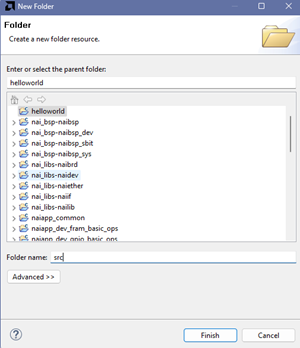
- A project with the name entered will appear in the project explorer, right-click the project and select New→New Folder. Create a folder named “src” in the resulting window.
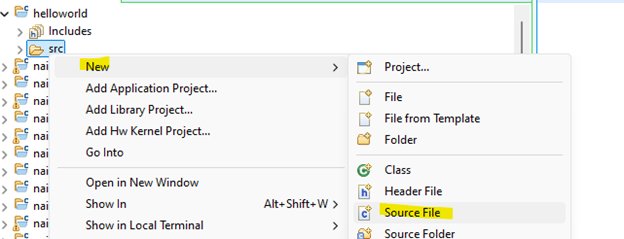
- Right-click the newly created folder, which should appear under the “helloworld” project. Select New→Source File. In the resulting window, select “Default C source template” and name the file “main.c”.
- Open the newly created source file from the project explorer. Inside the source file, add the following lines of code:
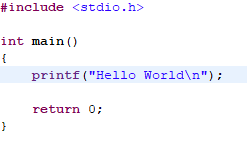
- Right-click the project and select build to generate the executable ELF file.
Creating Projects from Scratch (PetaLinux 2023.2)
-
Projects can be created with their source code and library includes manually create/linked. This can be helpful if a sample app is having issues and you want to go step by step to make sure nothing is wrong.
-
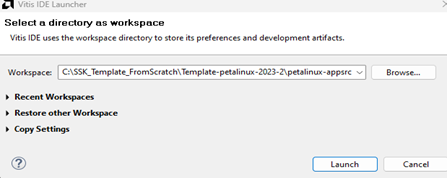
If you wish to create projects from scratch (starting from a blank slate, creating projects, and linking the source code manually) then navigate to File→Switch Workspace and set the path to ‘SSK_Template_FromScratch/Template-petalinux-2023-2/petalinux-appsrc’. This directory is included with the package and has the same folder structure as the normal petalinux-202302 folder, but the folders contain nothing so that projects can be made from a blank slate with nothing being detected by Vitis.
Creating an NAI Library Project from Scratch (PetaLinux 2023.2)
-
If not done already, set an environment variable named BOARD to the name of the desired board configuration. Navigate to “Window”→”Preferences”. In the Preferences window, navigate to the “Additional”→”C/C++”→“Build”→“Environment” tab.
-
Create an environment variable named “BOARD” and set the value to the name of the board configuration you wish to build for (e.g. “CIU3”, “NIU3C”, etc.). Then select “Apply and Close”.

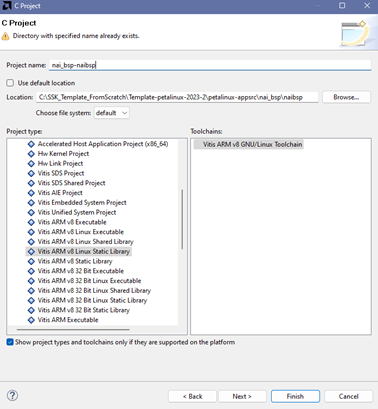
- Navigate to File→New…→Other. Select C Project under the C/C++ dropdown.

- Select Vitis ARM v8 Linux Executable under Project type. Name the project “nai_bsp-naibsp”. Uncheck ‘Use default location’ and change the location to ‘SSK_Template_FromScratch/Template-petalinux-2023-2\petalinux-appsrc\nai_bsp\naibsp’. Select the settings as shown in the screenshot and click Finish.
Note
If you use the Browse button to Browse to the location of ‘SSK_Template_FromScratch’ but can’t get to it because the C: drive doesn’t show up as an option to browse to, type ‘C:’ into the Location text box and then press Browse again, and you should be able to Browse into the C: drive.
-
Your workspace in the IDE should now have a project named “nai_bsp-naibsp”.
-
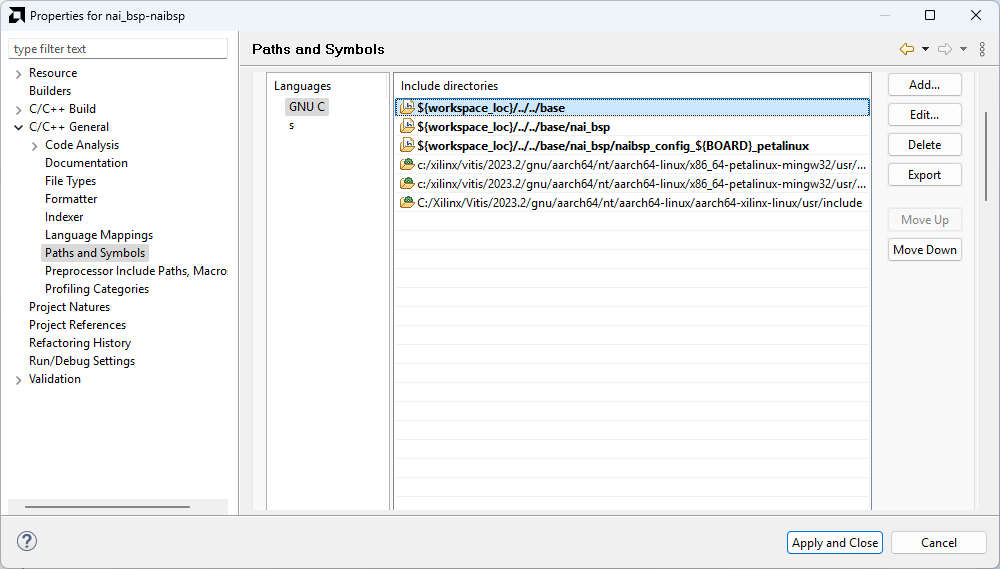
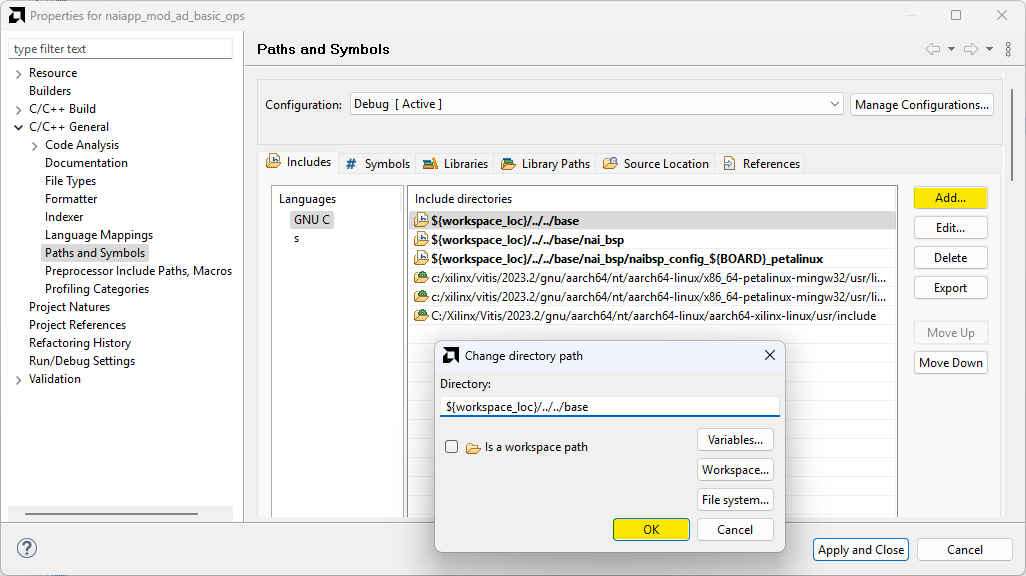
Right-click on the project and select ‘Properties’. Now, select ‘Paths and Symbols’ and select the ‘Includes’ page. Click Add… and add the following directories. Press OK when done. If the program asks to rebuild then say no.
- ${workspace_loc}/../../base
- ${workspace_loc}/../../base/nai_bsp
- ${workspace_loc}/../../base/nai_bsp/naibsp_config_${BOARD}_petalinux
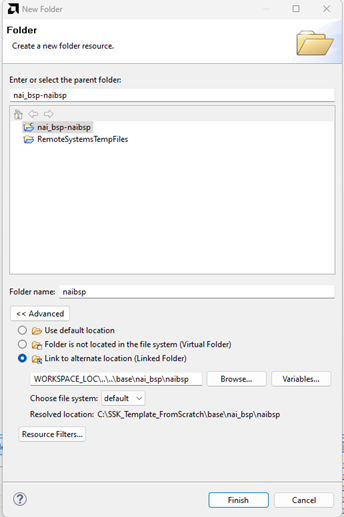
- Right-click on the project and select New→Folder.
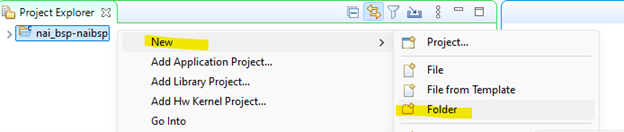
- Click Advanced to show more options then click “Link to alternate location (Linked Folder)“. Write “WORKSPACE_LOC…\base\nai_bsp\naibsp” as the folder location. Click Finish.
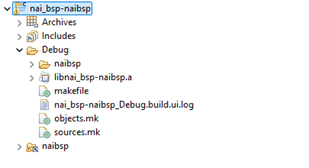
- Right-click the project to Clean Project and then Build Project. The project should build, and the progress will be displayed in the ‘Console’ tab. When finished, there will be a newly created ‘Debug’ folder with an archive (static library) named ‘libnai_bsp-naibsp.a’.
Adding Additional Library Projects (PetaLinux 2023.2)
-
If other libraries are needed, then the steps are the same except for differences in names and paths. The following is a list of the different library paths, debug configurations, and folder paths.
-
nai_bsp
-
nai_bsp-naibsp (explained in the above tutorial)
-
nai_bsp-naibsp_sys
- New→Project step
- Name:nai_bsp-naibsp_sys
- Path: ‘PACKAGE_LOC\Template-petalinux-2023-2\petalinux-appsrc\nai_bsp\naibsp_sys’
- New→Folder step
- WORKSPACE_LOC…\base\nai_bsp\naibsp_sys
- New→Project step
-
nai_bsp-naibsp_sbit
- New→Project
- Name:nai_bsp-naibsp_sbit
- Path: ‘PACKAGE_LOC\Template-petalinux-2023-2\petalinux-appsrc\nai_bsp\naibsp_sbit’
- New→Folder step
- WORKSPACE_LOC…\base\nai_bsp\naibsp_sbit
- New→Project
-
nai_bsp-naibsp_dev
- New→Project
- Name:nai_bsp-naibsp_dev
- Path: ‘PACKAGE_LOC\Template-petalinux-2023-2\petalinux-appsrc\nai_bsp\naibsp_dev’
- New→Folder step
- WORKSPACE_LOC…\base\nai_bsp\naibsp_dev
- New→Project
-
-
nai_libs
-
nai_libs-naibrd
- New→Project
- Name:nai_libs-naibrd
- Path: ‘PACKAGE_LOC\Template-petalinux-2023-2\petalinux-appsrc\nai_libs\nai_libs-naibrd’
- New→Folder step
- WORKSPACE_LOC…\base\nai_libs\naibrd
- New→Project
-
nai_libs-naiether
- New→Project
- Name:nai_libs-naiether
- Path: ‘PACKAGE_LOC\Template-petalinux-2023-2\petalinux-appsrc\nai_libs\nai_libs-naiether’
- New→Folder step
- WORKSPACE_LOC…\base\nai_libs\naiether
- New→Project
-
nai_libs-naiif
- New→Project
- Name:nai_libs-naiif
- Path: ‘PACKAGE_LOC\Template-petalinux-2023-2\petalinux-appsrc\nai_libs\nai_libs-naiif’
- New→Folder step
- WORKSPACE_LOC…\base\nai_libs\naiif
- New→Project
-
nai_libs-nailib
- New→Project
- Name:nai_libs-nailib
- Path: ‘PACKAGE_LOC\Template-petalinux-2023-2\petalinux-appsrc\nai_libs\nai_libs-nailib’
- New→Folder step
- WORKSPACE_LOC…\base\nai_libs\nailib
- New→Project
-
naiapp_common
- New→Project
- Name:naiapp_common
- Path: ‘PACKAGE_LOC\Template-petalinux-2023-2\petalinux-appsrc\nai_sample_apps\naiapp_common’
- New→Folder step
- WORKSPACE_LOC…\base\nai_sample_apps\naiapp_common
- New→Project
-
Creating an NAI Sample Project from Scratch (PetaLinux 2023.2)
- All library projects must be created or imported as described previously for the sample apps to build.
-
Navigate to File→New→Other to get to the New Project wizard and select C/C++→C Project, then click Next.
-
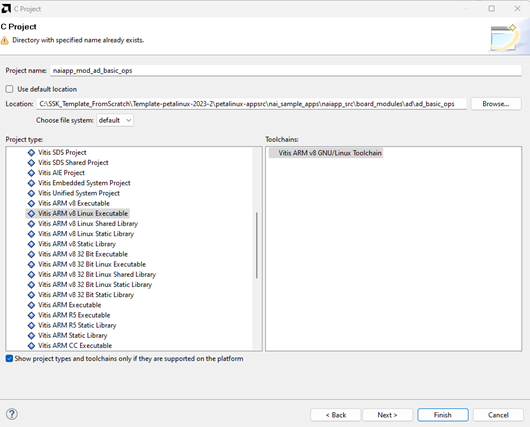
Set the project name. In this example we use “naiapp_mod_ad_basic_ops”.
-
Uncheck the “use default location” check box, and set the location to C:\SSK_Template_FromScratch\Template-petalinux-2023-2\petalinux-appsrc\nai_sample_apps\naiapp_src\board_modules\ad\ad_basic_ops.
-
Under “Project type”, select “Vitis ARM v8 Linux Executable” and under “Toolchains”, select “Vitis ARM v8 GNU/Linux Toolchain”. Press “Finish” when complete.
- Right-click the project and click “Properties"→"C/C++ General"→"Paths and Symbols”. Under the “Includes” tab, add the following paths:
- ${workspace_loc}/../../base
- ${workspace_loc}/../../base/nai_bsp
- ${workspace_loc}/../../base/nai_bsp/nai_bsp_config_${BOARD}_petalinux
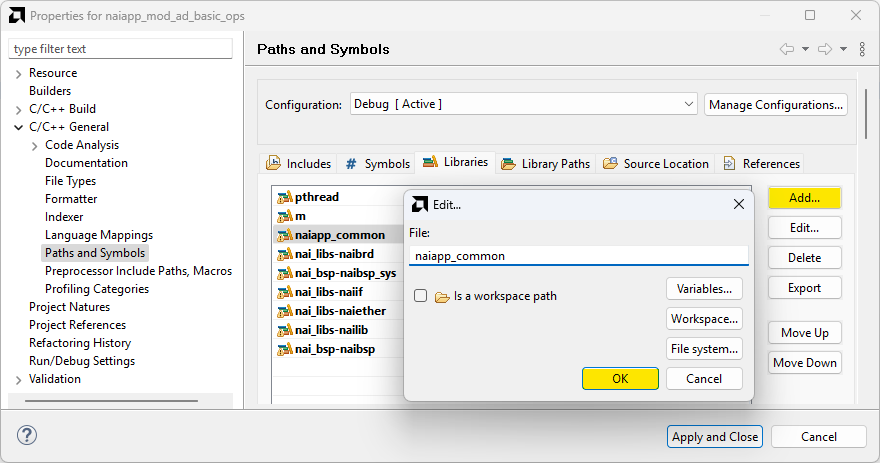
- Under the “Libraries” tab click “Add…” and add the following (ORDER MATTERS):
- pthread
- m
- naiapp_common
- nai_libs-naibrd
- nai_bsp-naibsp_sys
- nai_libs-naiif
- nai_libs-naiether
- nai_libs-nailib
- nai_bsp-naibsp
- Under the “Library Paths” tab click “Add…”, then check “Is a workspace path”, and add the following (ORDER MATTERS):
- /nai_bsp-naibsp/${config_name:${ProjName}}
- /nai_bsp-naibsp_sys/${config_name:${ProjName}}
- /naiapp_common/${config_name:${ProjName}}
- /nai_libs-naibrd/${config_name:${ProjName}}
- /nai_libs-naiether/${config_name:${ProjName}}
- /nai_libs-naiif/${config_name:${ProjName}}
- /nai_libs-nailib/${config_name:${ProjName}}

-
Click “Apply” on the “Properties” window to save the settings.
-
In the Project Explorer, right-click on the “naiapp_mod_ad_basic_ops” project and select “Build Configurations"→"Set Active"→"Debug”.
-
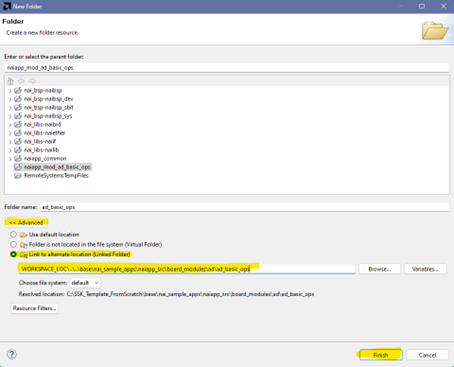
To add the source files to the project, right-click on the “naiapp_mod_ad_basic_ops” project folder and select “New"→"Folder”. Click the “Advanced” button followed by the “Link to alternate location (Linked Folder)” check box.
-
Click the browse button and add the following folder path:
- SSK_Template_FromScratch\base\nai_sample_apps\naiapp_src\board_modules\ad\ad_basic_ops
Note
Alternatively, enter “WORKSPACE_LOC…\base\nai_sample_apps\naiapp_src\board_modules\ad\ad_basic_ops” if you want the path to be relative to the workspace location.
-
Click the “Finish” button to add the file to the project.
-
Select “New Folder” again, and once again select “Advanced”, followed by “Link to alternate location (Linked Folder)”, and add the following foler path:
- SSK_Template_FromScratch\base\nai_sample_apps\naiapp_src\board_modules\ad\ad_common_utils
Note
“WORKSPACE_LOC…\base\nai_sample_apps\naiapp_src\board_modules\ad_ad_common_utils” if you want the path to be relative to the workspace location.
- Click the “Finish” button to add the file to the project.
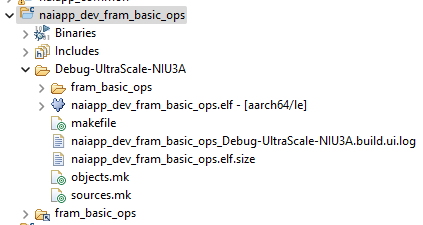
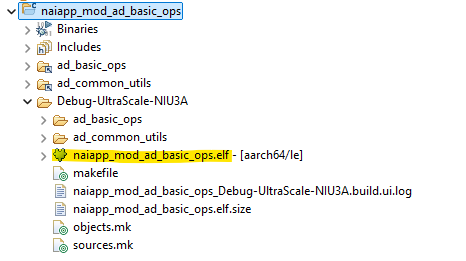
- The project is now ready to build. Right-click the project and click Clean Project. Then right-click the project again and select Build Project. Once the build is complete, a file named “naiapp_mod_ad_basic_ops.elf” will be created under the Debug folder.
Adding Additional NAI Sample Projects (PetaLinux 2023.2)
-
The steps for adding new sample app projects from scratch are the same steps as stated above but the folder paths depend on the sample app.
-
The project will be created in a path that starts with ‘SSK_Template_FromScratch\Template-petalinux-2023-2\petalinux-appsrc\nai_sample_apps\naiapp_src\board_modules’. The next folder is the module family followed by the name of the sample app (ex. ad\ad_basic_ops, dt\dt_basic_ops).
-
Some sample apps include a utils folder which will be seen within the module’s folder. To add these, you right-click the project, click New→Folder→Advance>>→Link to alternate location (Linked folder) and Browse… for it.
-
The source code will be in a path that starts as ‘SSK_Template_FromScratch\base\nai_sample_apps\naiapp_src\board_modules’ with the next folder being the module family followed again by the name of the sample app, which contains the necessary .c file.
Debugging a Sample App on Vitis (PetaLinux 2023.2)
- We will be copying one of the built .elf sample apps to the target board’s home/root folder. You can do this in any preferred way, but the following steps shouw how to do it using Vitis.
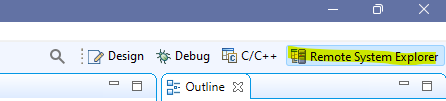
- Go to the “Remote System Explorer” perspective in the top right. If you don’t have this then in the top tab click “Window"→"Perspective"→"Open Perspective"→"Other” and double click “Remote System Explorer”.
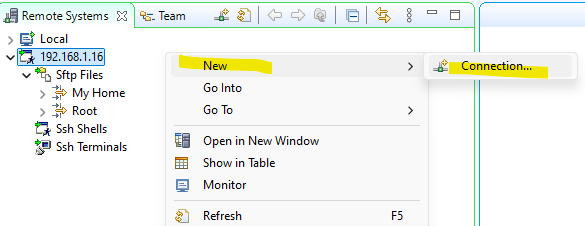
- Right-click the blank area and click “New"→"Connection…“. There are several modes of connection. In this case, “SSH Only” with the IP address of the board is being used.
- Navigate to Root/home/root. Enter the username “root” and the password “root”. Right-click the root and click “Export from Project”.
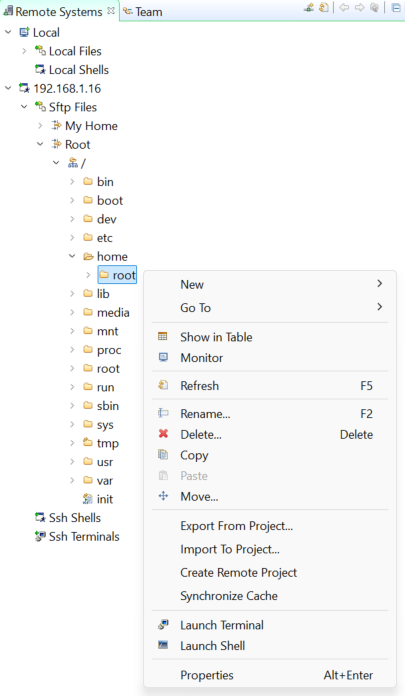
- In the “Remote file system” page, navigate to the sample app you want. On the left side click the dropdown arrow to expand it, then click the “Debug” folder. Then on the right, check the .elf file. When you are done, click Finish.

-
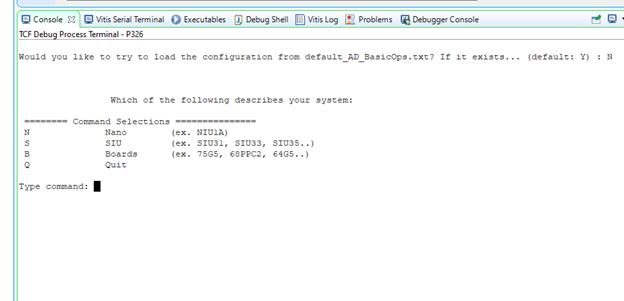
Run the sample app on Teraterm to make sure the app is working and to give execute permissions to it. You can also just use Teraterm as a simple way to use the program.
-
Navigate to /home/root/ on the terminal:
# cd /home/root/- Give Execute permission to the application:
# chmod 777 <Sample Application>- Execute program from Linux shell terminal:
# ./<Sample Application>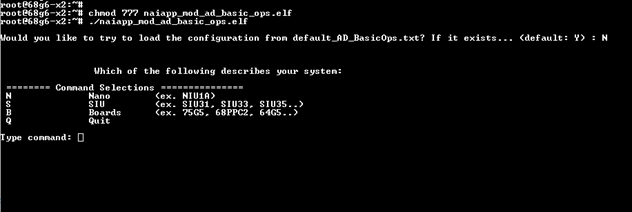
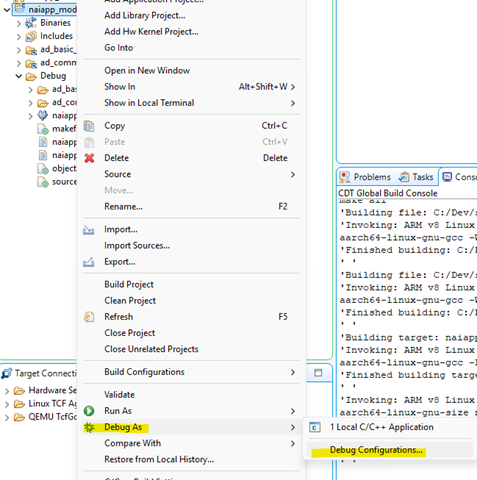
- In Vitis with the sample app selected in the “Project Explorer”, navigate to “Debug As"→"Debug Configurations…“.
Note
The same steps work for “Run As"→"Run Configurations…” if you prefer to use Vitis to run the program.
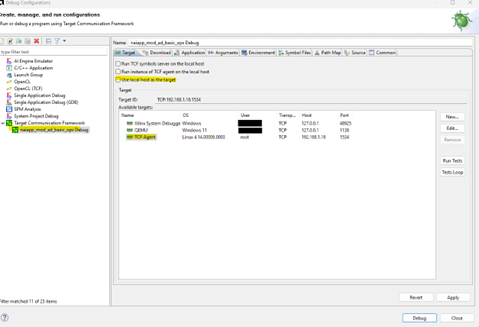
- In the “Debug Configurations” window, double click “Target Communication Framework”, select the new configuration, uncheck “Use local host as the target”, click on the TCF Agent and click Apply.
- Navigate to the “Application” tab. The local file path should be entered as “Debug/<sample_app>.elf”. The remote file path should be filled in as “home/root/<sample_app.elf>“. Click Debug when finished.

- Vitis should ask to open the Debugger perspective.