NAI ARM Linux Quick-Start Guide (PetaLinux 2018)
Overview
This document describes how to set up your environment and cross-compile NAI’s Software Support Kit (SSK) 2.x to be run on a PetaLinux 2018.2 target.
Environment Setup
Required Tools (PetaLinux 2018.2)
- Xilinx SDK 2018.2
- NAI Library Package
- Terminal Program (Teraterm)
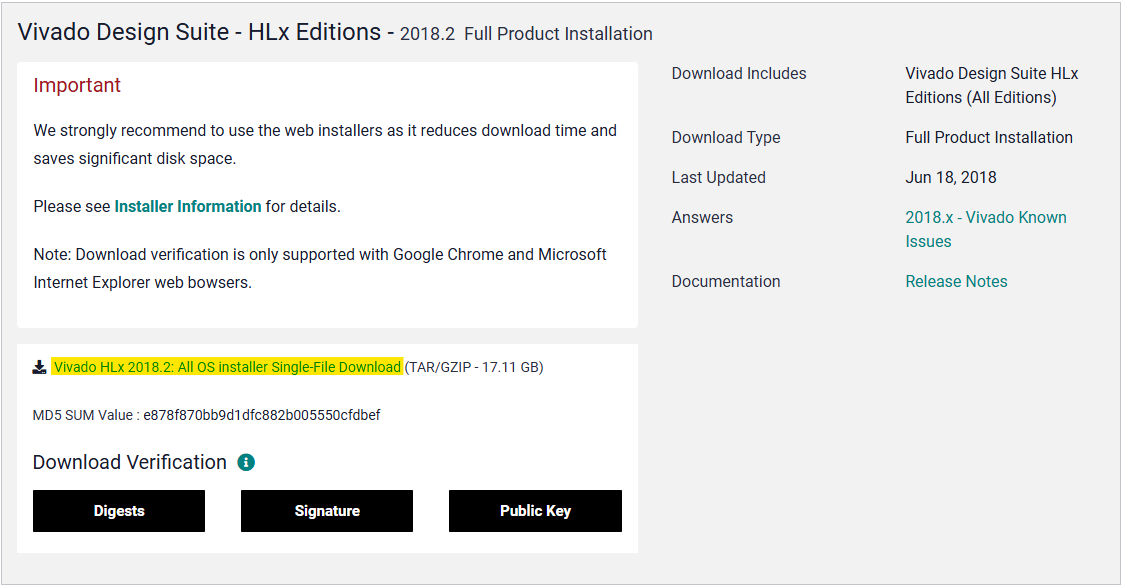
Downloading Xilinx (PetaLinux 2018.2)
-
Head to the Xilinx website archive section.
-
Click the 2018.2 tab to expand it.
-
Select the All OS installer to begin download, then run the installer. The tool that will be used for development is Xilinx SDK 2018.2, which is included in the Vivado Design Suite installation.
Building and Running a Project
Importing and Building Sample Applications (PetaLinux 2018.2)
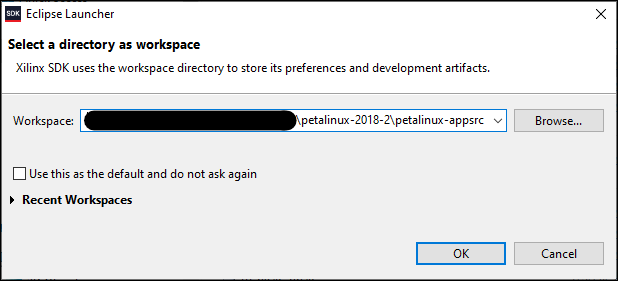
- Run Xilinx SDK 2018.2 and select the following folder from the NAI library package as your workspace:
- PACKAGE_LOCATION\petalinux-2018-2\petalinux-appsrc
- If there are already projects when you load the workspace, select them all, right-click, and Delete them. Do NOT select “Delete project contents on disk”.

- Import NAI projects by selecting File→Import→Existing Projects into Workspace from the Xilinx SDK toolbar:
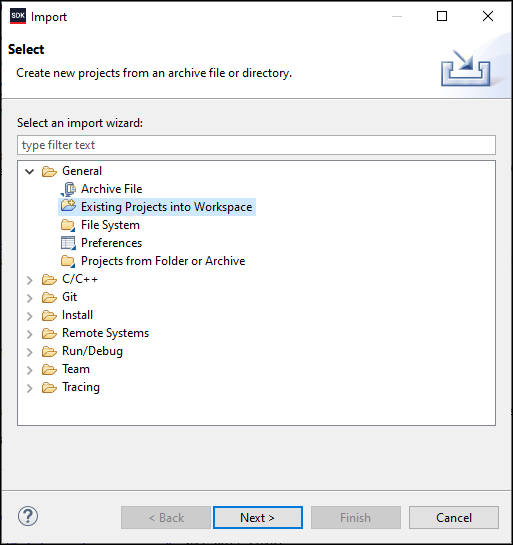
- Select Next and then select the workspace directory as the root directory:
- PACKAGE_LOCATION\petalinux-2018-2\petalinux-appsrc
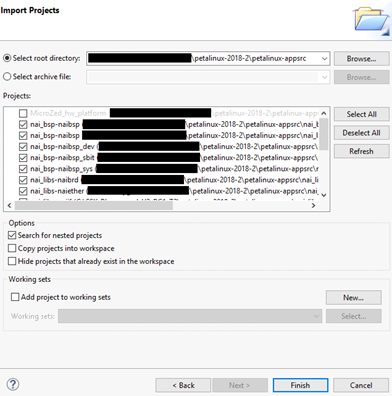
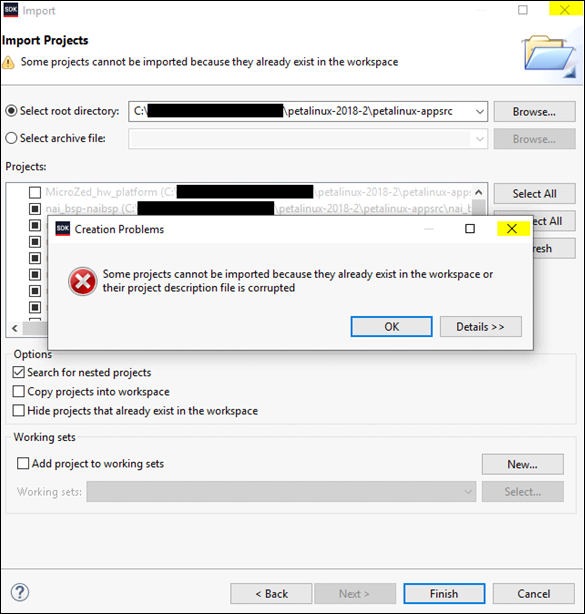
- Select finish to add NAI libraries and sample code projects to the workspace.
- If you get this error, simply X it out and X out the Import window.
- Your Project Explorer should now look similar to this:
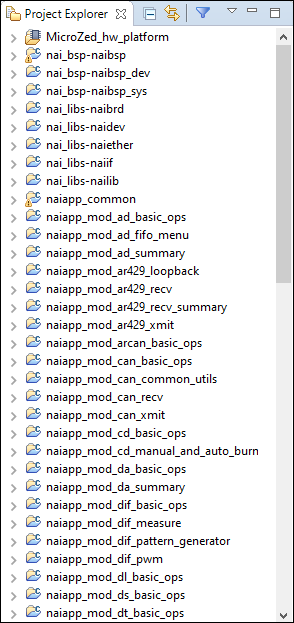
-
Navigate to Project at the top of Xilinx and make sure Build automatically is unchecked.
-
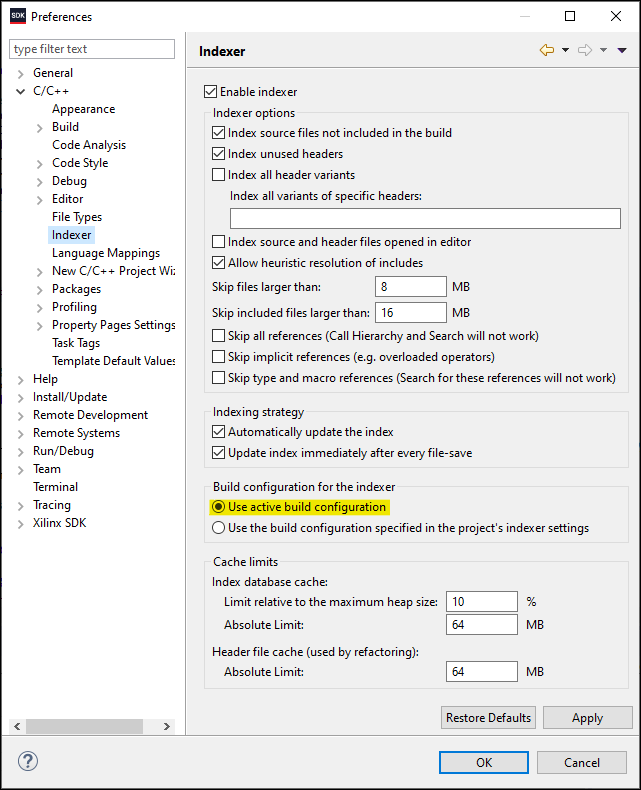
Select Window→Preferences from the Xilinx toolbar and set the Indexer to “Use active build configuration” and select OK.
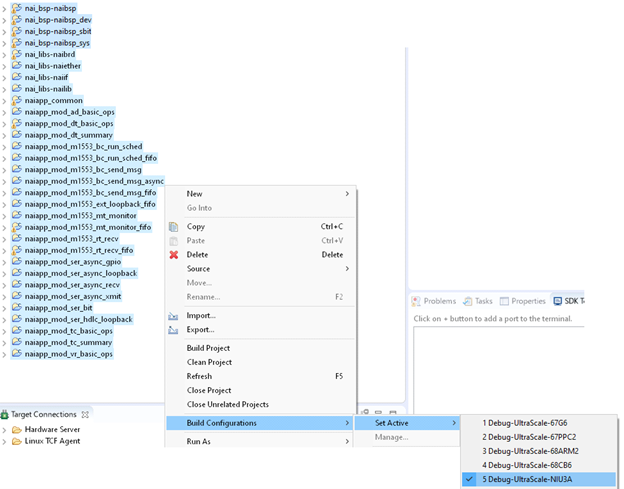
- Select all of the projects, right-click, click Build Configurations, Set Active, Debug-UltraScale/Zynq-********** (pick the configuration (Zynq/UltraScale) and the board you have, ex. NIU3A).
- Select all of the library projects (nai_bsp projects, nai_libs projects, naiapp_common) and right-click Clean Project then right-click Build Project.

- Select a module sample project to Clean then Build which will generate an elf executable that can be run on the processor board.
Creating a New Hello World Application (PetaLinux 2018.2)
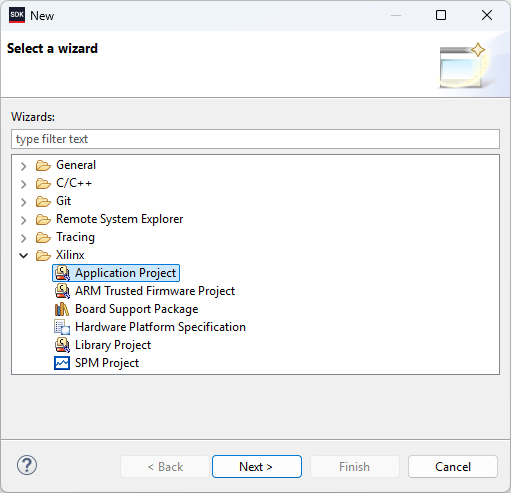
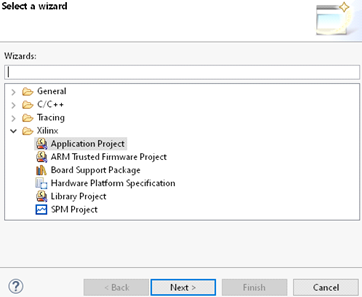
- Navigate to File→New→Application Project to get to the New Project wizard and select Xilinx→Application Project.
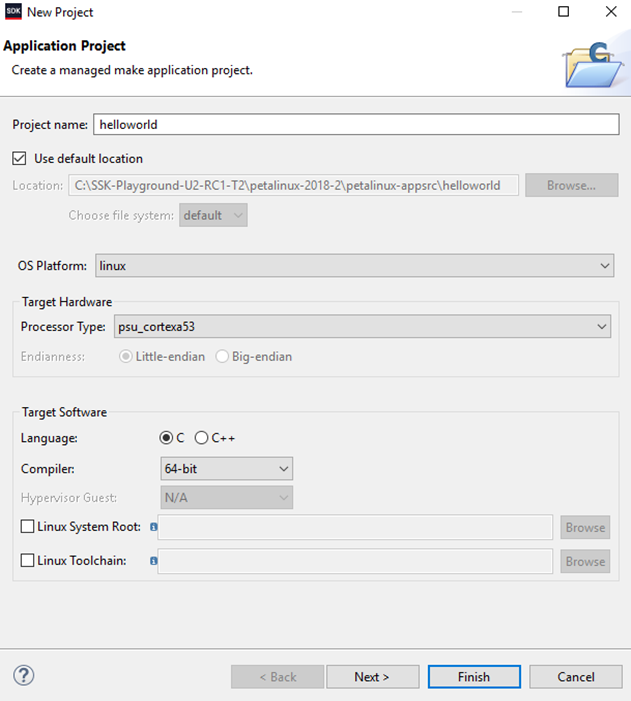
- Provide a name for the project, select linux as the OS Platform and select psu_cortexa53 as the processor type. Language should default to C and Compiler should default to 64-bit. Press next when complete.
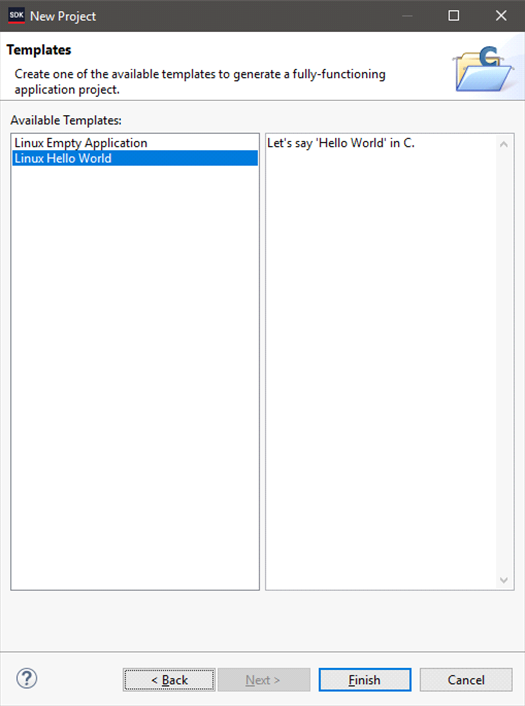
- Select the type of application template you’d like to start with and click Finish when complete.
- A project with the name entered will appear in the project explorer, right-click the project and build to generate the executable ELF file.
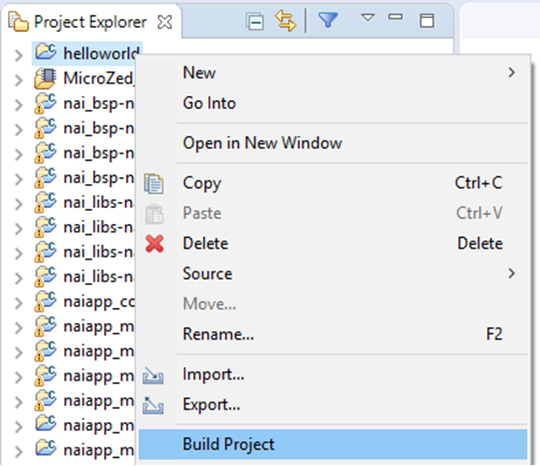
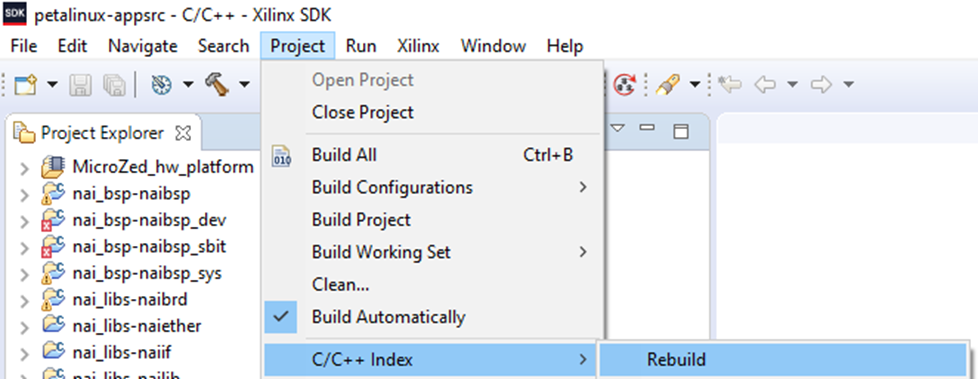
- If your projects appear to successfully build but the Project Explorer still shows a red X on them, trying clicking Project→C/C++ Index→Rebuild to rebuild your projects.
Creating Projects from Scratch (PetaLinux 2018.2)
- Projects can be created with their source code and library includes manually created/linked. This can be helpful if a sample app is having issues and you want to go step by step to make sure nothing is wrong.
- If you wish to create projects from scratch (starting from a blank slate, creating projects, and linking the source code manually) then navigate to File→Switch Workpsace and set the path to ‘SSK_Template_FromScratch/Template-petalinux-2018-2/petalinux-appsrc’.
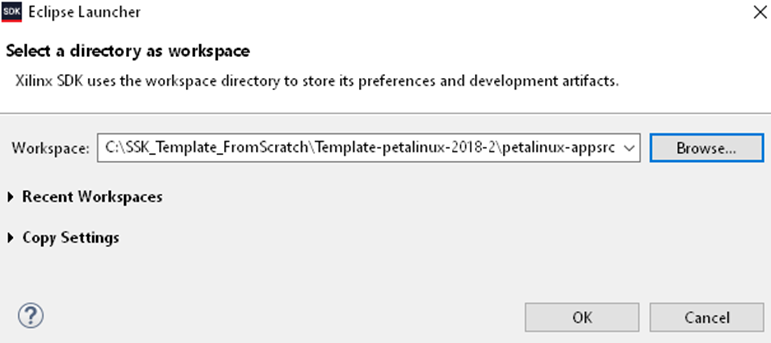
- This directory is included with the package and has the same folder structure as the normal petalinux-2018-2 folder but the folders contain nothing so that projects can be made from a blank slate with nothing being detected by Xilinx.
Note
For Zynq, the workspace path would instead be “SSK_Template_FromScratch/Template-petalinux” and all subsequent path locations would follow this path rather than the aforementioned UltraScale one.
Creating an NAI Library Project from Scratch (PetaLinux 2018.2)
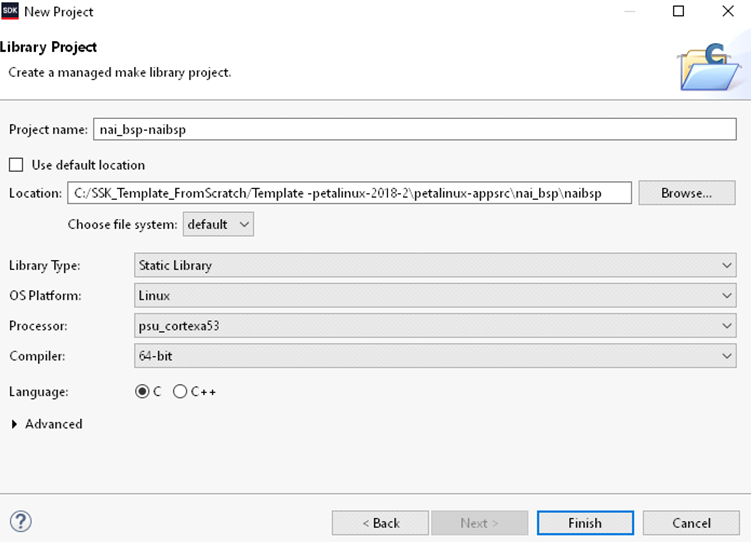
- Navigate to File→New…→Project. Select Library Project under the Xilinx dropdown.
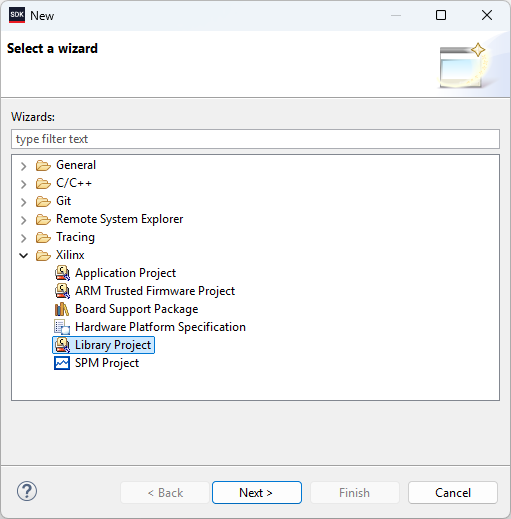
- Create a project named nai_bsp-naibsp. Uncheck ‘Use default location’ and change the location to ‘SSK_Template_FromScratch/Template-petalinux-2018-2\petalinux-appsrc\nai_bsp\naibsp’. Select the settings as shown in the screenshot and click Finish when done.
Note
If you use the Brose button to Brose to the location of ‘SSK_Template_FromScratch’ but can’t get to it because the C: drive doesn’t show up as an option to browse to, type ‘C:’ into the Location text box and then press Brose again, and you should be able to Brose into the C: drive.
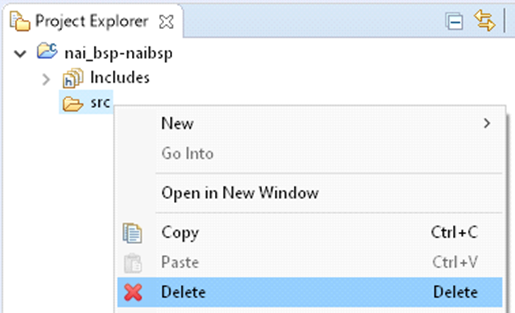
- Your workspace in the IDE should now have an ‘nai_bsp-naibsp’ project.
- Click the arrow to expand the project, then right-click on the src folder and click Delete. Press OK after it asks to confirm the deletion.
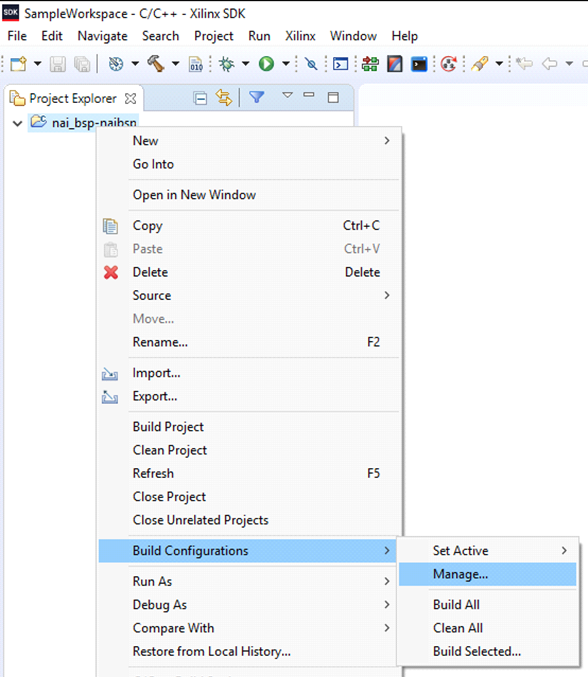
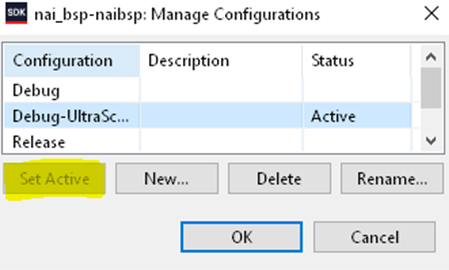
- Right-click the project and click Build Configurations→Manage…
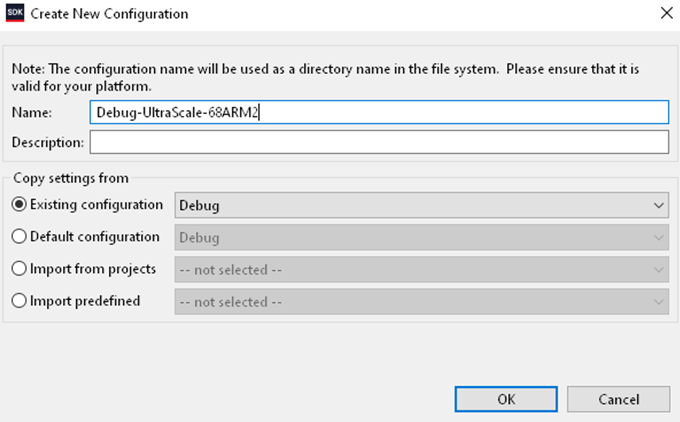
- Click New…
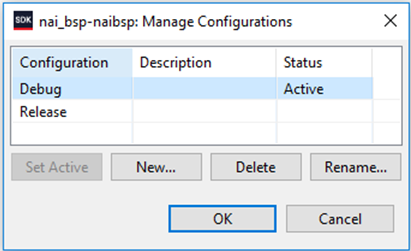
- Add Debug-UltraScale-68ARM2 as the Name with the Existing configuration based on Debug then press OK.
Note
Replace UltraScale with Zynq if your board is Zynq, and replace 68ARM2 with the board you have, ex. NIU3A, 64ARM1.
- Click on this new configuration and click Set Active.
- Right-click on the project and select ‘Properties’. Now, select ‘Path and Symbols’ and select the ‘Includes’ page. Click Add… and add the following directories. Press OK when done. If the program asks to rebuild then say no.
-
${workspace_loc}/../../base/
-
${workspace_loc}/../../base/nai_bsp
-
${workspace_loc}/../../base/nai_bsp/naibsp_config_68arm2_petalinux
Note
Replace the 68arm2 in the config folder with your board, ex. NIU3A, 64ARM1.

- Right-click on the project and select New→Folder.
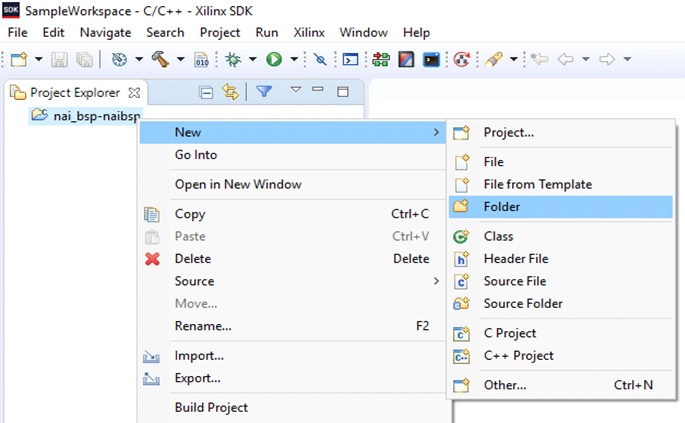
- Click Advanced to show more options then click ‘Link to alternate location (Linked Folder)‘. Write WORKSPACE_LOC…\base\nai_bsp\naibsp as the folder location. Click Finish.

- Add another folder with New→Folder. For the path write WORKSPACE_LOC…\base\nai_bsp\naibsp_config_68arm2_petalinux as the folder location. Click Finish.
Note
Replace the 68arm2 in the config file with your board.
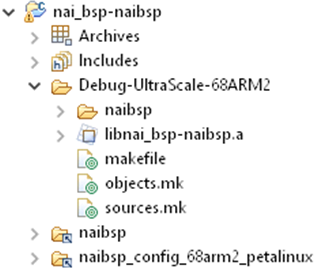
- Right-click the project to Clean Project and then Build Project. The project should build and the progress will be displayed in the ‘Console’ tab. When finished, there will be a newly created ‘Debug-Zynq/UltraScale-XXXXXX’ folder with an archive file (static library) named ‘libnai_bsp-naibsp.a’.
Adding Additional Library Projects (PetaLinux 2018.2)
- If other libraries are needed, then the steps are the same except for differences in names and paths. The following is a list of the different library paths, debug configurations, and folder paths.
Note
Replace UltraScale with Zynq if your configuration requires Zynq instead, and replace the 68ARM2 in the Debug Configuration with your board, ex. NIU3A, 64ARM1.
-
nai_bsp
-
nai_bsp-naibsp (explained in the above tutorial)
-
nai_bsp-naibsp_sys
- New→Project step
- Name:nai_bsp-naibsp_sys
- Path: ‘PACKAGE_LOC\Template-petalinux-2018-2\petalinux-appsrc\nai_bsp\naibsp_sys’
- Debug Configuration Name
- Debug-UltraScale-68ARM2
- New→Folder step
- WORKSPACE_LOC…\base\nai_bsp\naibsp_sys
- New→Project step
-
nai_bsp-naibsp_sbit
- New→Project
- Name:nai_bsp-naibsp_sbit
- Path: ‘PACKAGE_LOC\Template-petalinux-2018-2\petalinux-appsrc\nai_bsp\naibsp_sbit’
- Debug Configuration Name
- Debug-UltraScale-68ARM2
- New→Folder step
- WORKSPACE_LOC…\base\nai_bsp\naibsp_sbit
- New→Project
-
nai_bsp-naibsp_dev
- New→Project
- Name:nai_bsp-naibsp_dev
- Path: ‘PACKAGE_LOC\Template-petalinux-2018-2\petalinux-appsrc\nai_bsp\naibsp_dev’
- Debug Configuration Name
- Debug-UltraScale-68ARM2
- New→Folder step
- WORKSPACE_LOC…\base\nai_bsp\naibsp_dev
- New→Project
-
-
nai_libs
-
nai_libs-naibrd
- New→Project
- Name:nai_libs-naibrd
- Path: ‘PACKAGE_LOC\Template-petalinux-2018-2\petalinux-appsrc\nai_libs\nai_libs-naibrd’
- Debug Configuration Name
- Debug-UltraScale-68ARM2
- New→Folder step
- WORKSPACE_LOC…\base\nai_libs\naibrd\src
- WORKSPACE_LOC…\base\nai_libs\naibrd\include
- New→Project
-
nai_libs-naiether
- New→Project
- Name:nai_libs-naiether
- Path: ‘PACKAGE_LOC\Template-petalinux-2018-2\petalinux-appsrc\nai_libs\nai_libs-naiether’
- Debug Configuration Name
- Debug-UltraScale-68ARM2
- New→Folder step
- WORKSPACE_LOC…\base\nai_libs\naiether\src
- WORKSPACE_LOC…\base\nai_libs\naiether\include
- New→Project
-
nai_libs-naiif
- New→Project
- Name:nai_libs-naiif
- Path: ‘PACKAGE_LOC\Template-petalinux-2018-2\petalinux-appsrc\nai_libs\nai_libs-naiif’
- Debug Configuration Name
- Debug-UltraScale-68ARM2
- New→Folder step
- WORKSPACE_LOC…\base\nai_libs\naiif\src
- WORKSPACE_LOC…\base\nai_libs\naiif\include
- New→Project
-
nai_libs-nailib
- New→Project
- Name:nai_libs-nailib
- Path: ‘PACKAGE_LOC\Template-petalinux-2018-2\petalinux-appsrc\nai_libs\nai_libs-nailib’
- Debug Configuration Name
- Debug-UltraScale-68ARM2
- New→Folder step
- WORKSPACE_LOC…\base\nai_libs\nailib\src
- WORKSPACE_LOC…\base\nai_libs\nailib\include
- New→Project
-
naiapp_common
- New→Project
- Name:naiapp_common
- Path: ‘PACKAGE_LOC\Template-petalinux-2018-2\petalinux-appsrc\nai_sample_apps\naiapp_common’
- Debug Configuration Name
- Debug-UltraScale-68ARM2
- New→Folder step
- WORKSPACE_LOC…\base\nai_sample_apps\naiapp_common\src
- WORKSPACE_LOC…\base\nai_sample_apps\naiapp_common\include
- New→Project
-
Creating an NAI Sample Project from Scratch (PetaLinux 2018.2)
- All library projects must be created or imported as described previously in order for the sample apps to build.
- Navigate to File→New→Application Project to get to the New Project wizard and select Xilinx→Application Project, then click Next.
-
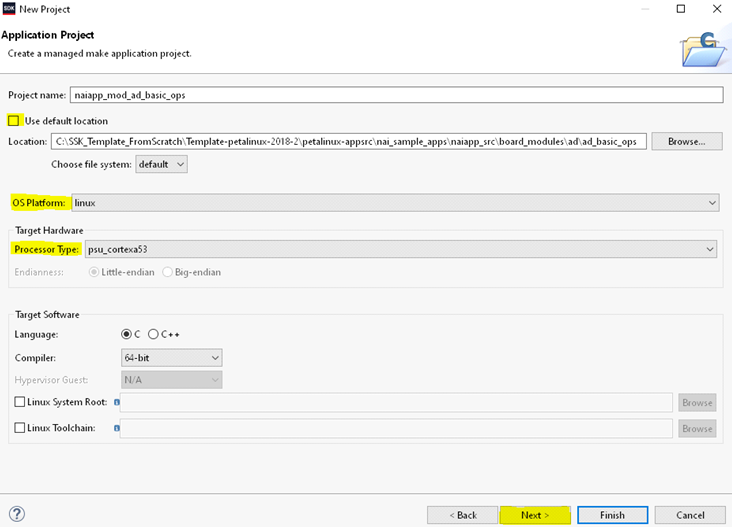
Set the project name; in this example, we use naiapp_mod_ad_basic_ops.
-
Uncheck the use default location check box, and set the location to C:\SSK_Template_FromScratch\Template-petalinux-2018-2\petalinux-appsrc\nai_sample_apps\naiapp_src\board_modules\ad\ad_basic_ops
Note
For Zynq, the workspace path would instead be “SSK_Template_FromScratch/Template-petalinux”, and all subsequent path locations would follow this path rather than the aforementioned UltraScale one.
- Change the OS Platform to linux and select psu_cortexa53 as the processor type for UltraScale or ps7_cortexa9 for Zynq. Language should default to C and Compiler should default to 64-bit or 32-bit for Zynq. Press Next when complete.
- Under “Available Templates”, select the Linux Empty Application and click the Finish button.

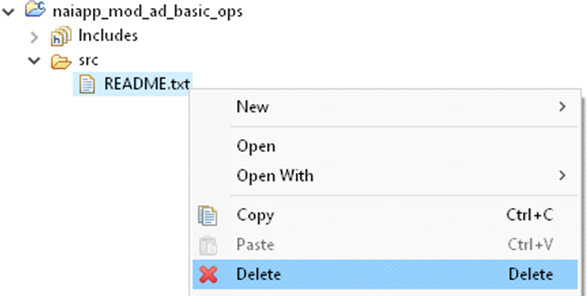
- The project “naiapp_mod_ad_basic_ops” should now be added to the Workspace and listed under the Project Explorer. Expand the “naiapp_mod_ad_basic_ops” project and “src” folder and right-click the readme.txt file. Select Delete to remove the readme.txt file from the project. Press OK on the confirmation prompt.
- Right-click on the “naiapp_mod_ad_basic_ops” folder and select properties. Select C/C++ General Paths and Symbols and click the Manage Configurations button.
- Click the New button to create a new Configuration.
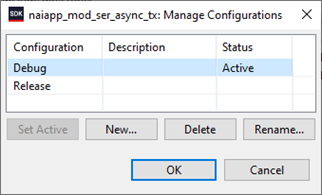
-
Enter the name as “Debug-UltraScale-68ARM2” or “Debug-Zynq-68ARM2” with the Existing configuration set to Debug and click the OK button. Replace 68ARM2 with the board you want to use.
-
Select Debug-Zynq/UltraScale-XXXXX and click on the Set Active button to make it the active configuration and click OK to close the window.
-
In the Configuration drop down box, select the Debug-Zynq/UltraScale-XXXXX configuration if it’s not already selected.
-
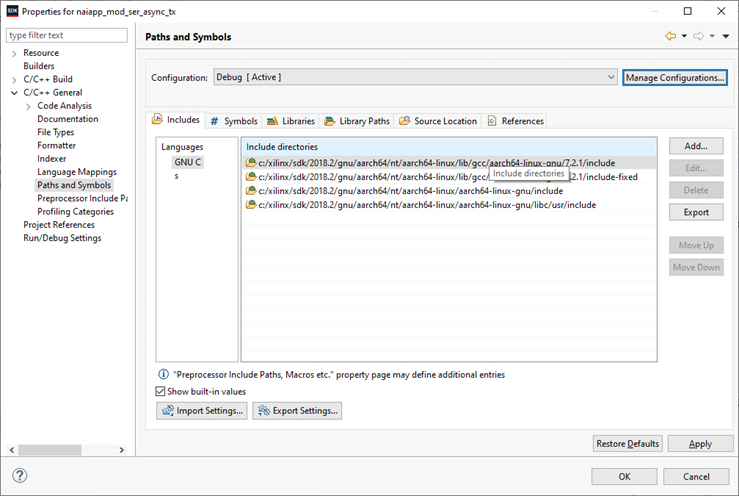
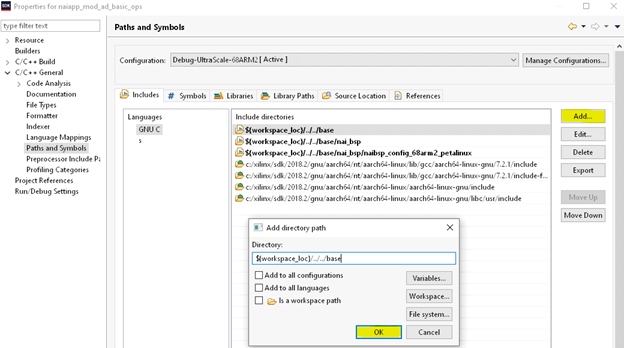
If not already in the Properties window, right-click the project and click Properties→C/C++ General→Paths and Symbols. Under the includes tab, add the following paths:
- ${workspace_loc}/../../base
- ${workspace_loc}/../../base/nai_bsp
- ${workspace_loc}/../../base/nai_bsp/naibsp_config_68arm2_petalinux
Note
Replace the 68arm2 in the config file with the board that you have.
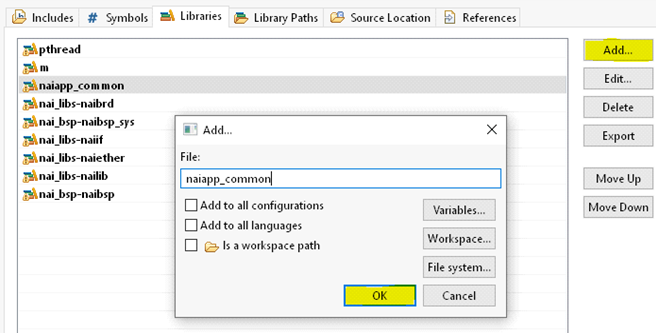
- Under the Libraries tab click Add… and add the following (ORDER MATTERS):
- m
- pthread
- naiapp_common
- nai_libs-naibrd
- nai_bsp-naibsp_sys
- nai_libs-naiif
- nai_libs-naiether
- nai_libs-nailib
- nai_bsp-naibsp
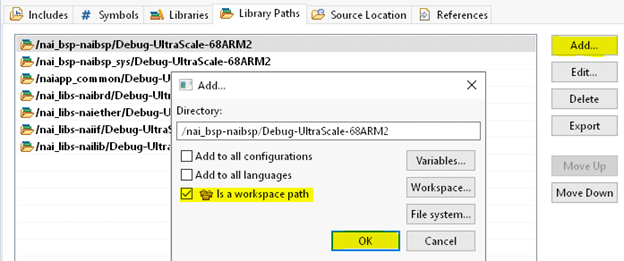
- Under the Library Paths tab click Add…, add the following and check “Is a workspace path” (ORDER MATTERS):
Note
Replace UltraScale with Zynq if your configuration requires Zynq and 68ARM2 with your board, ex. NIU3A, 64ARM1
- /nai_bsp-naibsp/Debug-UltraScale-68ARM2
- /nai_bsp-naibsp_sys/Debug-UltraScale-68ARM2
- /naiapp_common/Debug-UltraScale-68ARM2
- /nai_libs-naibrd/Debug-UltraScale-68ARM2
- /nai_libs-naiether/Debug-UltraScale-68ARM2
- /nai_libs-naiif/Debug-UltraScale-68ARM2
- /nai_libs-nailib/Debug-UltraScale-68ARM2
-
Click OK on the Properties window to save the settings.
-
In the Project Explorer, right-click on the “naiapp_mod_ad_basic_ops” project and select Build Configurations→Set Active→Debug-Zynq/UltraScale-XXXXX.
-
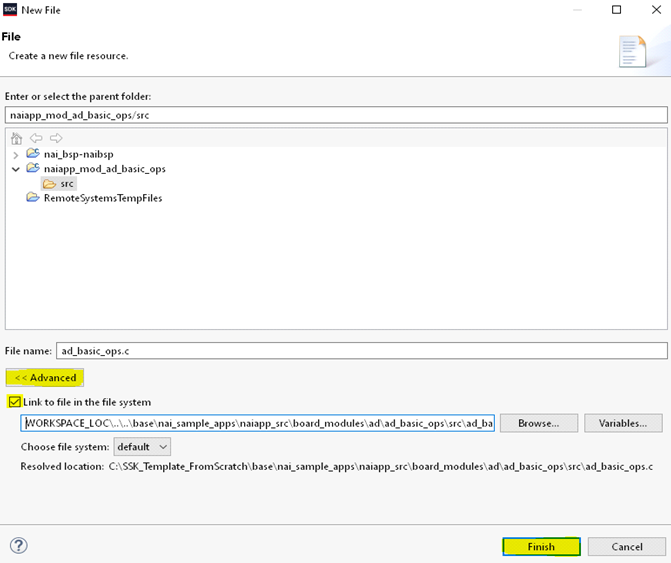
To add the source file to the project, right-click on the “src” folder inside the “naiapp_mod_ad_basic_ops” project folder, and select New File. Click the Advanced button followed by the Link to file in the file system check box.
-
Click the browse button and add the file path SSK_Template_FromScratch\base\nai_sample_apps\naiapp_src\board_modules\ad\ad_basic_ops\src\ad_basic_ops.c. Change the path to WORKSPACE_LOC…\base\nai_sample_apps\naiapp_src\board_modules\ad\ad_basic_ops\src\ad_basic_ops.c if you want the path to be relative to the workspace location. Click the finish button to add the file to the project.
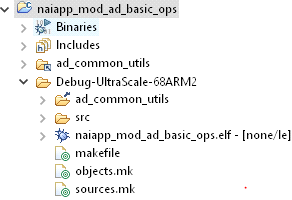
- The project is now ready to build by right-clicking the project and clicking Clean Project then right-clicking and clicking Build Project. Once the build completes, an naiapp_mod_ad_basic_ops.elf file will be created in the Debug-UltraScale folder.
Adding Additional NAI Sample App Projects (PetaLinux 2018.2)
-
The steps for adding new sample app projects from scratch are the same steps as stated above but the folder paths depend on the sample app.
-
The project will be created in a path that starts as SSK_Template_FromScratch\Template-petalinux-2018-2\petalinux-appsrc\nai_sample_apps-naiapp_src\board_modules. The next folder is the module family, followed by the name of the sample app (ex. ad for ad_basic_ops, dt for dt_basic_ops).
-
Some sample apps include a utils folder which will be seen within the module’s folder. To add these, you right-click the project, click New→Folder→Advanced→Link to alternate location (Linked folder) and Browse… for it.
-
The source code will be in a path that starts as SSK_Template_FromScratch\base\nai_sample_apps\naiapp_src\board_modules, again followed by the module family, then a folder with the name of the sample app which contains the necessary .c file.