NAI ARM Linux Quick-Start Guide (PetaLinux 2014.2)
Overview
This document describes how to set up a development environment and build the software libraries and sample applications of NAI’s Software Support Kit (SSK) 1.x for an ARM/PetaLinux 2014.2 target, using the Xilinx SDK.
Environment Setup
Choose the instructions for your development host below. The .c files you write are fully portable across hosts.
Windows Host
Development Environment Setup
Host PC
The recommended development platform is a PC with minimum 2GB RAM and 30GB hard drive space, and with Windows 7 or later.
Cross-Compiler
The ARM Linux Cross-Compiler package is available on Xilinx’s website. Download the software as follows:
- If you have not done so already, create a Xilinx account and make sure you are signed into it for the duration of the installation (you will need to be signed in to complete some parts of the installation).
- Navigate to https://www.xilinx.com/support/download/index.html/content/xilinx/en/downloadNav/vivado-design-tools/archive.html.
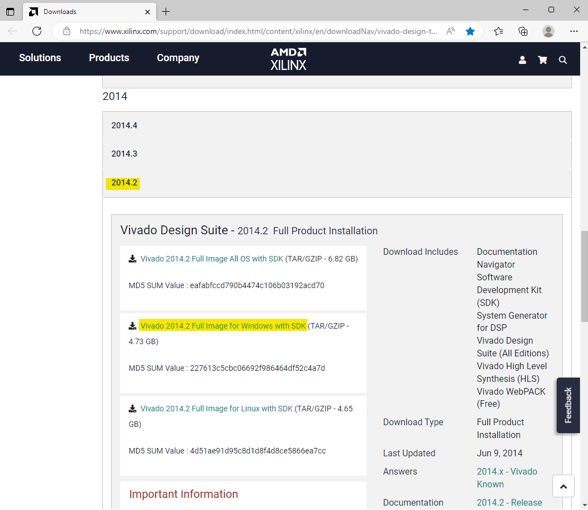
- Locate release 2014.2 and download “Vivado 2014.2 Full Image for Windows with SDK”.
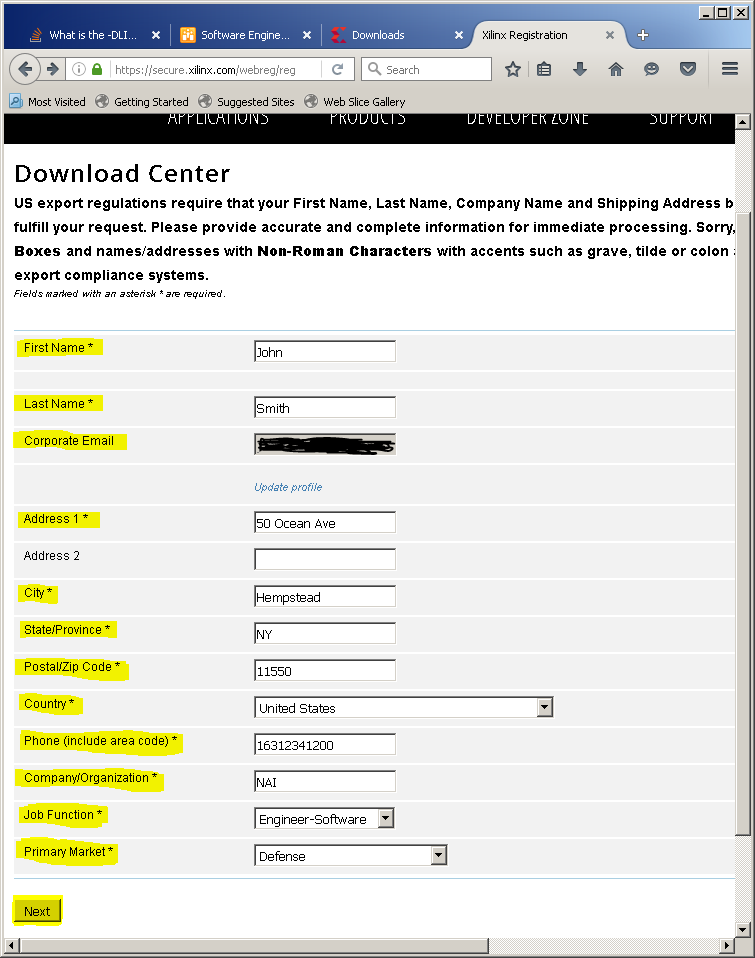
- On the “Download Center” page that comes up, fill out all of the required fields and then press “Next”.
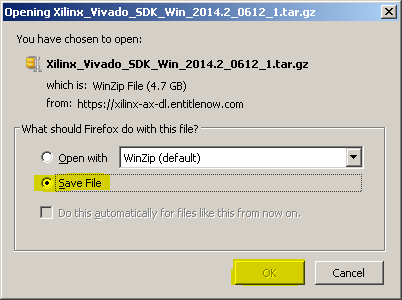
- In the window that pops up, select “Save File” and then click “OK” to save the file to the “Downloads” directory on your PC.
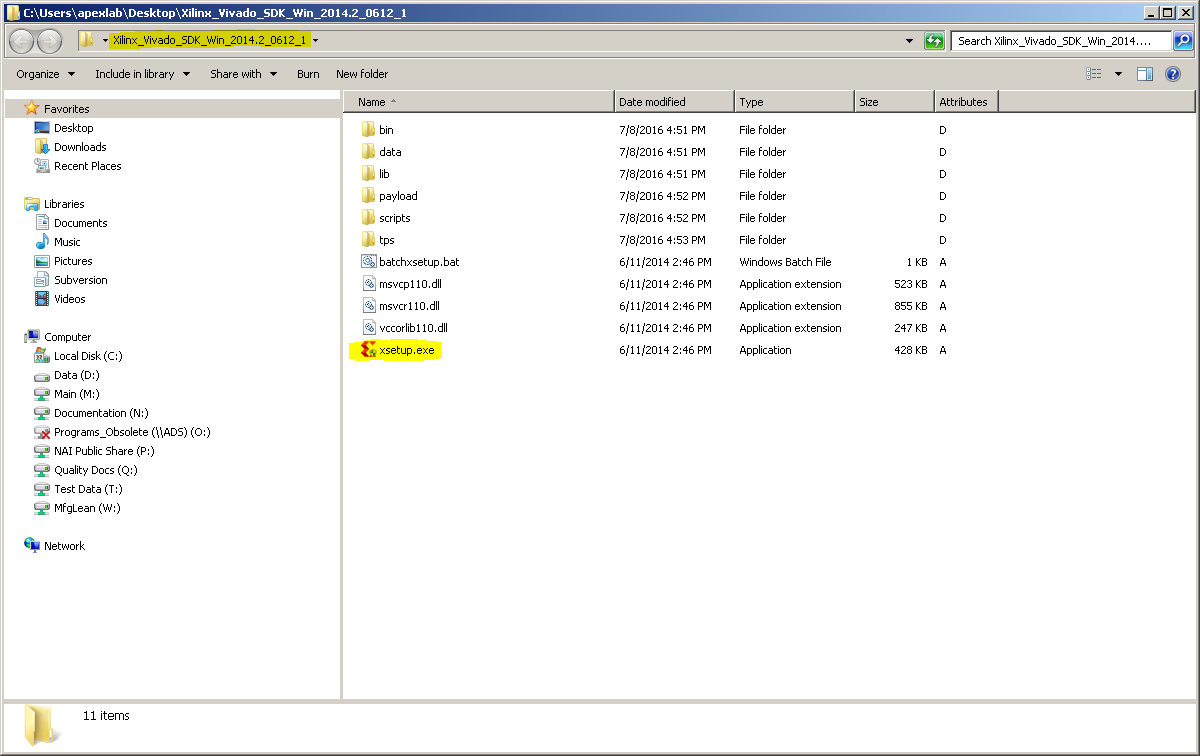
- Unzip the “Xilinx_Vivado_SDK_Win_2014.2_0612_1.tar.gz” file, which should now be found in the “Downloads” directory on your PC.
- Run xsetup.exe from the unzipped file folder.
- Click “Yes” when the User Account Control window pops up.
Note
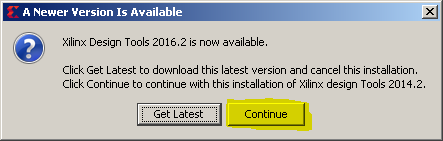
The Vivado 2014.2 Installation menu will prompt you to install a newer version of Vivado SDK. DO NOT upgrade to the newer version of the SDK.
- If a window pops up that says it is checking for the latest version, click “Ignore”. If a window labelled “A Newer Version Is Available” pops up, click “Continue”.
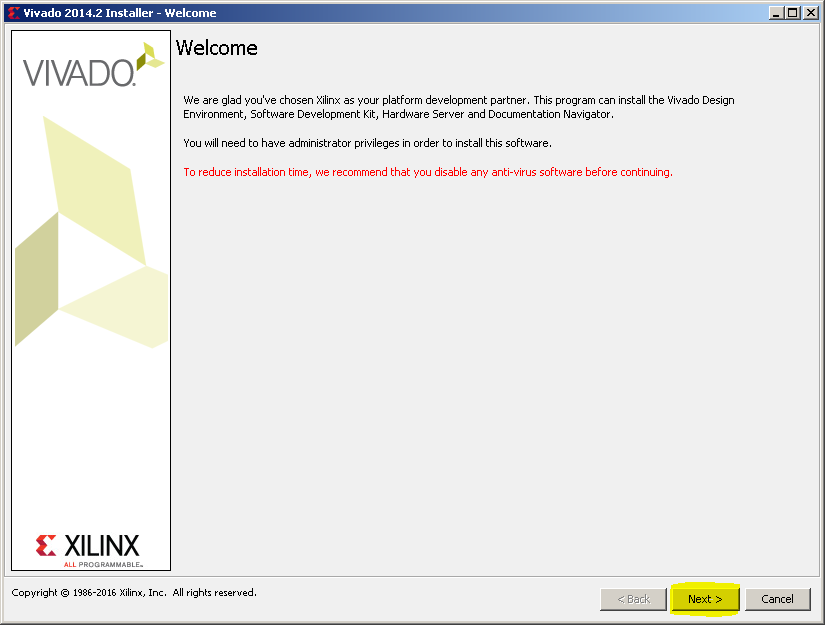
- In the “Vivado 2014.2 Installer – Welcome” window, click “Next >”.
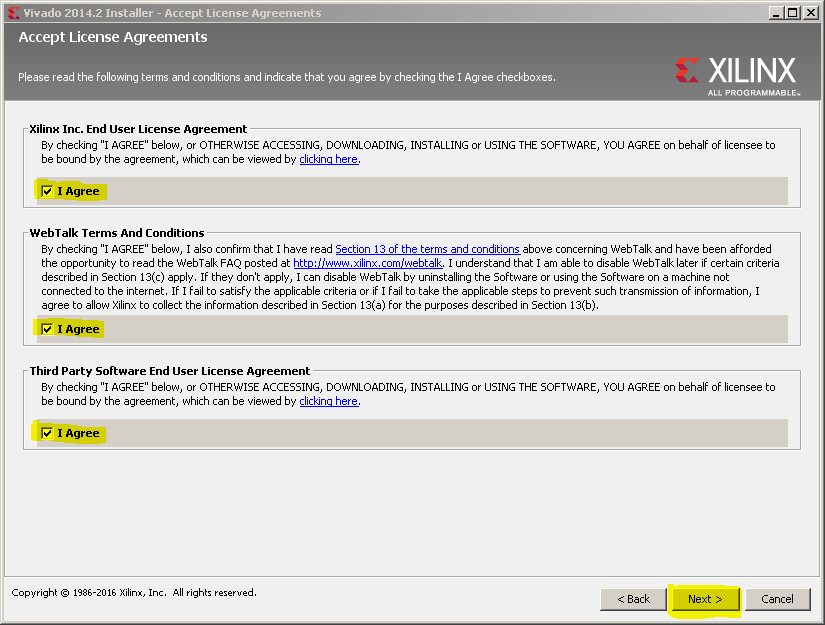
- In the “Accept License Agreements” window that pops up, check all of the “I Agree” check boxes and then click “Next >”.
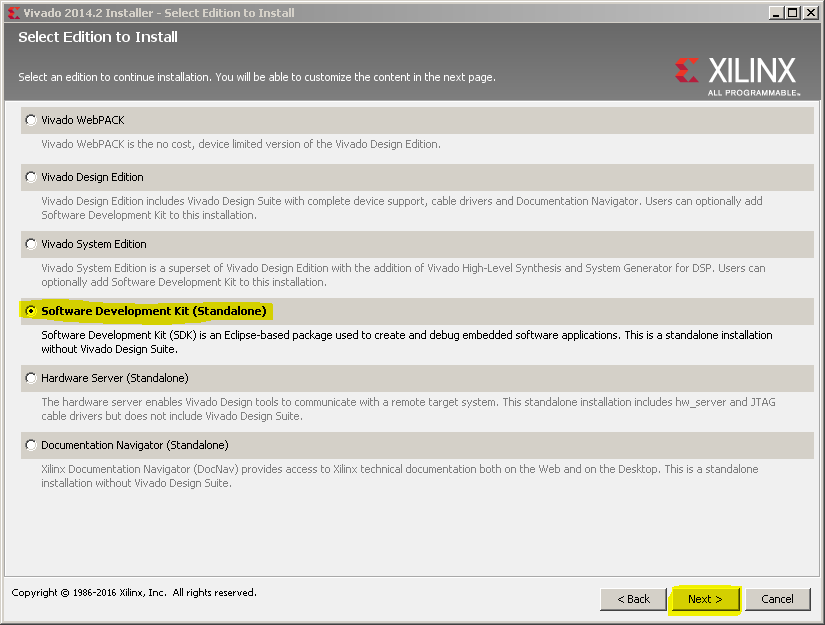
- Select “Software Development Kit (Standalone)” edition to install. This package includes the Cross-Compiler and debugger for application development. Then click “Next >”.
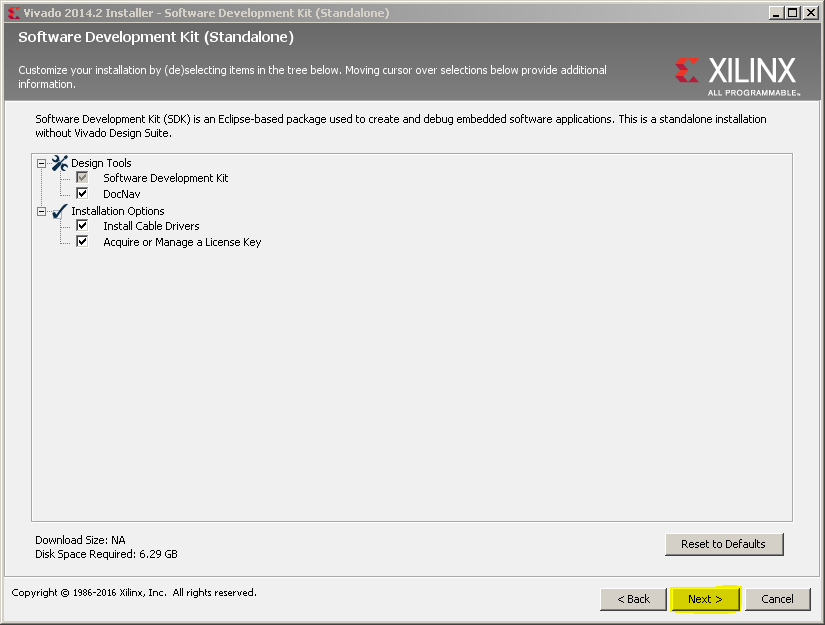
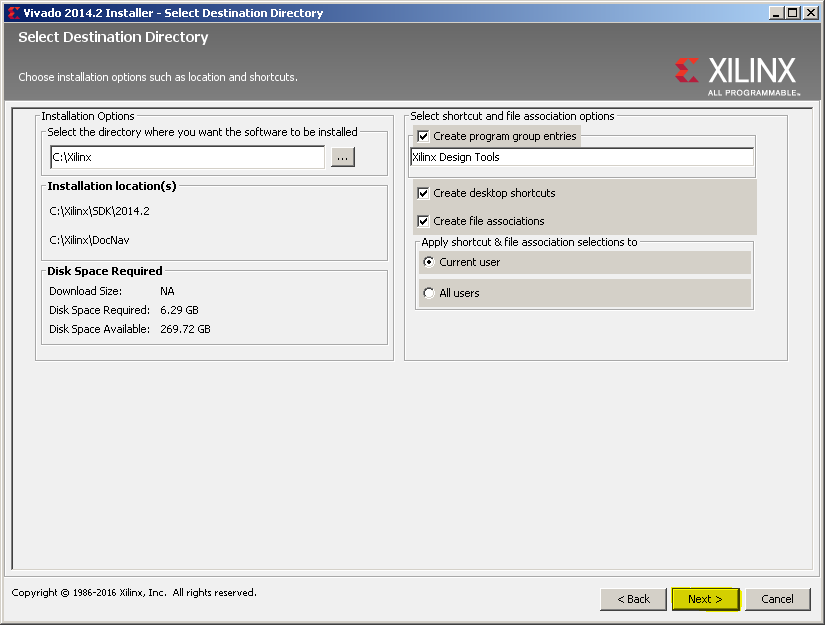
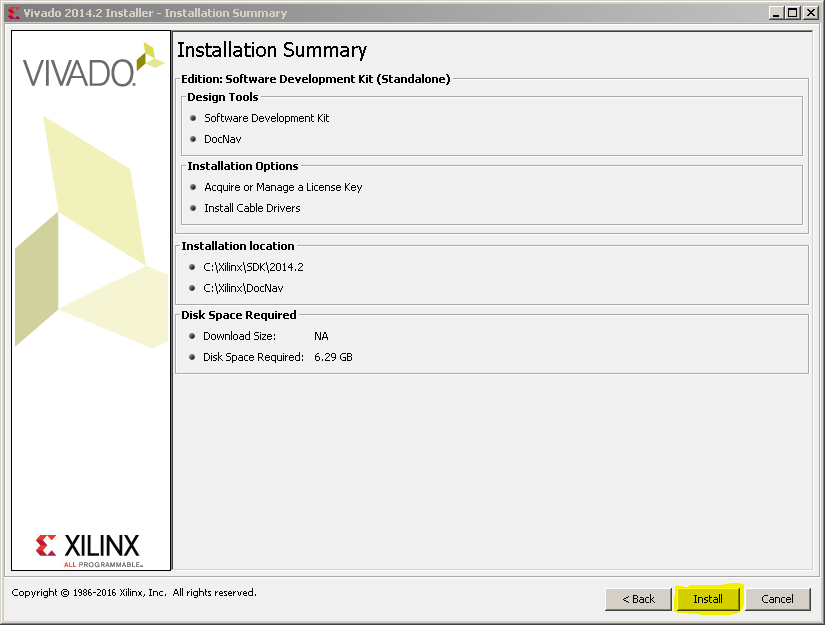
- In the 1st and 2nd window, click “Next >”. In the 3rd window, click “Install”.
- After the installation is complete, if you do not already have a license file for the SDK on your computer, select “Get Free Licenses – Vivado WebPACK, SDK, free IP and more”. Then, click “Connect Now”.
Note
You don’t need to purchase a license for the Software Development Kit (Standalone).
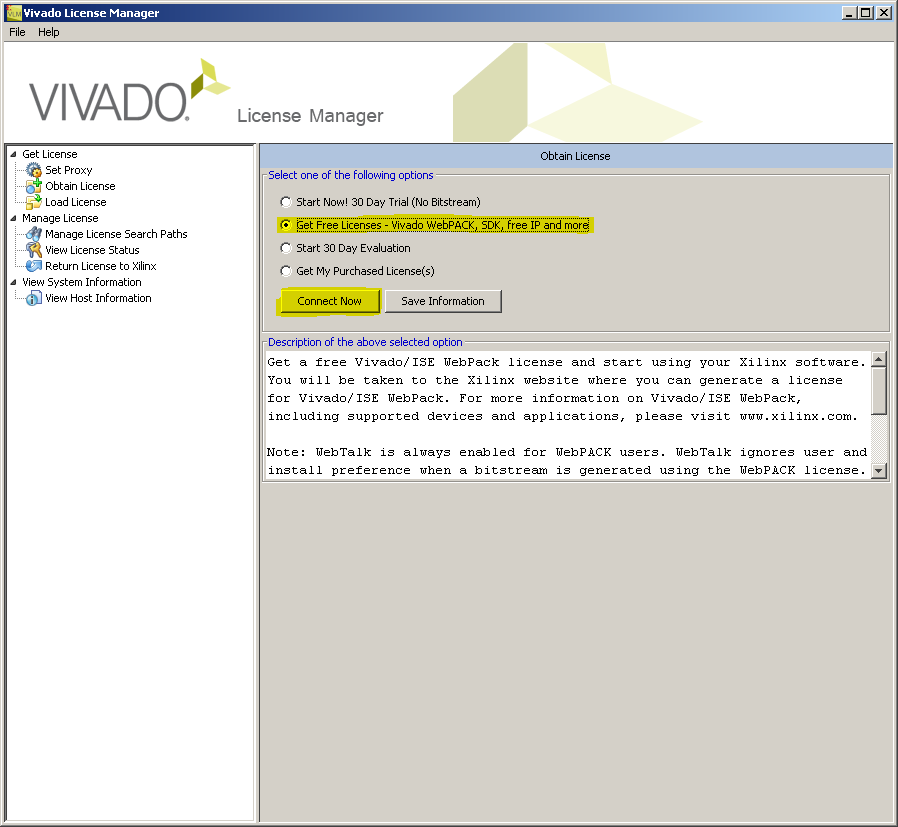
- When you click “Connect Now”, you will be taken to the Xilinx website. If you are not signed in to your Xilinx account, sign in. If the Xilinx website asks you to fill out some personal information, fill it out. Then, you will be taken to the “Product Licensing” page. Select “Vivado Design Suite: HL WebPACK 2015 and Earlier License”, and then click “Generate Node-Locked License”.
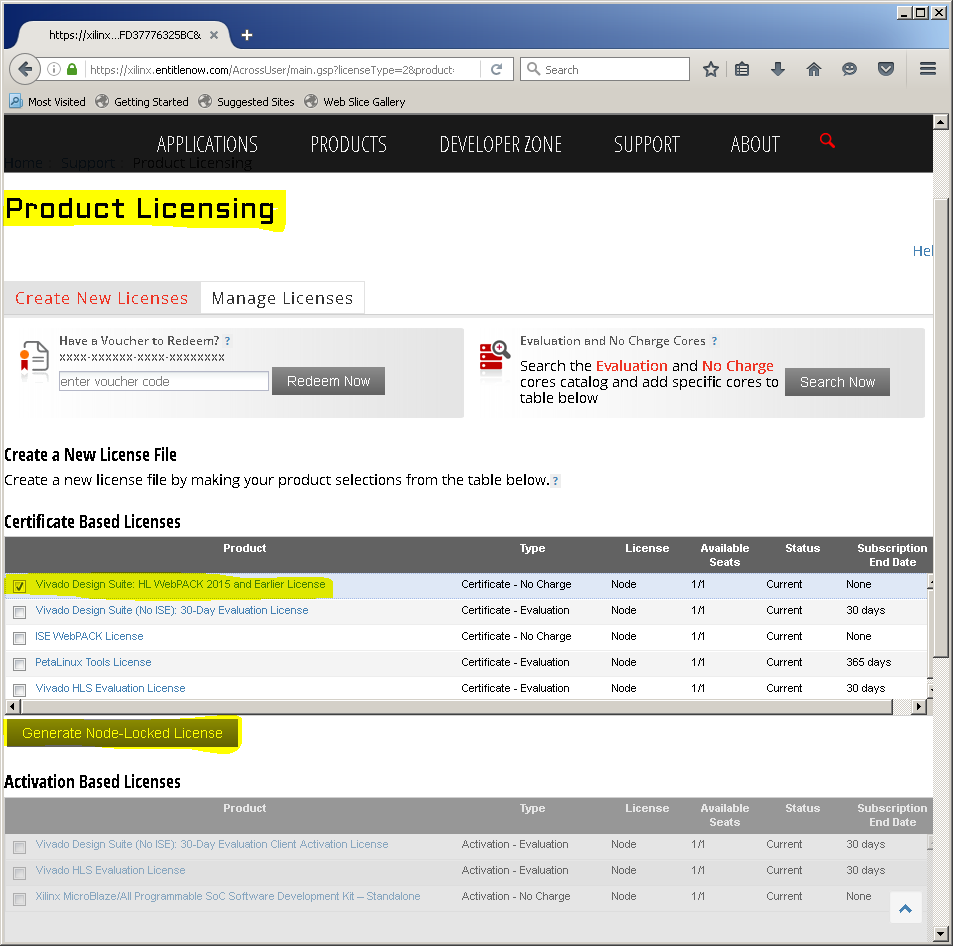
- Click “Next”.
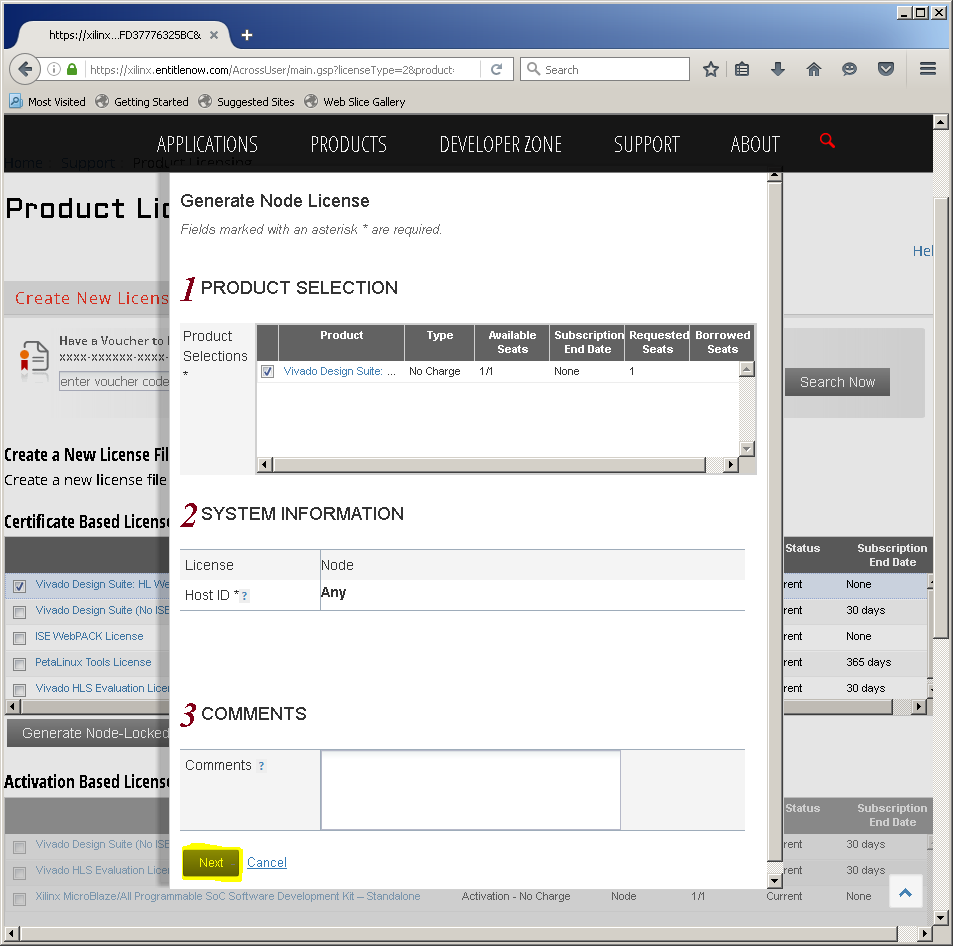
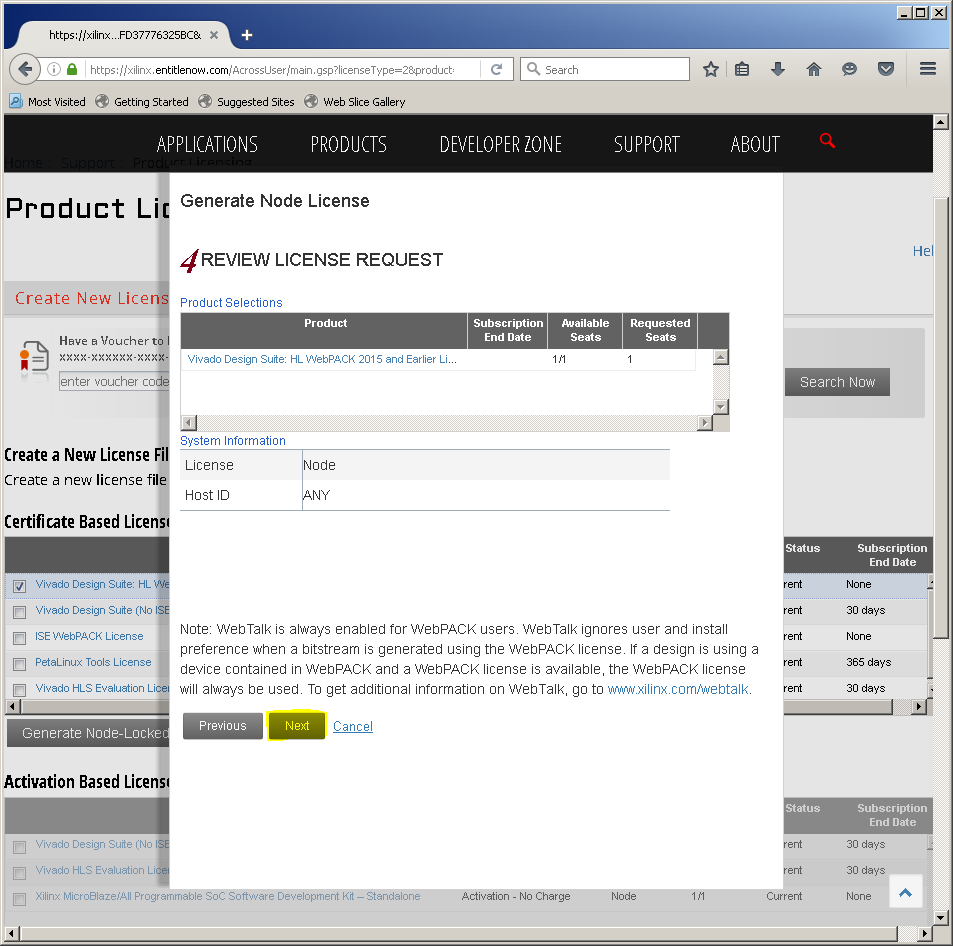
- Click “Next” again. The license file will now be emailed to the email account you specified when creating your Xilinx account. Copy the license file to your PC so that it can be detected when you run the SDK.
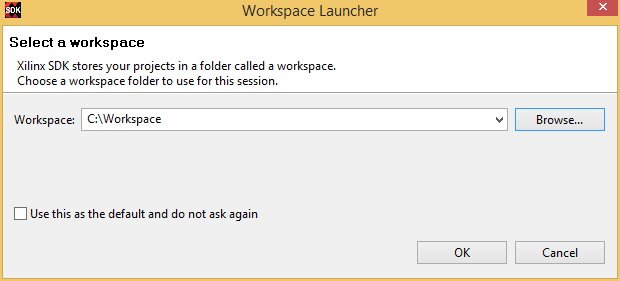
- Open Xilinx. You will be prompted to choose a workspace location. This will be where all the projects you create will be placed. There is no certain place where the workspace needs to be made; in this case, the workspace, called “Workspace,” is made in the C drive.
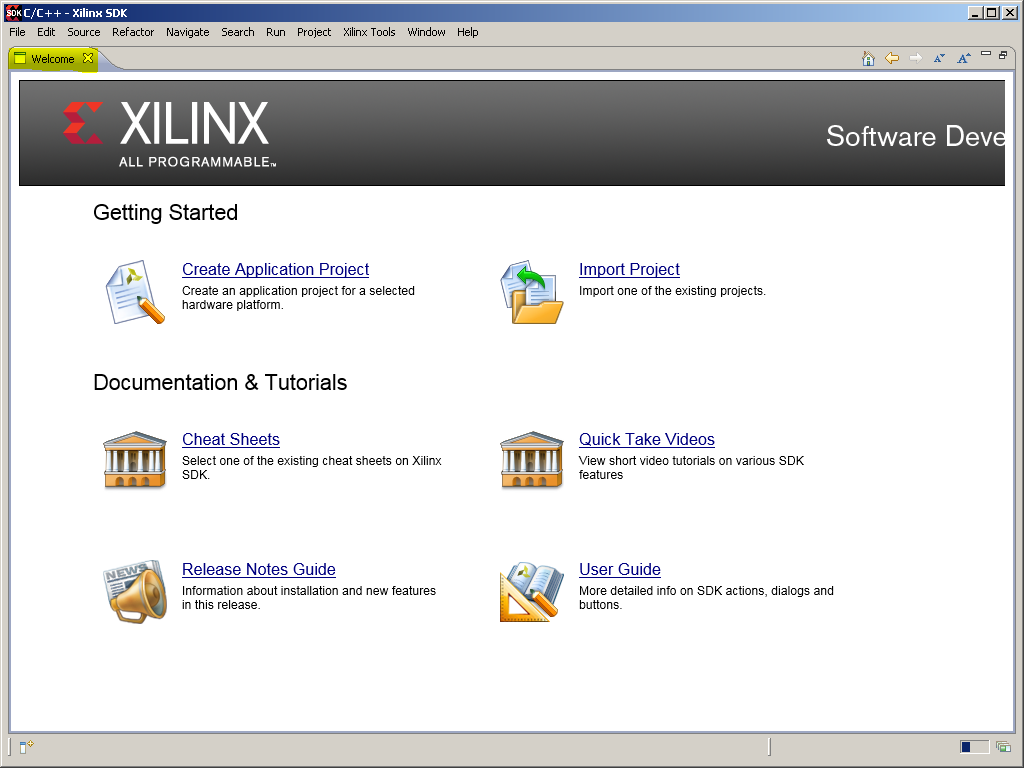
- Exit the “Welcome” tab that shows up by default.
Linux Host
Host PC
- The recommended development platform is a PC with minimum 2GB RAM and 30GB hard drive space, and with Linux CentOS 64-bit v6.5 installed.
- We have tested the application development environment with the above version of CentOS. Other versions of Linux may work as well but are not guaranteed.
CentOS
There are additional packages required to be installed after CentOS is installed on host PC. Type the following:
$ sudo yum install update

$ sudo yum groupinstall “Development Tools”

$ sudo yum install texi2html texinfo glibc-devel chrpath

$ sudo yum install glibc.i686 libgcc.i686 libstdc++.i686 glibc-devel.i686 ncurses-libs.i686 zlib.i686
Cross-Compiler
The current ARM target board is running on an XILINX® XC7Z015 SoC. The ARM Linux Cross-Compiler package is available on Xilinx’s website. Download the software as follows:
- Navigate to: https://www.xilinx.com/support/download.htmlhttps://www.xilinx.com/support/download/index.html/content/xilinx/en/downloadNav/vivado-design-tools.htmlhttps://www.xilinx.com/support/download/index.html/content/xilinx/en/downloadNav/vivado-design-tools.html
- Click on the “Embedded Development” tab.
- Click on “Archive” under “Version”.
- Select version “2017.2” under 2017. Under “Software Development Kit Standalone WebInstall Client”, download “SDK 2017.2 WebInstall for Linux 64”.
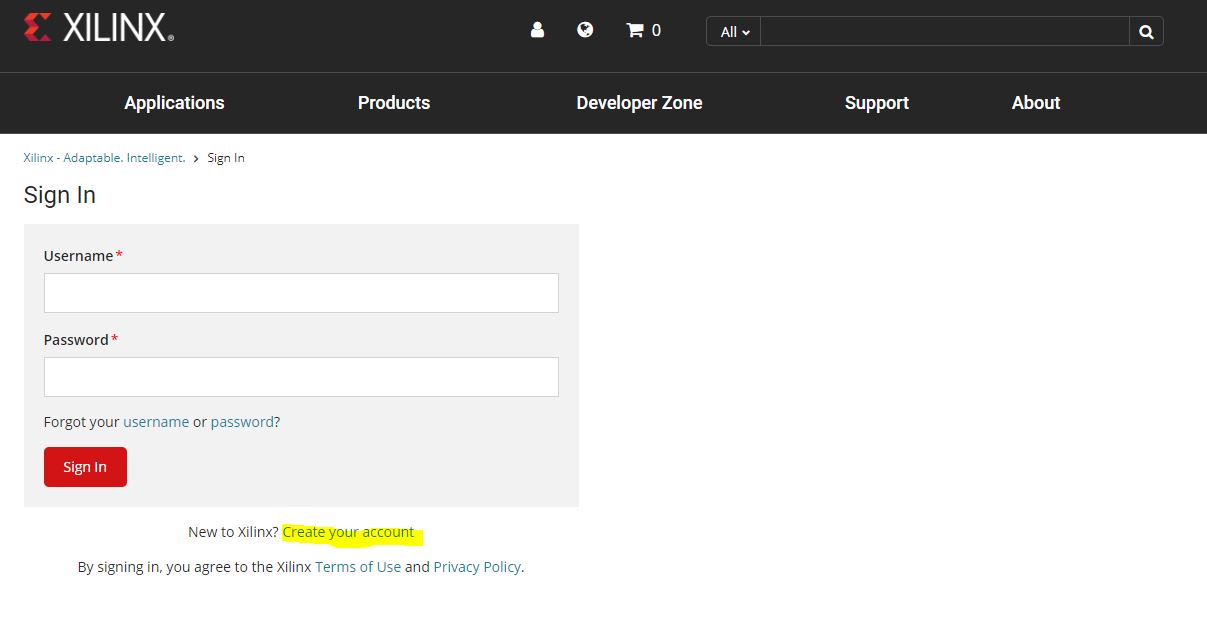
- You will be taken to a sign in page. If you have an account, sign in, otherwise click “Create your account.”
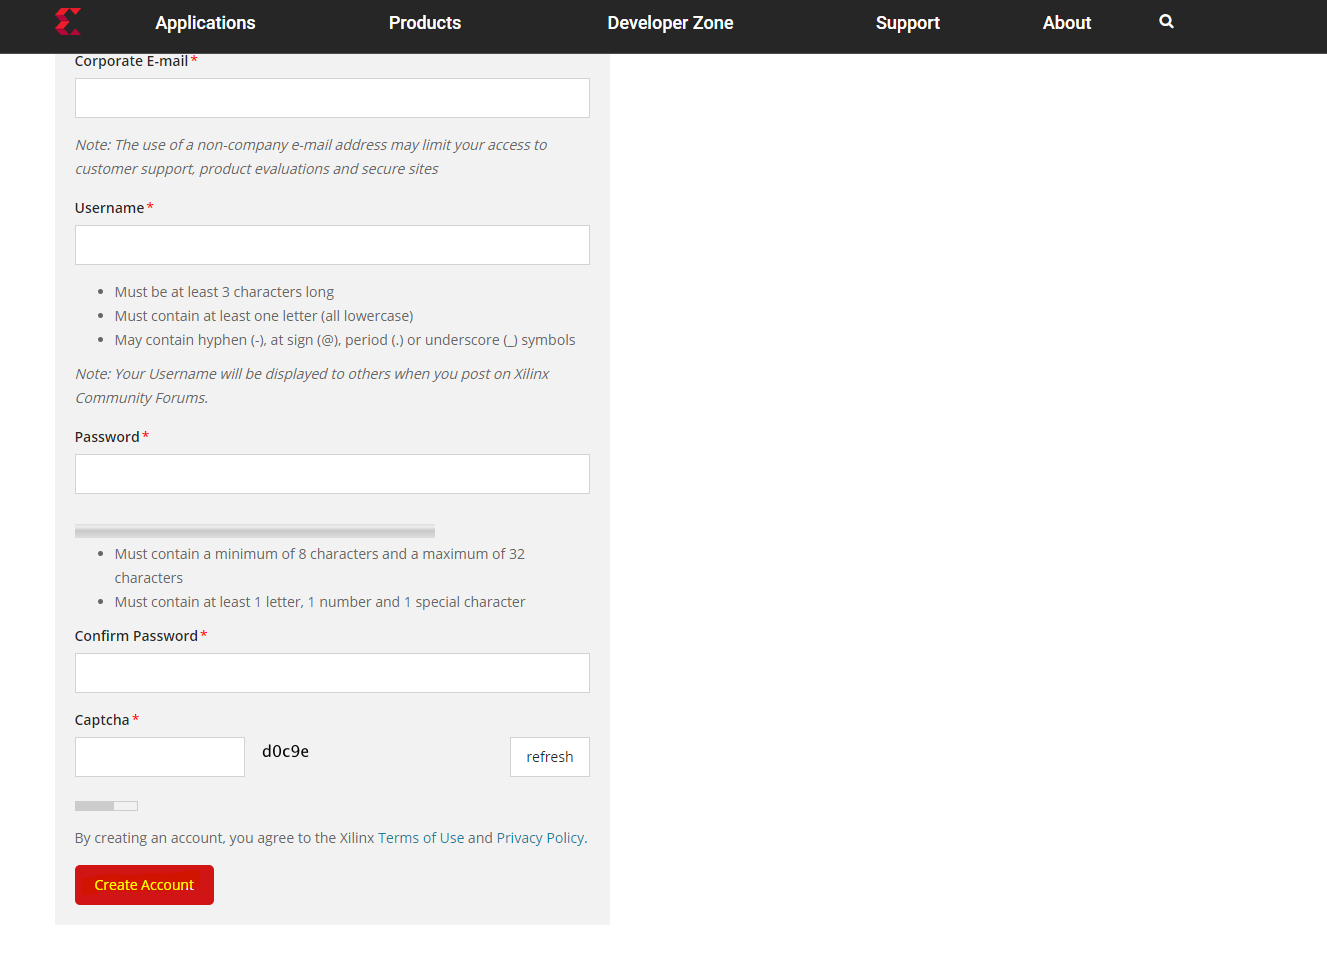
- Enter all required details and click “Create Account.”
- You will be e-mailed an activation message to your entered email address. Follow its instructions to activate your Xilinx account.
- Once your Xilinx account is created and activated, sign in. If necessary, go back to the Software Development download page and click “SDK 2017.2 WebInstall for Linux 64” once again.
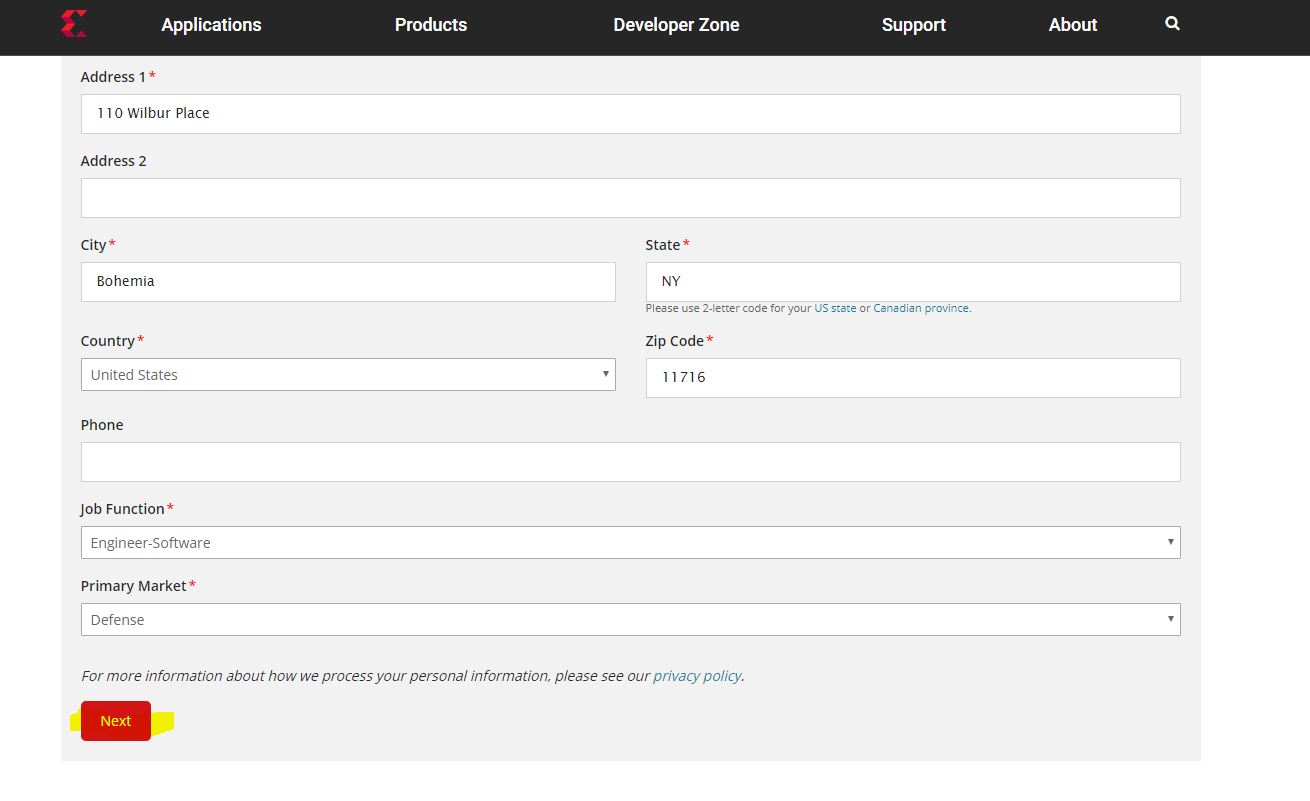
- On the “Download Center” page that comes up, fill out all of the required fields and then press “Next”. The file should begin downloading.
- Based upon the Firefox revision used, security errors may be encountered. If an error occurs, update the Firefox version installed by entering the following in the terminal, restarting the host PC, and retrying to install the SDK.
# sudo yum update firefox
- Go to the location the SDK file is downloaded to. Use the terminal as follows to allow the file to be executed, or right click the file, go to properties, then permissions, and check the “Allow executing file as program” box.
# cd <Directory of downloaded SDK file>

# chmod 777_ Xilinx_SDK_2017.2_0616_1_Lin64.bin
- Run Xilinx_SDK_2017.2_0616_1_Lin64.bin from the location it is downloaded to.
# ./Xilinx_SDK_2017.2_0616_1_Lin64.bin
Note
The Vivado 2017.2 Installation menu may prompt you to install a newer version of Vivado SDK. DO NOT upgrade to the newer version of the SDK.
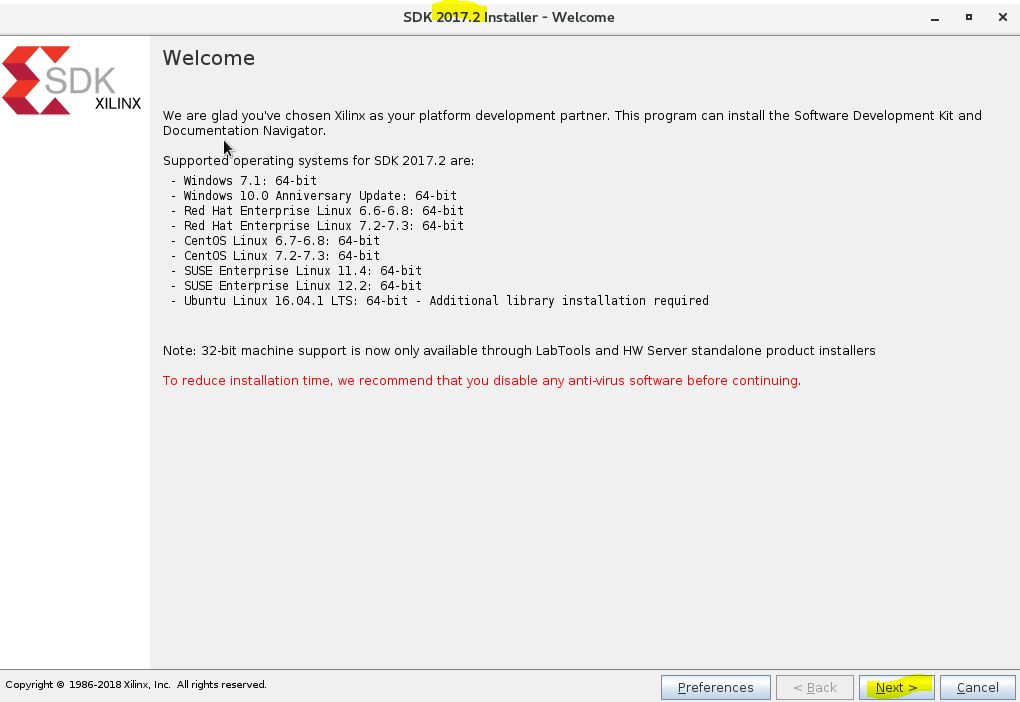
- Click on “Next.”
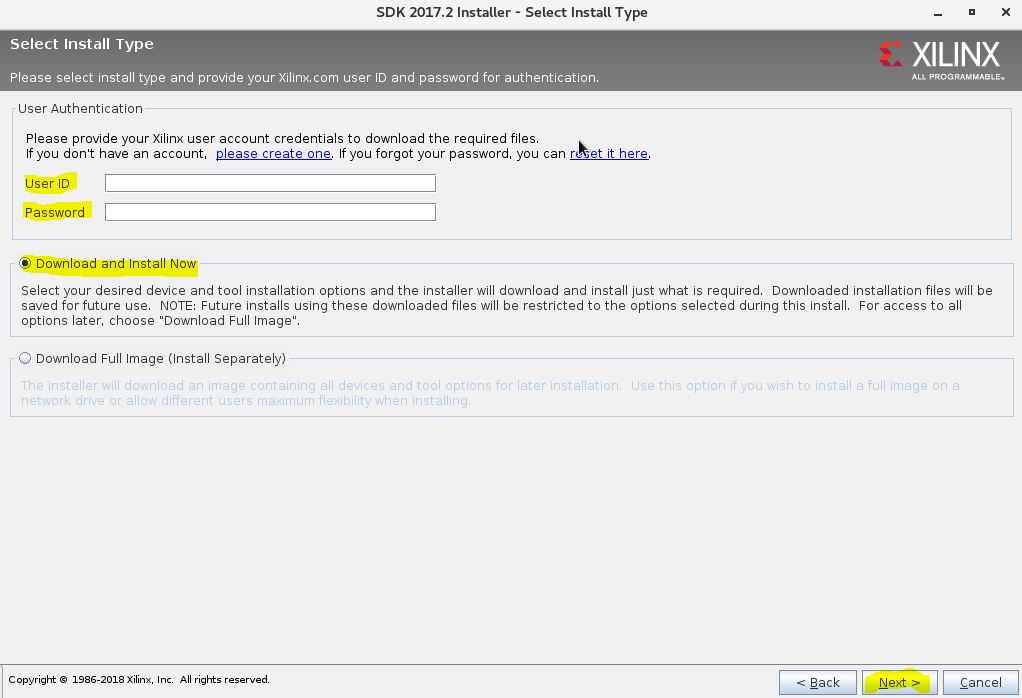
- Enter your credentials to login and click Next.
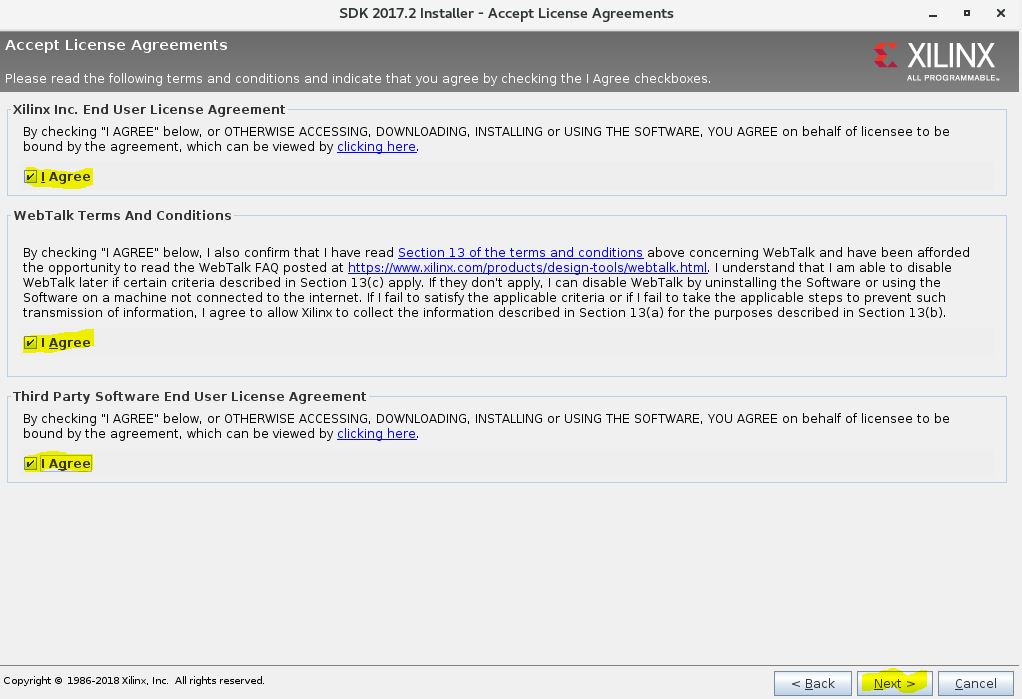
- Check all of the “I Agree” boxes and click Next.
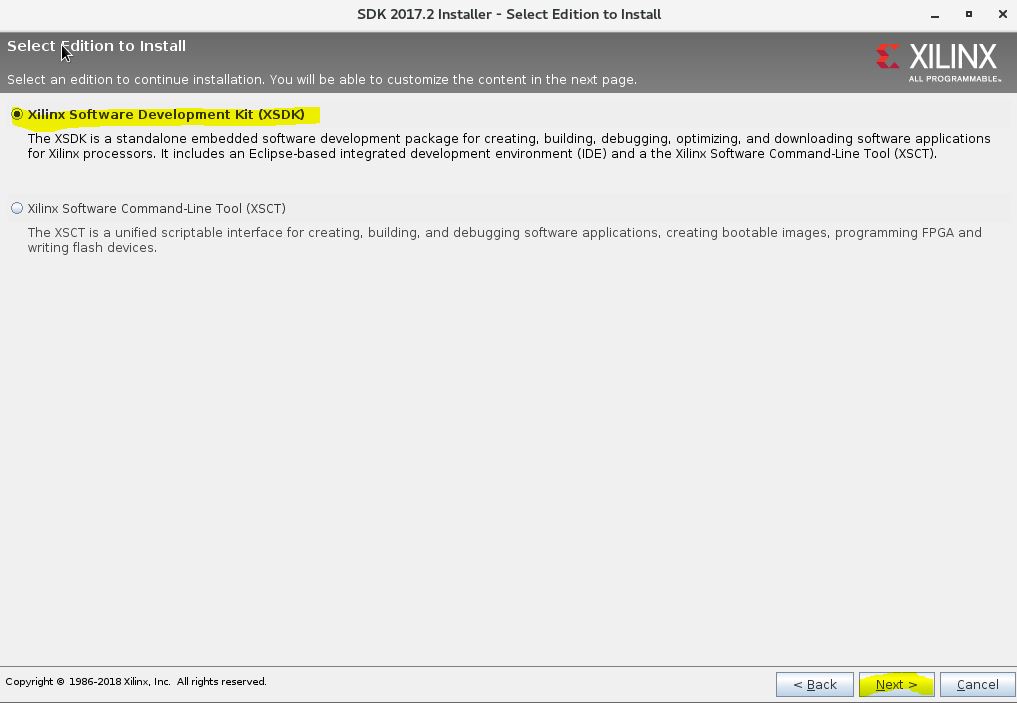
- Select “Xilinx Software Development Kit (XSDK)”.
Note
You don’t need to purchase a license for the Software Development Kit (Standalone).
- Leave the defaults checked and click Next. DocNav can be unchecked if not needed or disk space needs to be conserved.

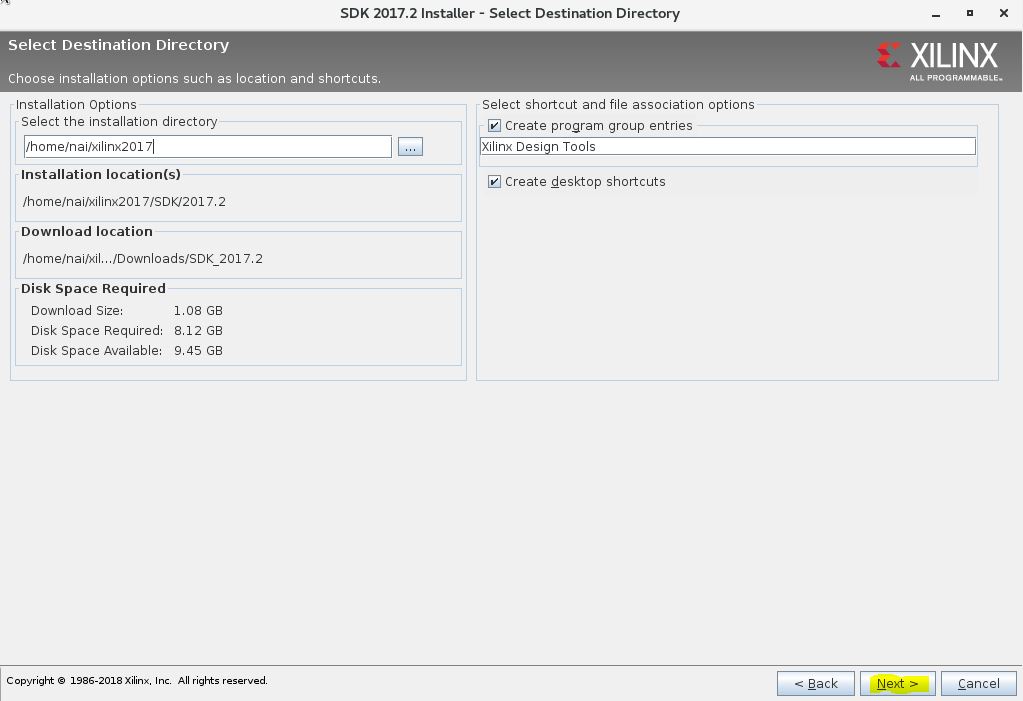
- Choose your desired installation directory and click Next.
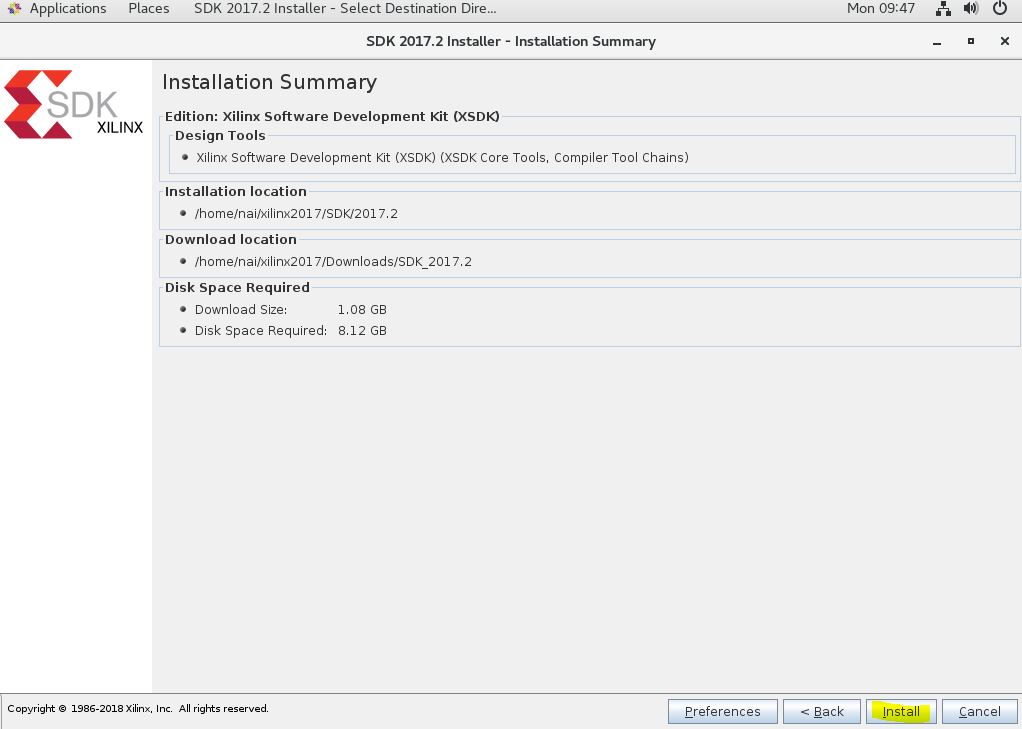
- Make sure all options chosen are correct and click Install.
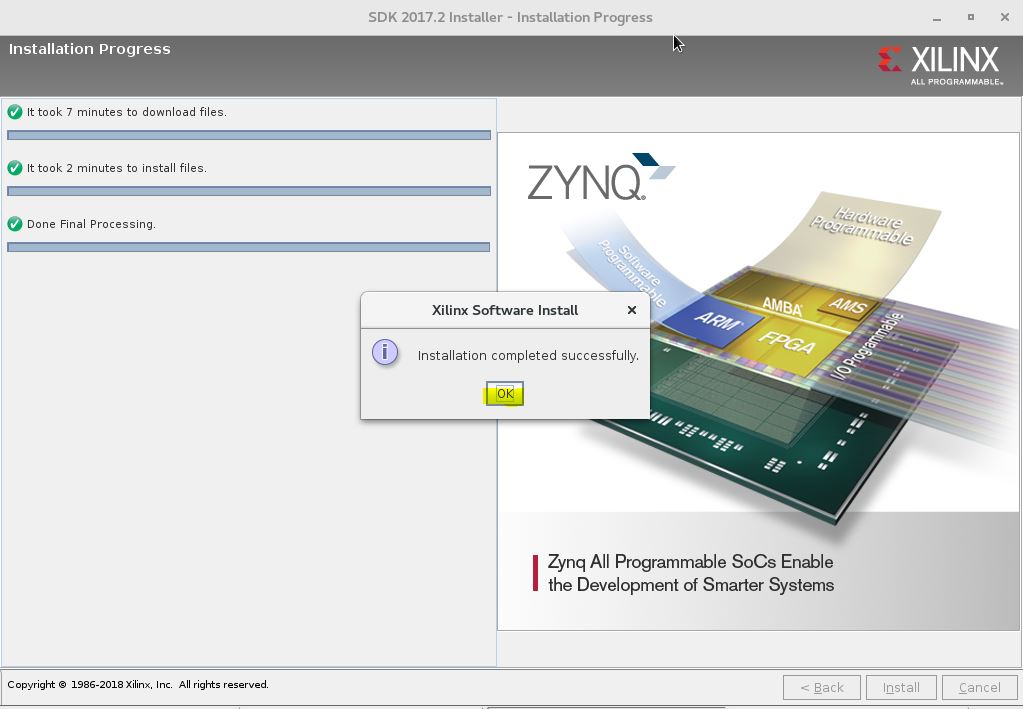
- Once the installation is complete, click “OK.”
Building and Running a Project
Building the “Hello World” Application
Create simple HelloWorld.c file on the Host PC as follows:
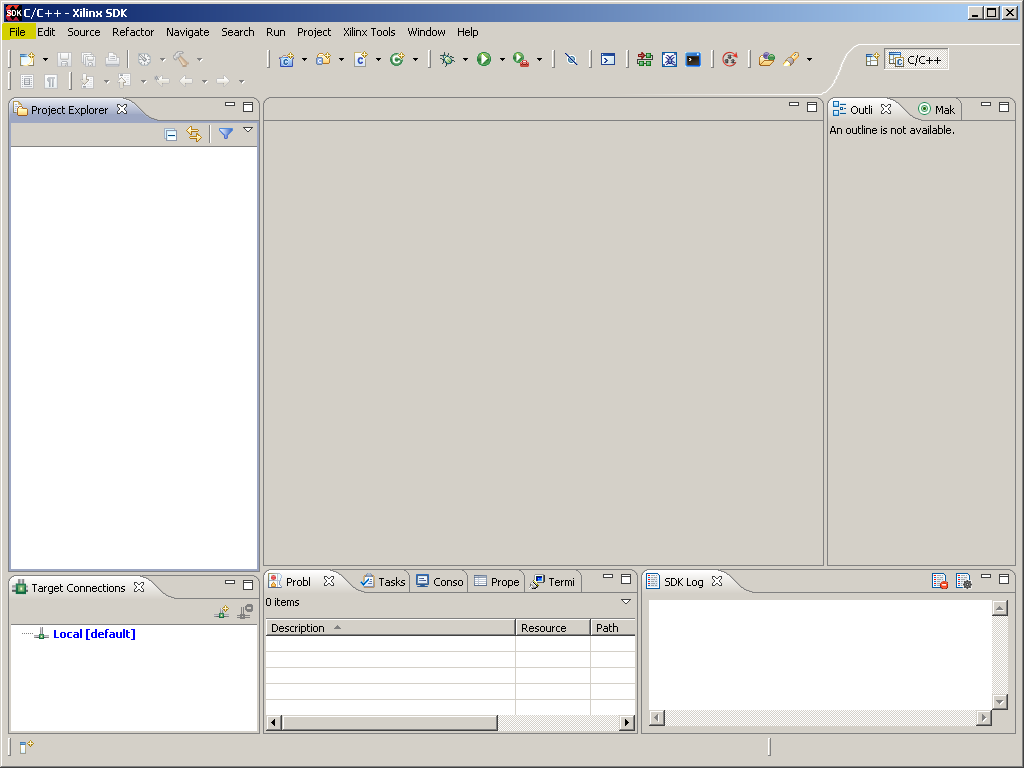
- Navigate to File→New→Project→C/C++.
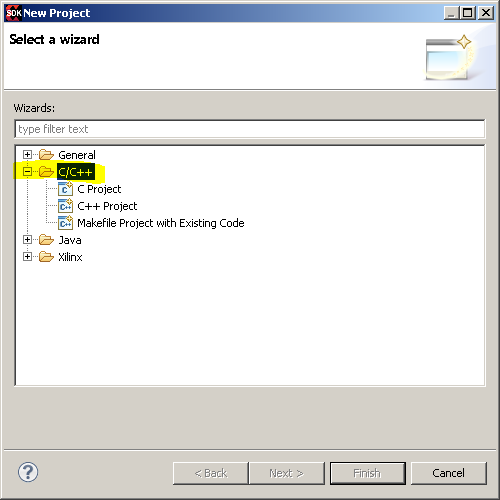
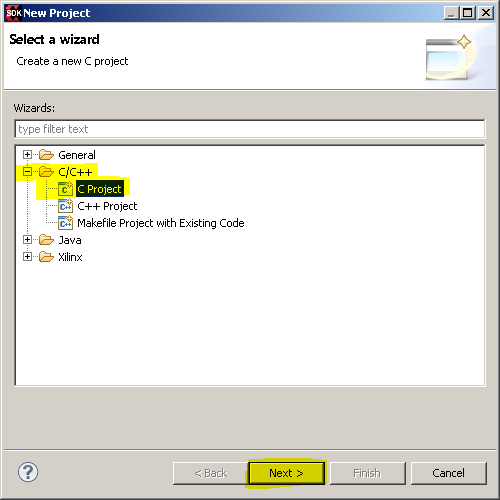
- Select “C Project” and click “Next >”.
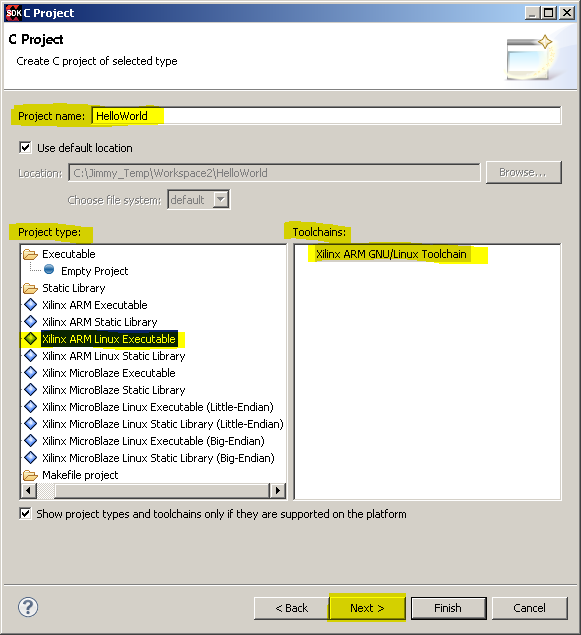
- Select “Xilinx ARM Linux Executable” under “Project type:” and make sure “Xilinx ARM GNU/Linux Toolchain” is selected under “Toolchains:”. Also, set “Project name:” to “HelloWorld”. Then, click “Next >”.
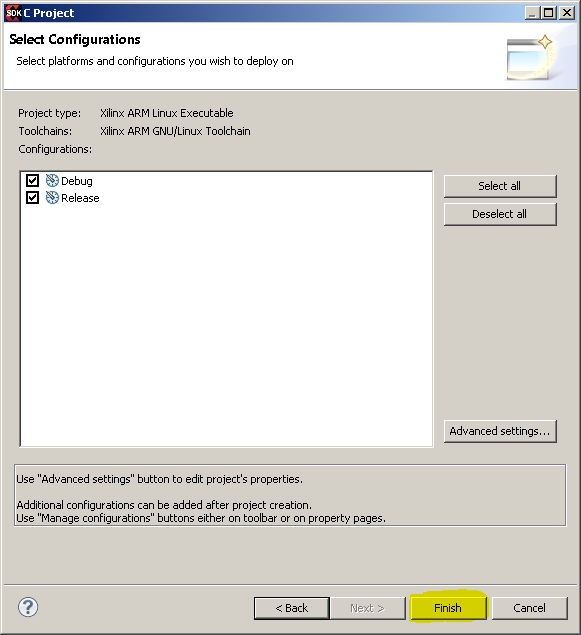
- You will be asked to select project configurations. Selecting Debug means debugging and symbolic information is included. Selecting Release means the compiler will optimize the executable and strip it of debugging information. By default, both Debug and Release configurations are selected. You can leave the defaults and select
.
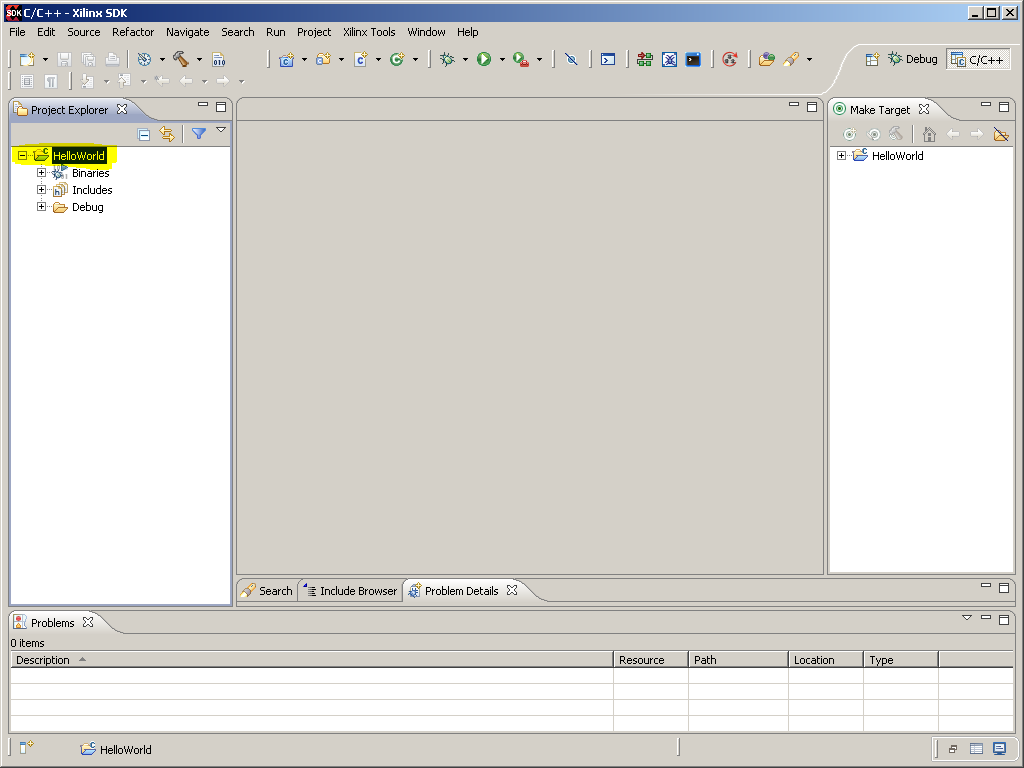
- Add the HelloWorld src file by right clicking on the HelloWorld project in the project explorer and then selecting New→File. This will cause the “New File” window to come up.
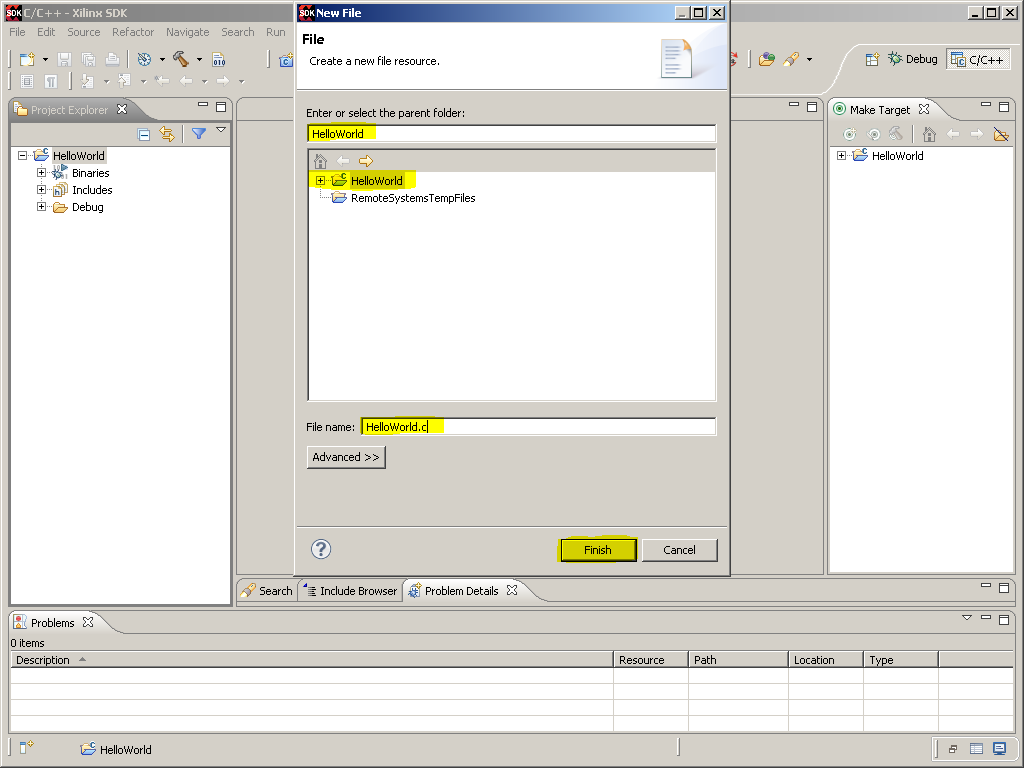
- Make sure that HelloWorld is selected as the parent folder. Then, enter HelloWorld.c as the File Name and click the “Finish” button.
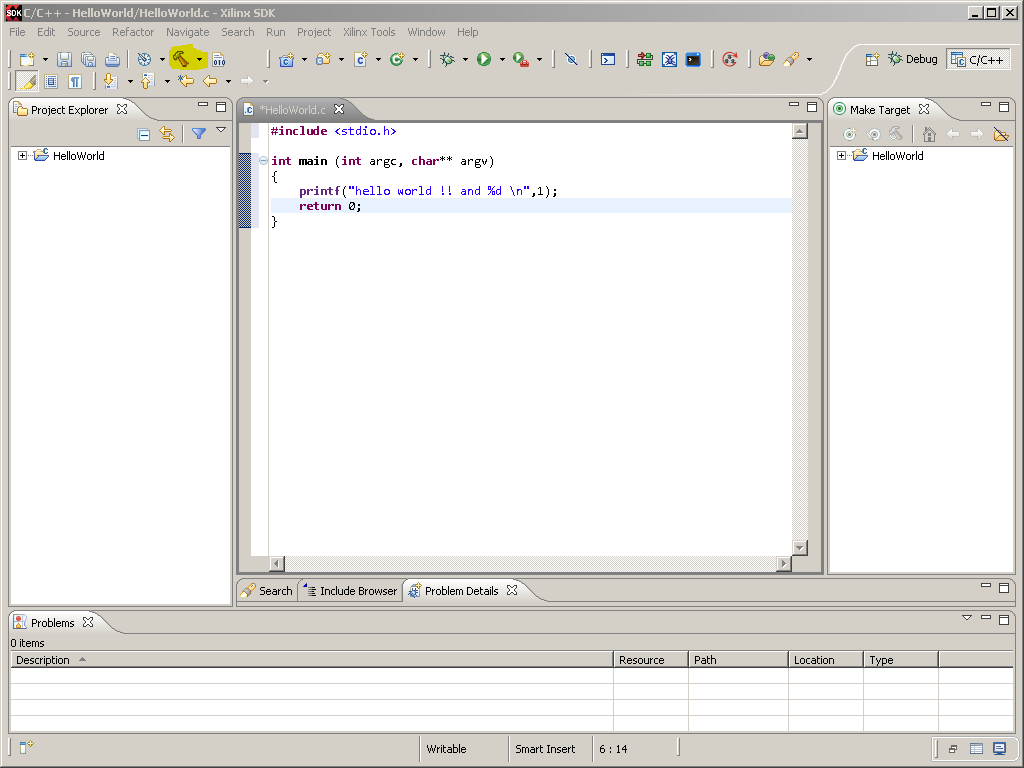
- Type some code to execute in the HelloWorld.c file. Then, save the project and build it by clicking the hammer icon.
Running “Hello World” on the Target Board
An executable .elf file may be run from the board using either a Serial Console (Tera Term) or the Xilinx SDK.
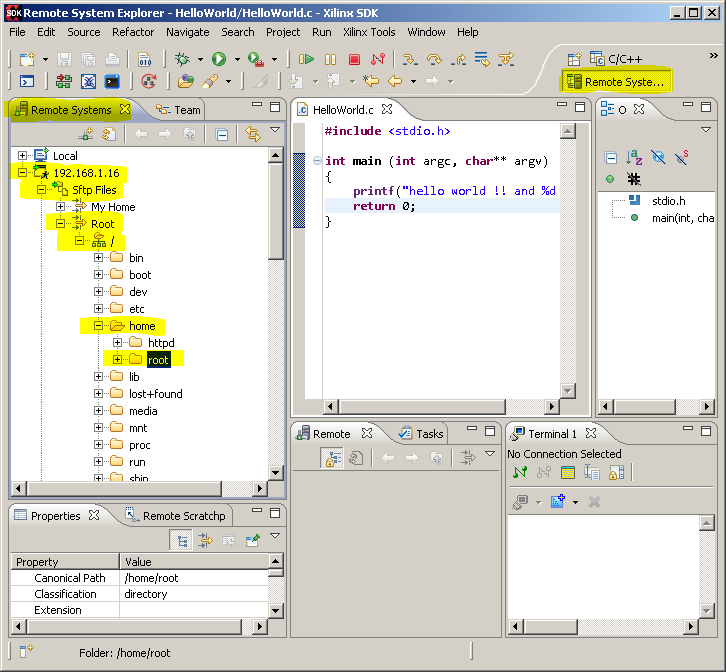
- Copy the HelloWorld.elf executable file from your PC to the /home/root directory of the target board.
.. In the Xilinx SDK, in the “Remote Systems” tab in the “Remote System Explorer” perspective, right-click “root” (
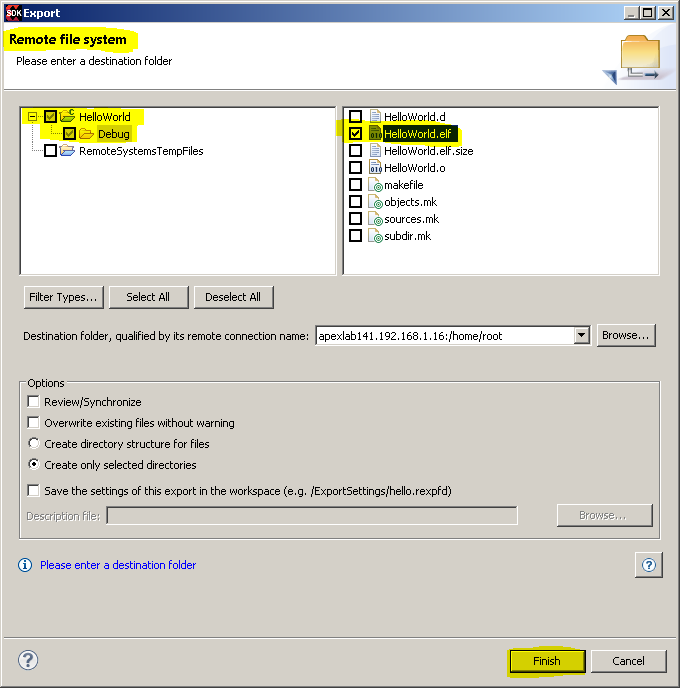
- In the “Remote file system” window, in the left box, navigate to and select HelloWorld/Debug (but do not check either the “HelloWorld” or “Debug” folders, as this will copy over the entire folder). In the box on the right, select and check the check box next to “HelloWorld.elf”. Then, click “Finish”.
- Run HelloWorld.elf using either the Serial Console or the Xilinx SDK.
Running “Hello World” Via the Serial Console (Tera Term used in this example)
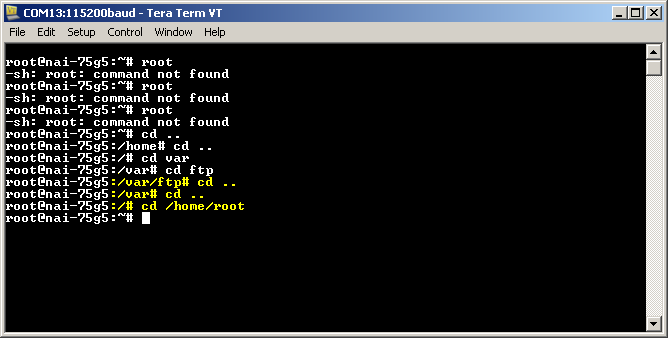
- Navigate to the /home/root directory of the target board using the serial console (Tera Term).
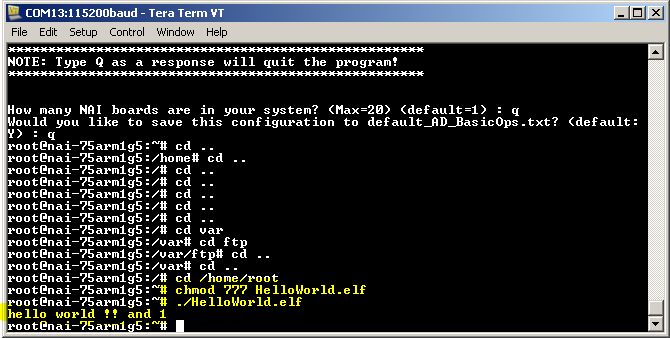
- While in this directory, type chmod 777 HelloWorld.elf to change the permission mode of HelloWorld.elf to executable.
- Stay in the /home/root directory and type ./HelloWorld.elf to run the program via the serial console.
Running “Hello World” via the Xilinx SDK
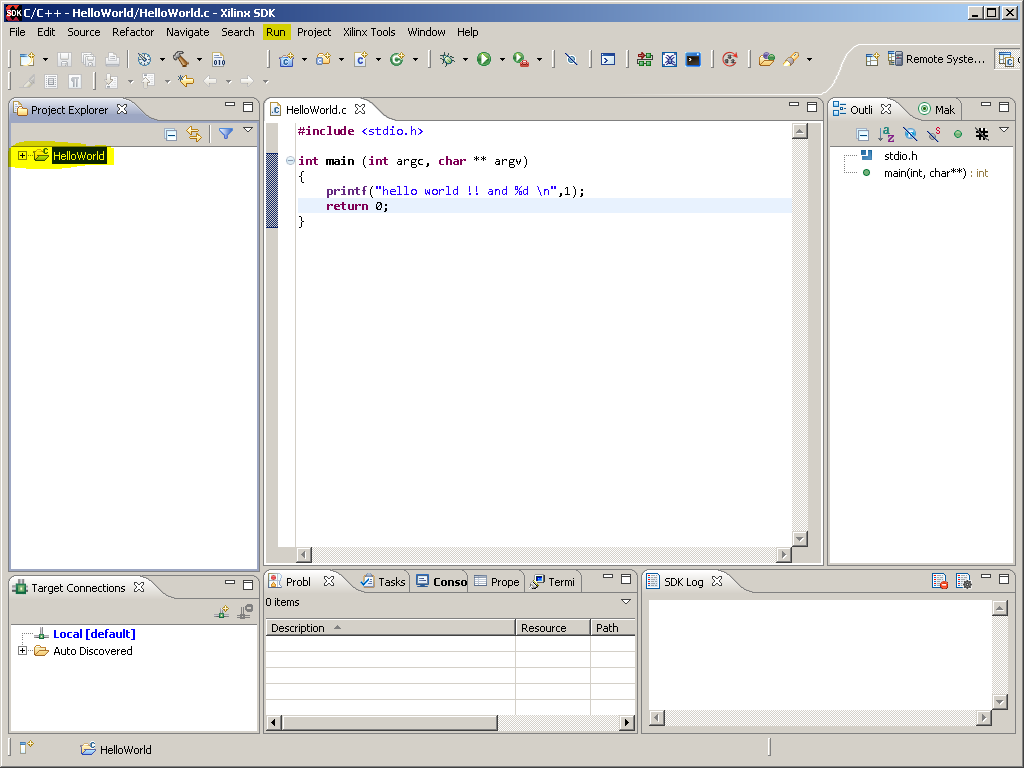
- In the Xilinx SDK, with “HelloWorld” selected in the Project Explorer, go to Run→Run Configurations…
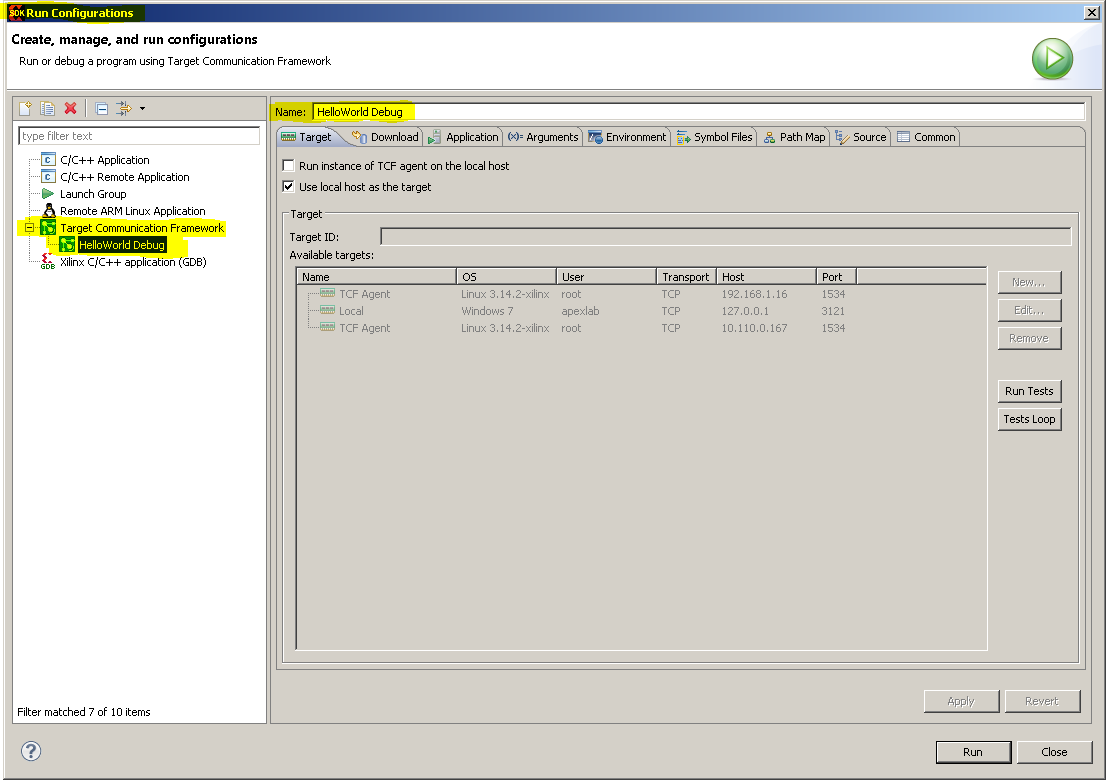
- In the “Run Configurations” window, double-click “Target Communication Framework”. This will create a new TCF run configuration for the HelloWorld project, called “HelloWorld Debug” by default.
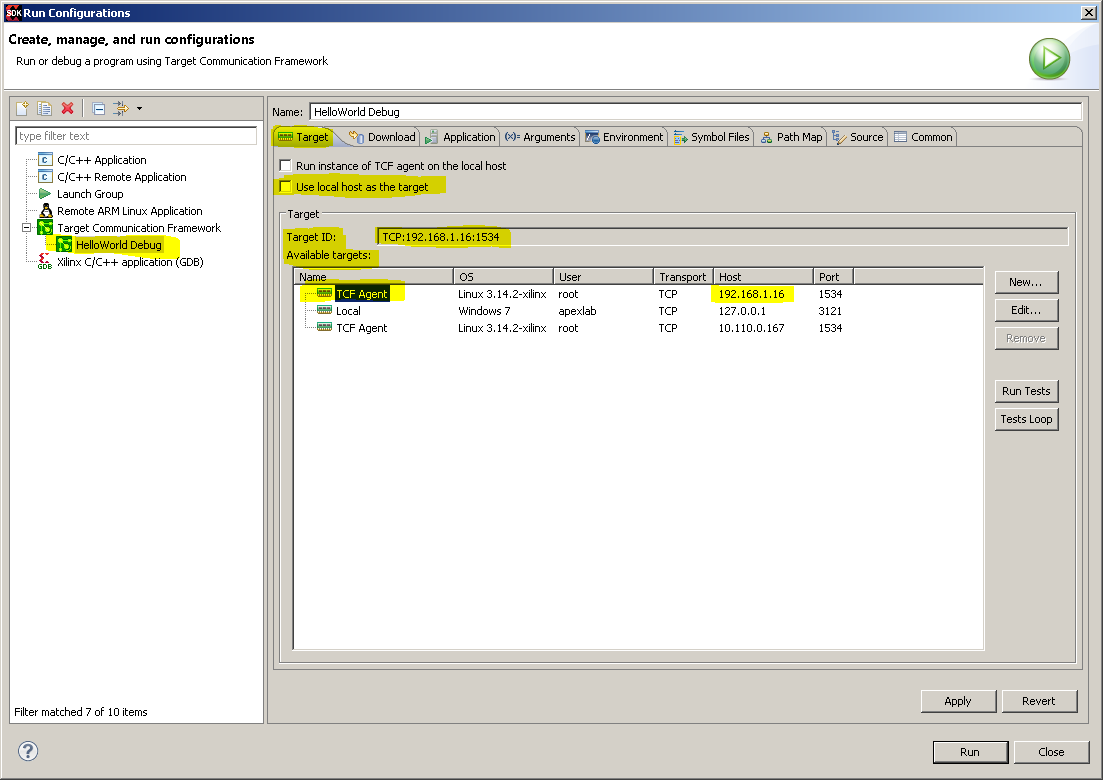
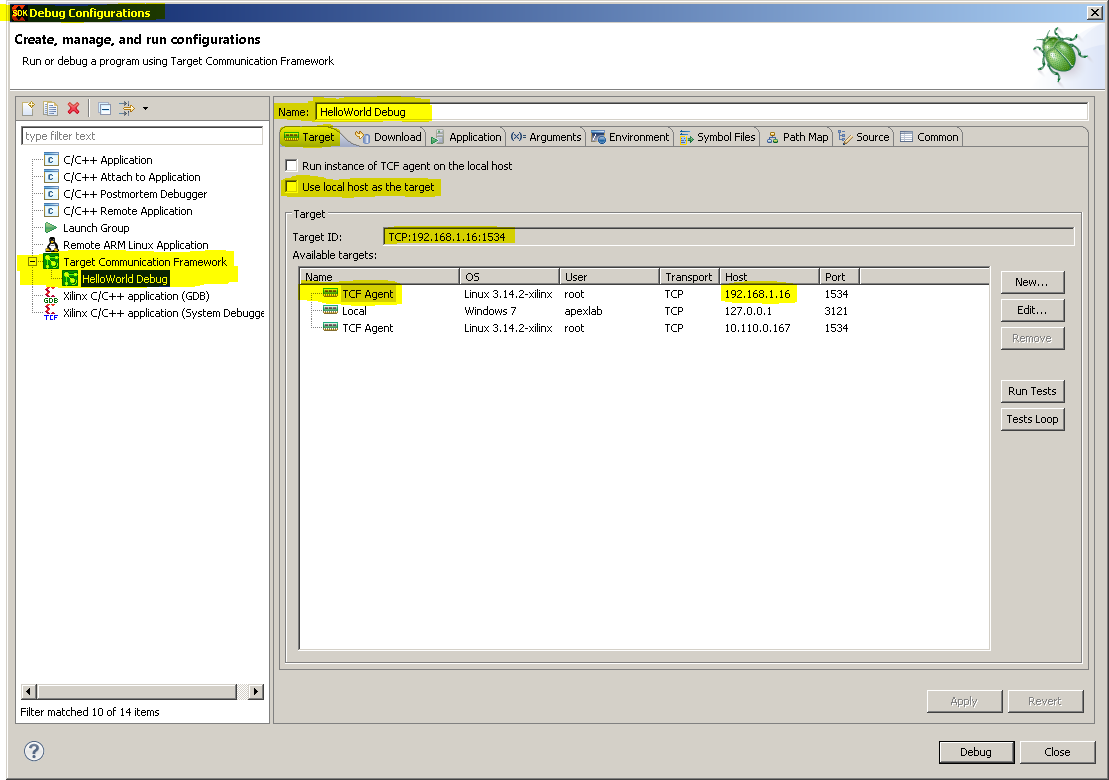
- With the “HelloWorld Debug” configuration selected, under the “Target” tab, uncheck the check box labelled “Use local host as the target”. Then, in the “Available Targets:” list view, select the row saying “TCF Agent” in the “Name” column and lists the target board’s IP Address in the “Host” column. Then, verify that it says “TCP:
: ” in the “Target ID:” text box. In this case, the IP Address is 192.168.1.16, and the port is 1534.
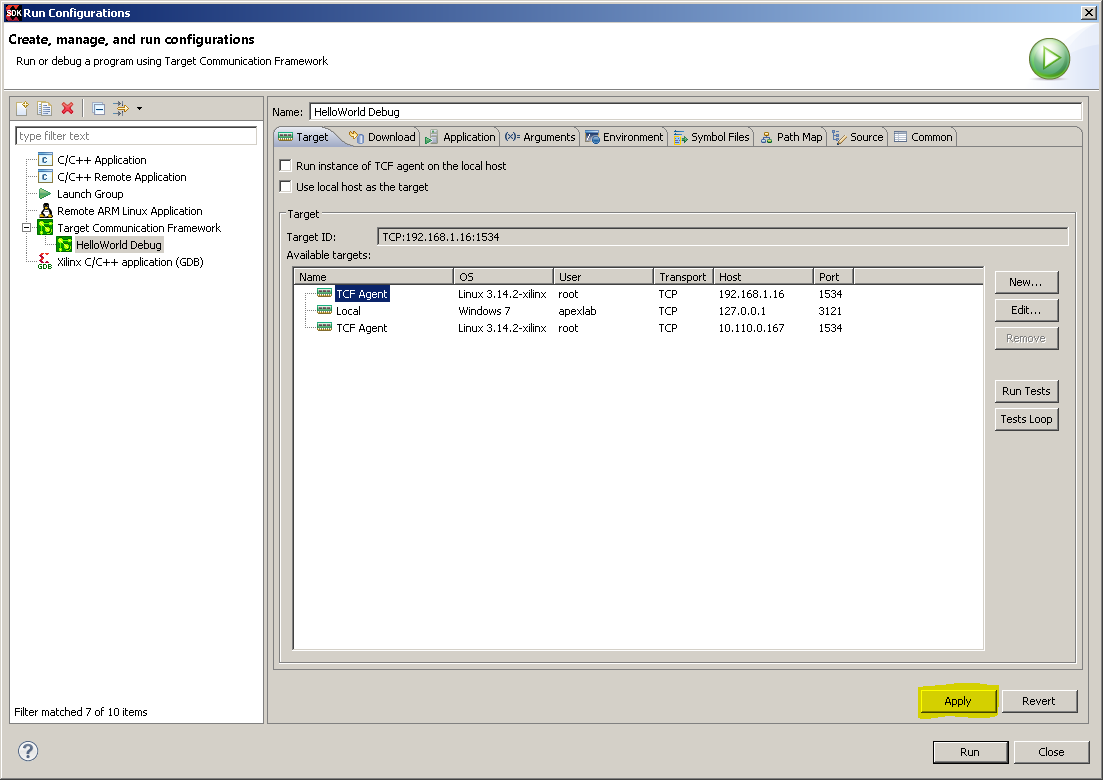
- Click the “Apply” button.
- Navigate to the “Application” tab.
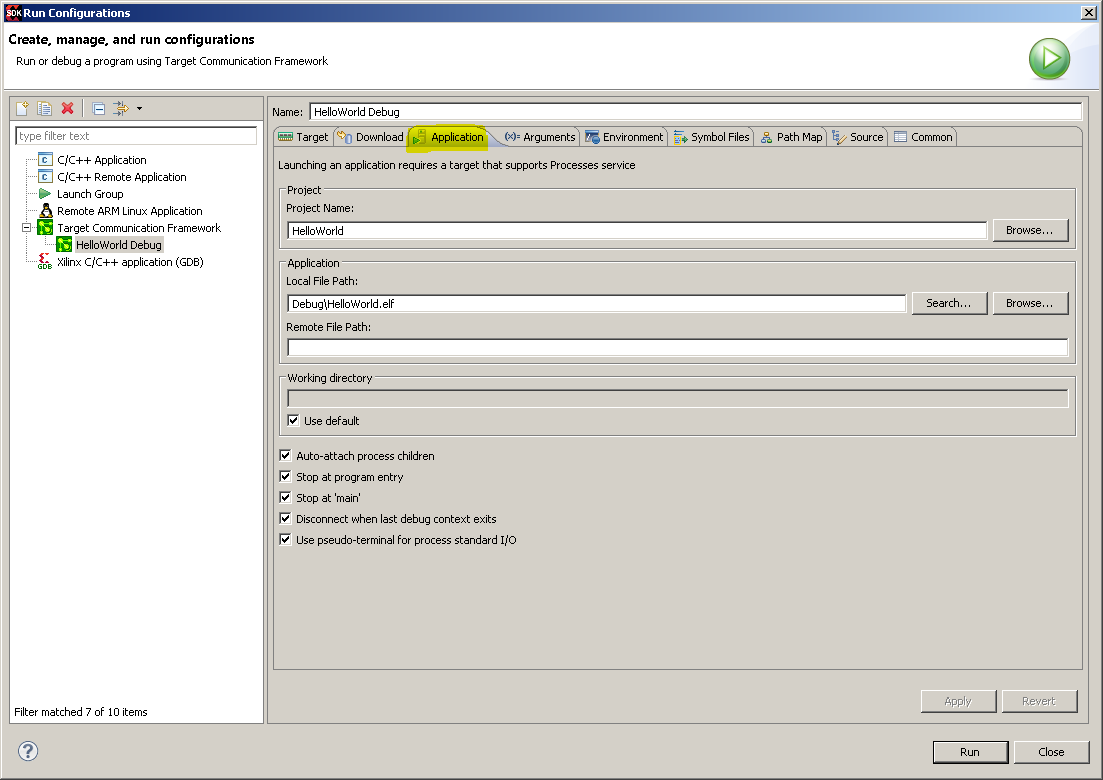
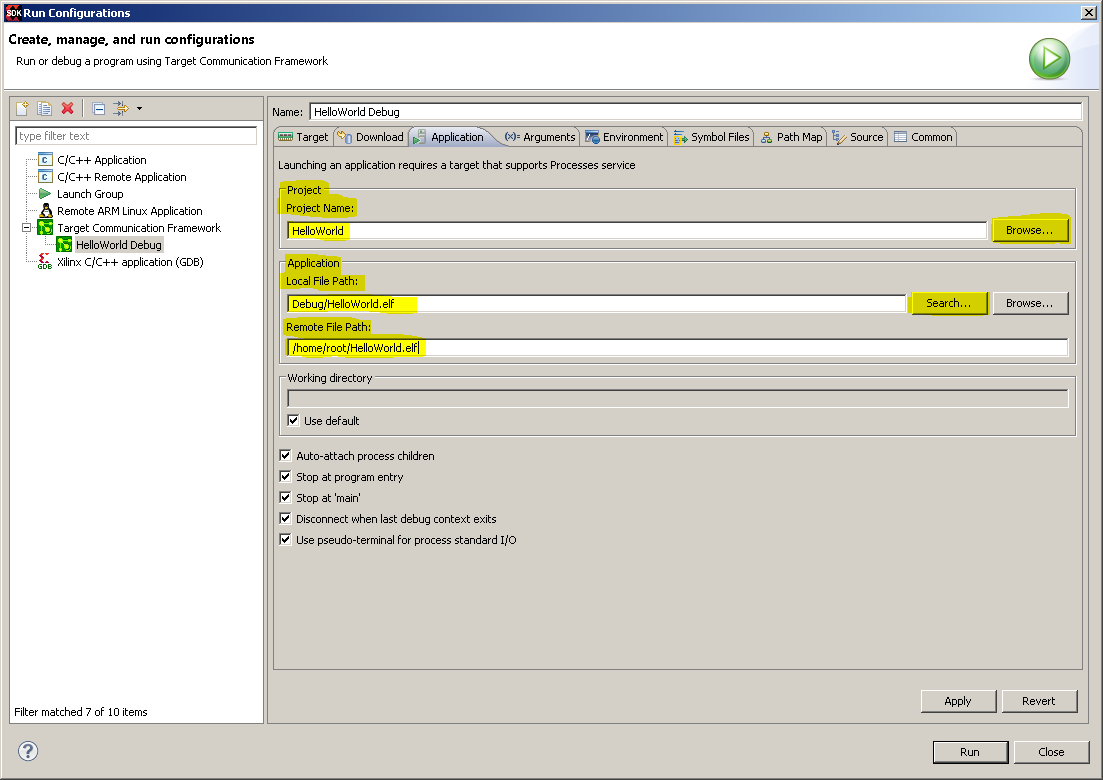
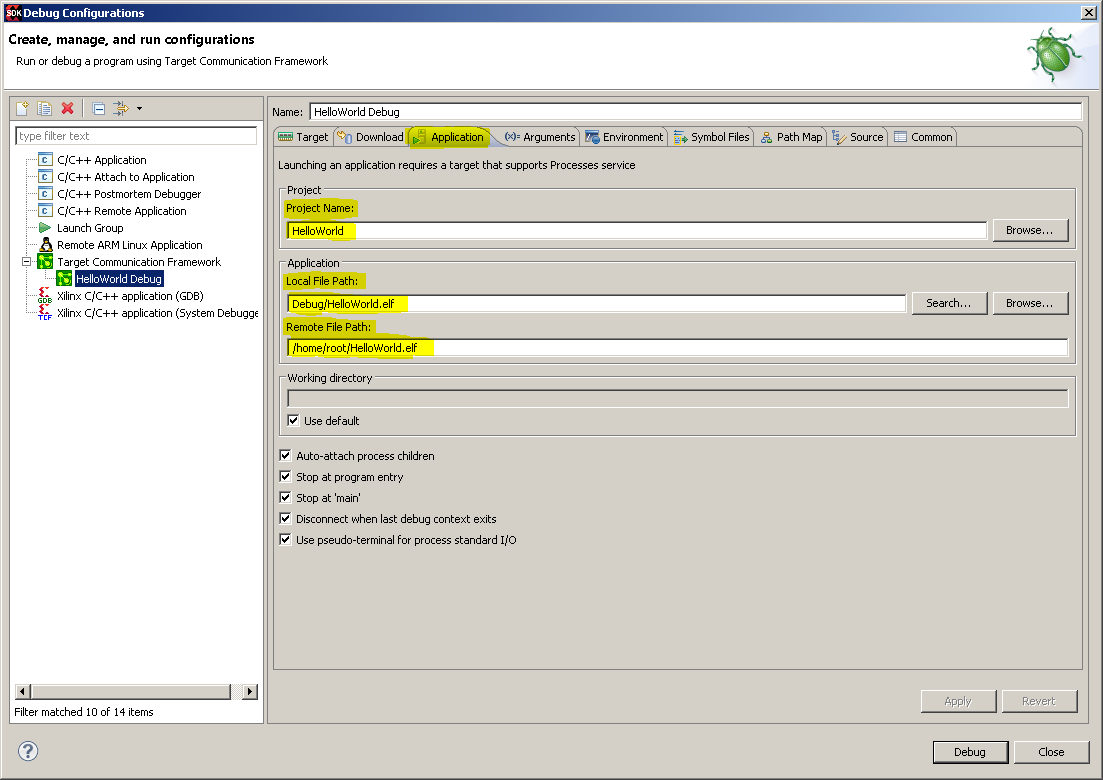
- Fill in the text boxes highlighted in the picture. For the “Project Name:” text box, you can click the “Browse…” button and select “HelloWorld” from the list of projects. Then, in the “Application” group box, next to the “Local File Path:” text box, you can click the “Search…” button and select “HelloWorld.elf” from the pop up menu. Then, type “/home/root/HelloWorld.elf” into the “Remote File Path:” field.
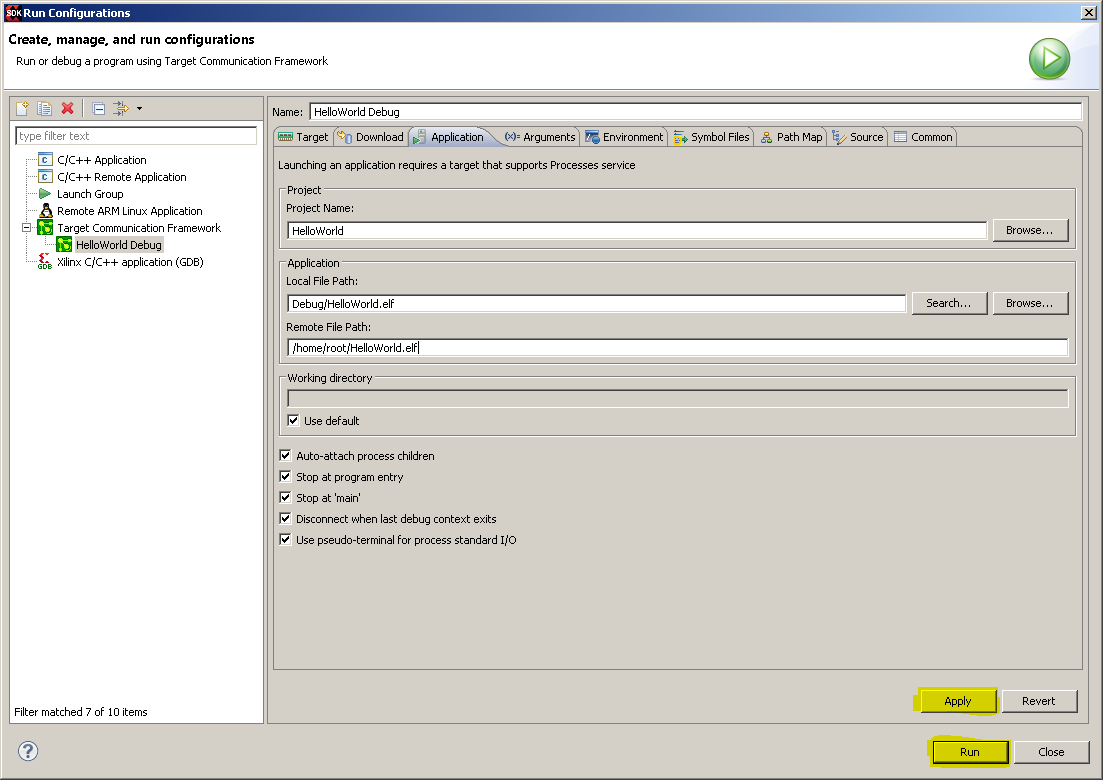
- Click “Apply” to save all the changes you just made, and then click “Run” to run “HelloWorld” using the “HelloWorld Debug” run configuration.
Debugging “Hello World” via the Xilinx SDK
The process of Debugging a program via the Xilinx SDK is very similar to the process of Running a program via the Xilinx SDK.
- If it has not been done already, copy the HelloWorld.elf executable file from your PC to the /home/root directory of the target board. This can be done via the Xilinx SDK. See step 1 of Running “Hello World” on the Target Board for more details.
- If you have not done so already, create a run configuration for the HelloWorld project (see Running “Hello World” via the Xilinx SDK).
Note
The run configuration you just made for the HelloWorld project can also be used as a debug configuration.
- Navigate to Run→Debug Configurations…
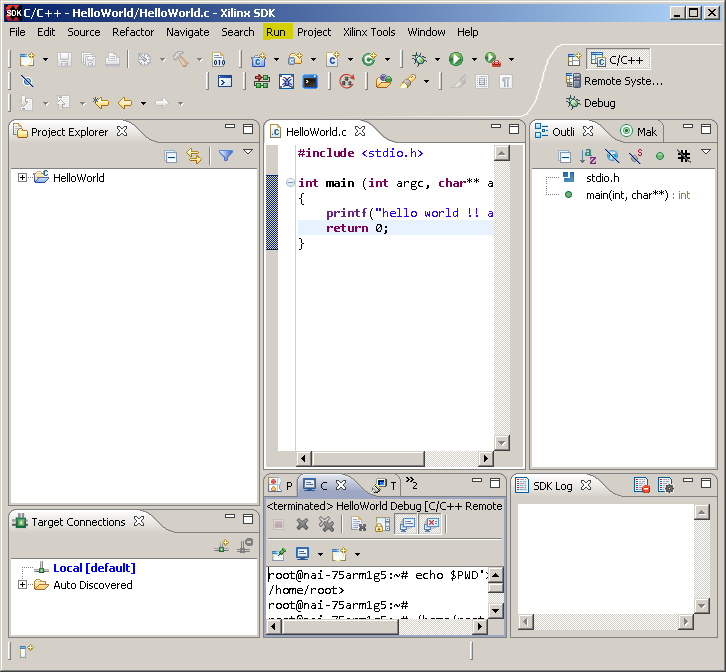
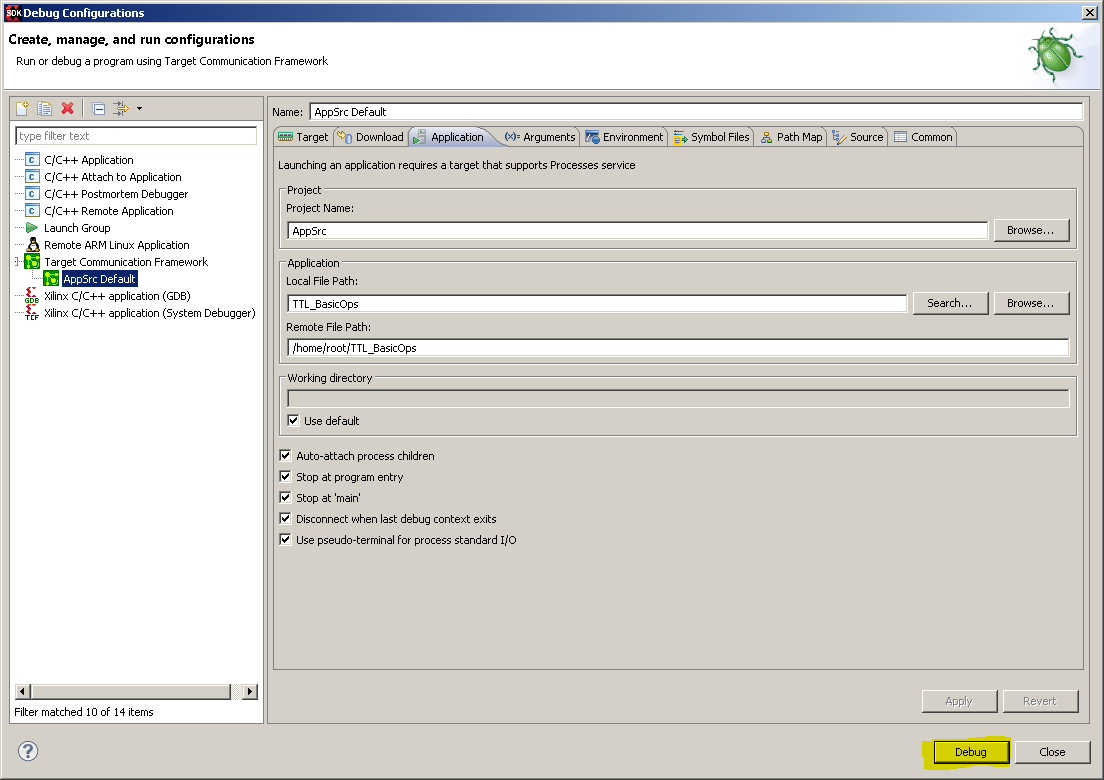
- In the “Debug Configurations” window, under “Target Communication Framework”, select “HelloWorld Debug” (the run configuration we created). The configuration properties you set up in Running “Hello World” via the Xilinx SDK should still be there.
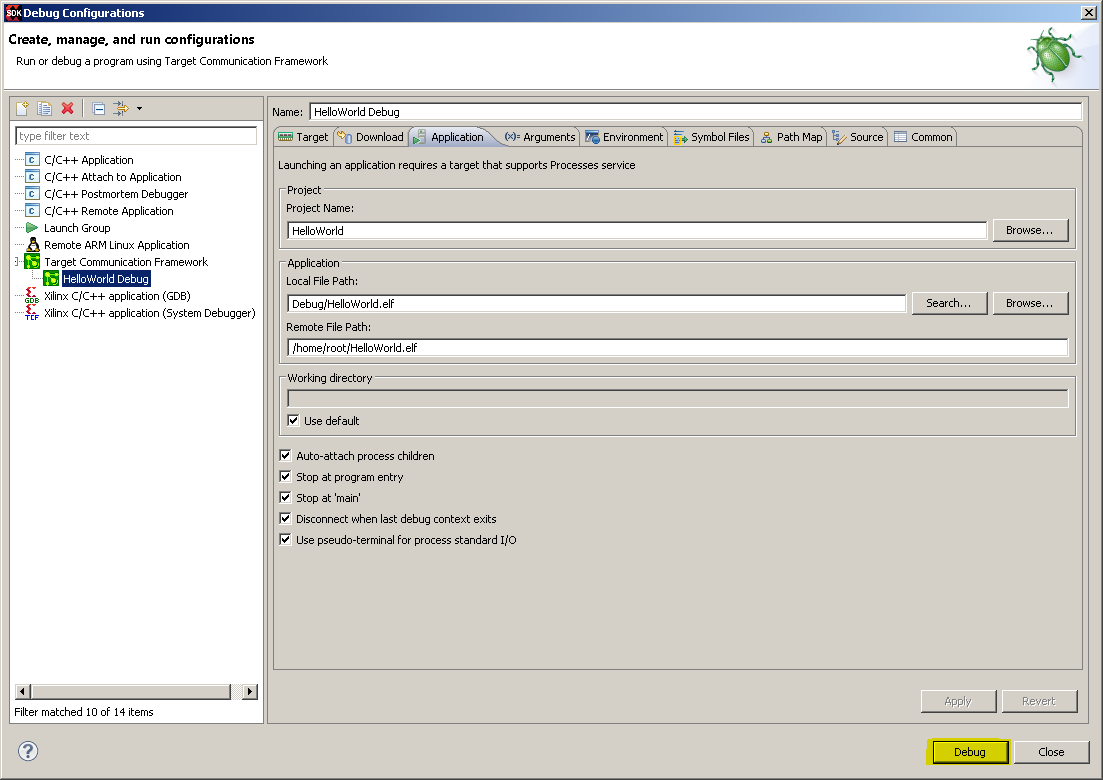
- Click “Debug” to start debugging the HelloWorld project.
Building naibrd_SSK_Linux_ARM_Rev1.63 Library
NAI provides a pre-built library and source code. You can also rebuild the library on your Host PC.
Note
Cross-Compiler and PATH must be configured on Host PC. Refer to Step 18 of the Cross-Compiler subsection of Environment Setup for details.
Note
The latest version of Linux Library for ARM Processor SSK can be found at: http://www.naii.com/Downloads.
- Copy NAI SSK Library and Sample Application package to Host PC.
- Build NAI SSK Library on Host PC to generate a (libnaibrd.so) file as follows:
.. Import
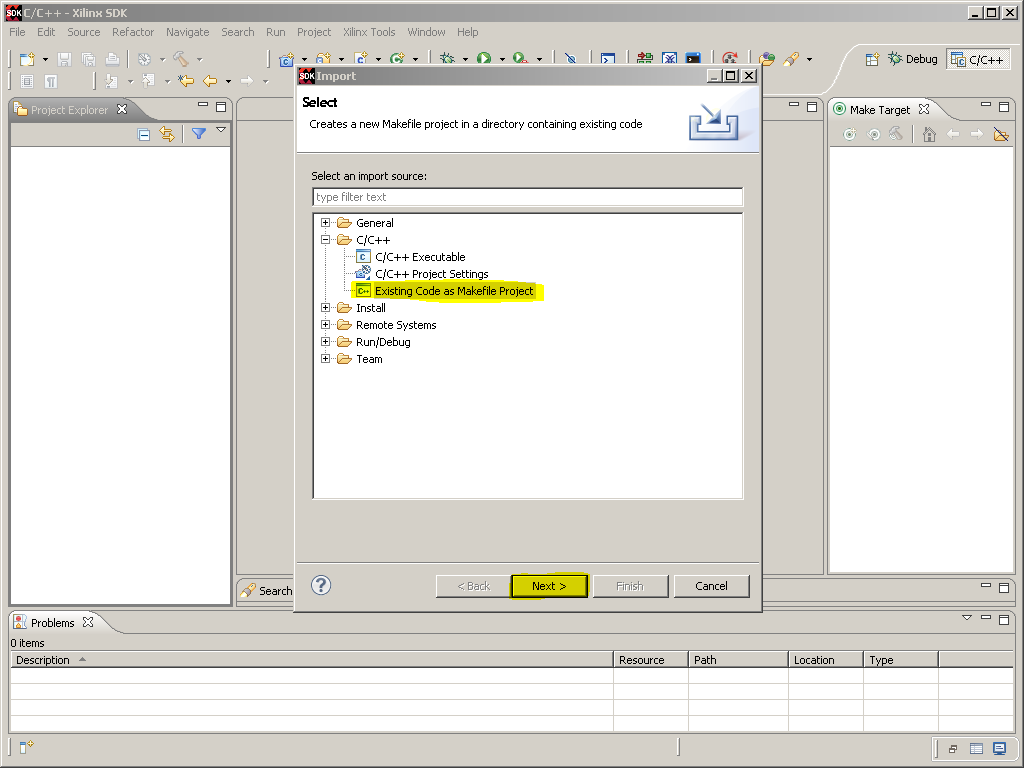
- Click File→Import…
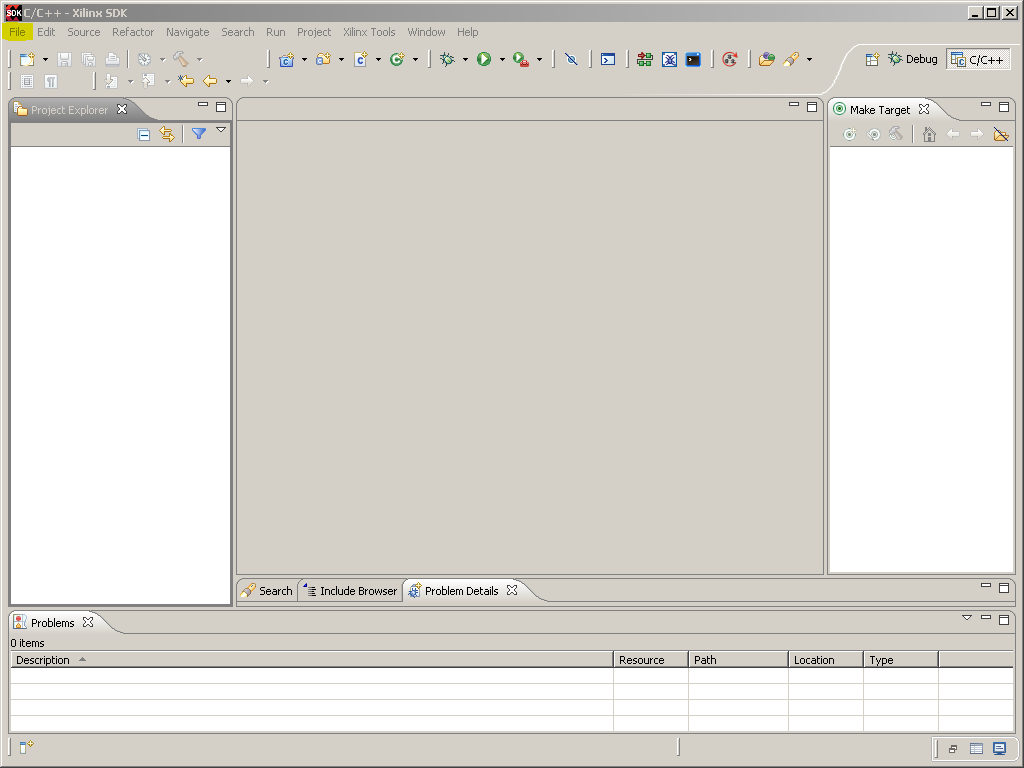
- On the Import pop-up page, select the option “Existing Code as Makefile Project” under “C/C++” and then click the “Next >” button.
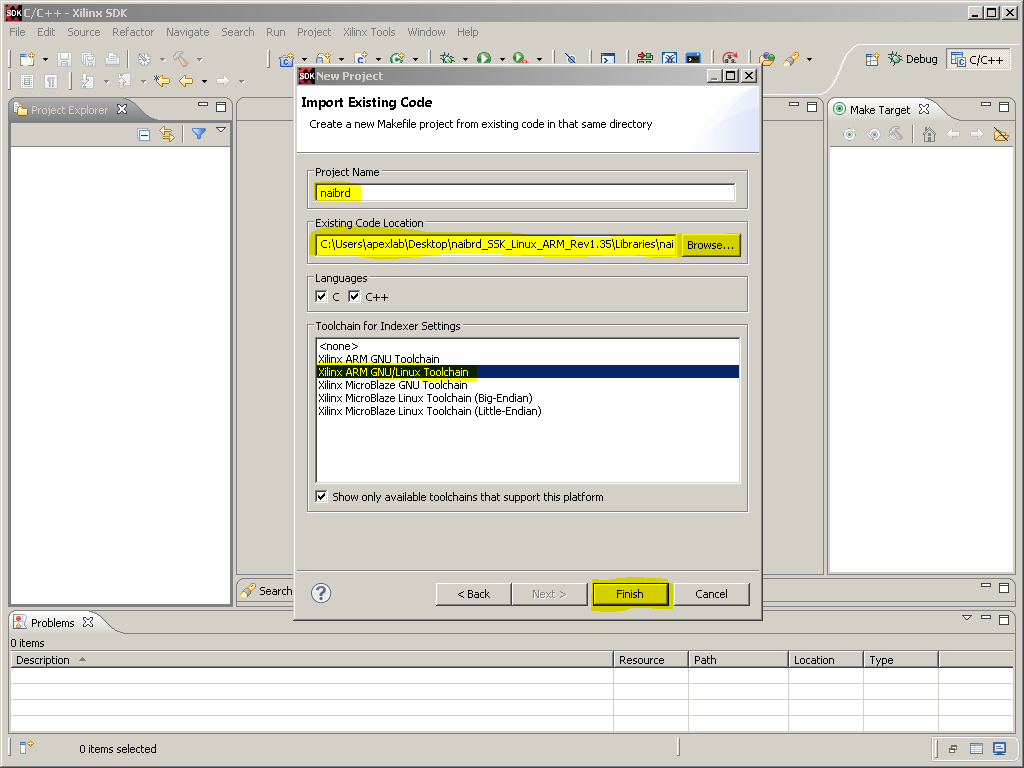
- Click “Browse…” and navigate to
\Libraries\naibrd. Once you navigate to this folder and click OK, the text box labelled “Project Name” will fill itself out with the name of the naibrd folder (which is “naibrd”). - Select “Xilinx ARM GNU/Linux Toolchain” under “Toolchain for Indexer Settings”, and then click “Finish”.
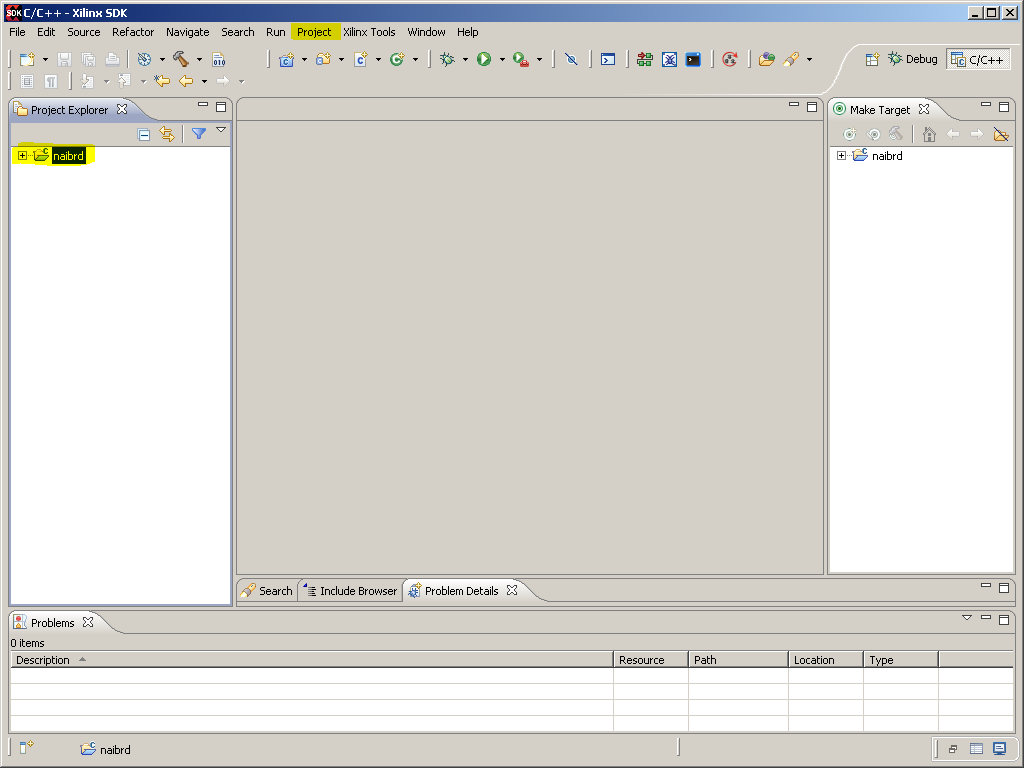
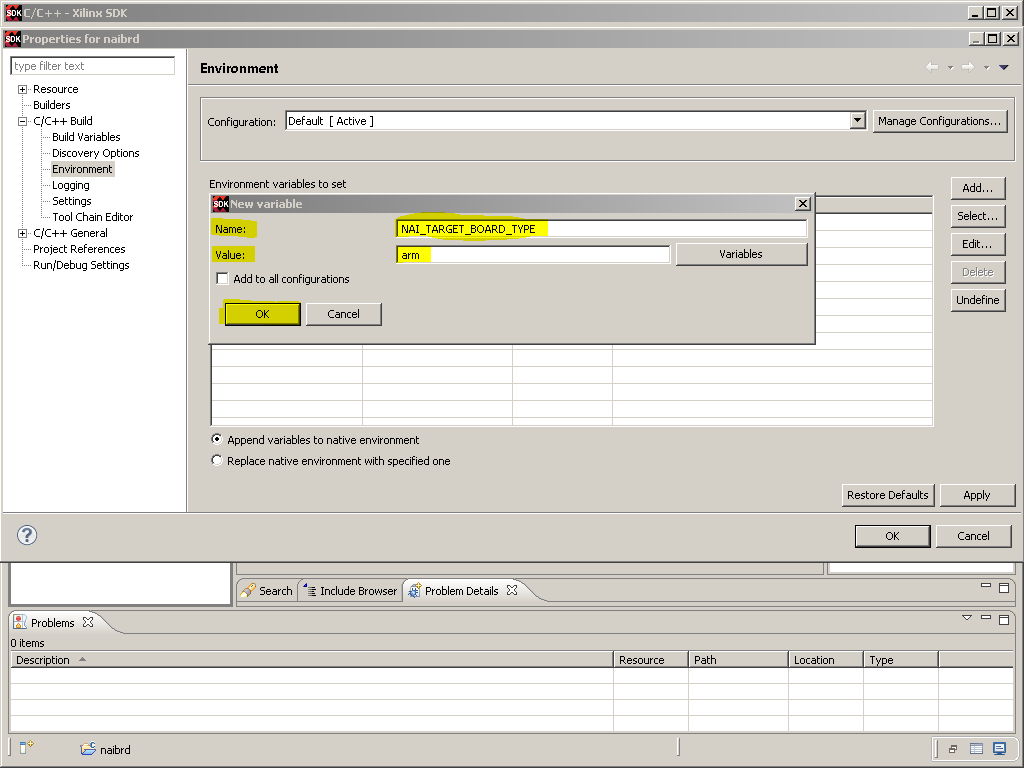
- With naibrd Project selected in the Project Explorer, select Project→Properties→C/C++ Build→Environment, and click the “Add…” button.
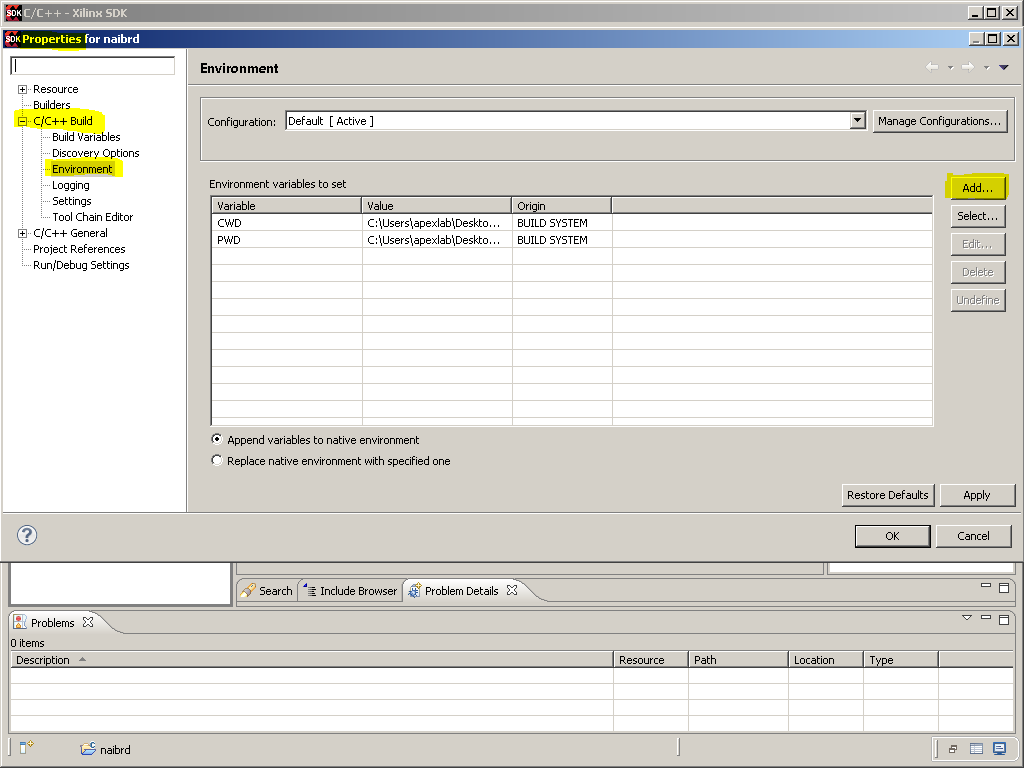
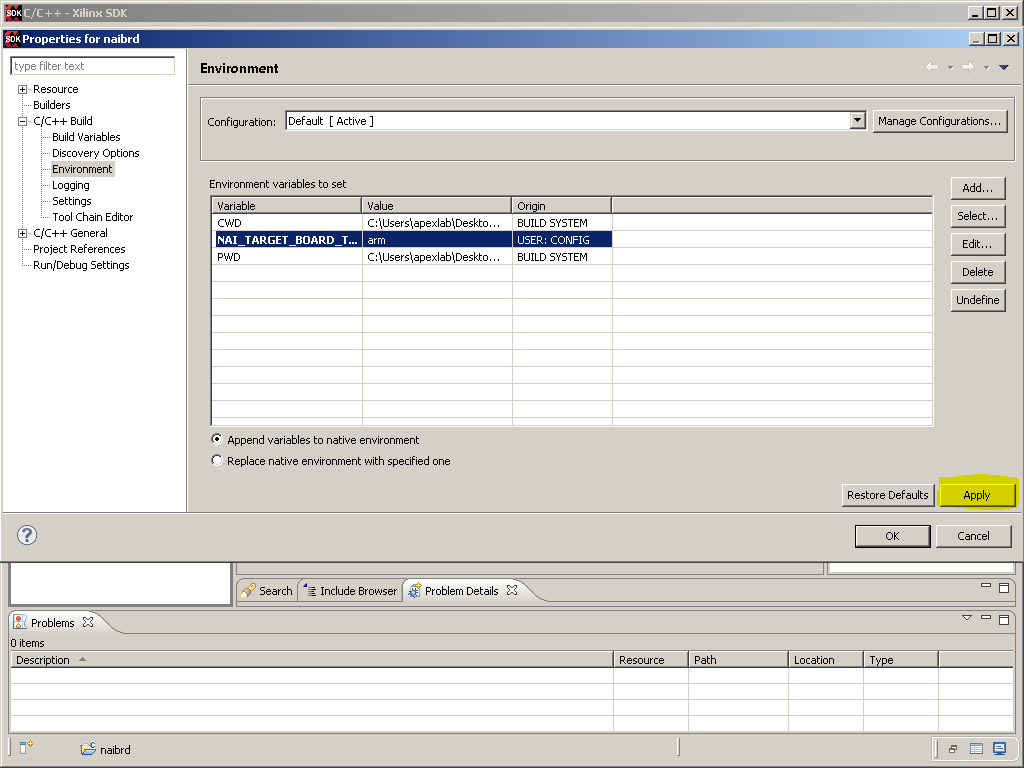
- Enter a new environment variable with Name = NAI_TARGET_BOARD_TYPE and Value = arm, and click “OK” button.
- Click Apply Button
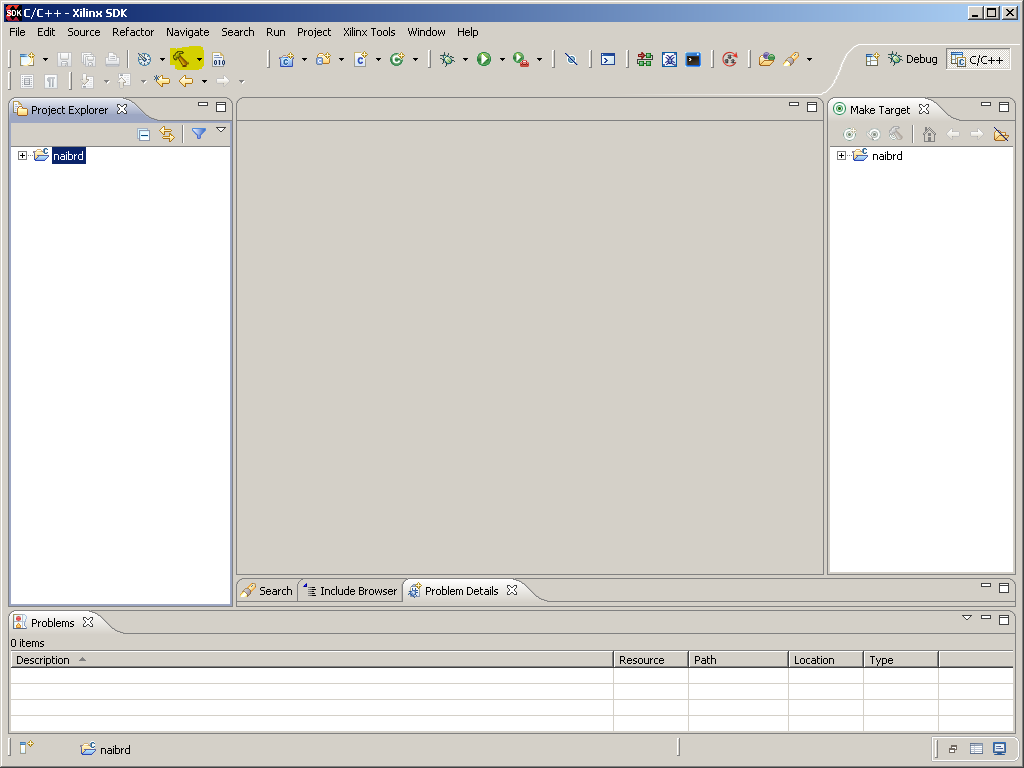
- To Clean and Build the naibrd project, right-click on “naibrd” in the Project Explorer and click “Clean Project”. Then, with “naibrd” selected in the Project Explorer, either click the hammer icon at the top of the page or right-click on “naibrd” in the Project Explorer and click “Build Project”.
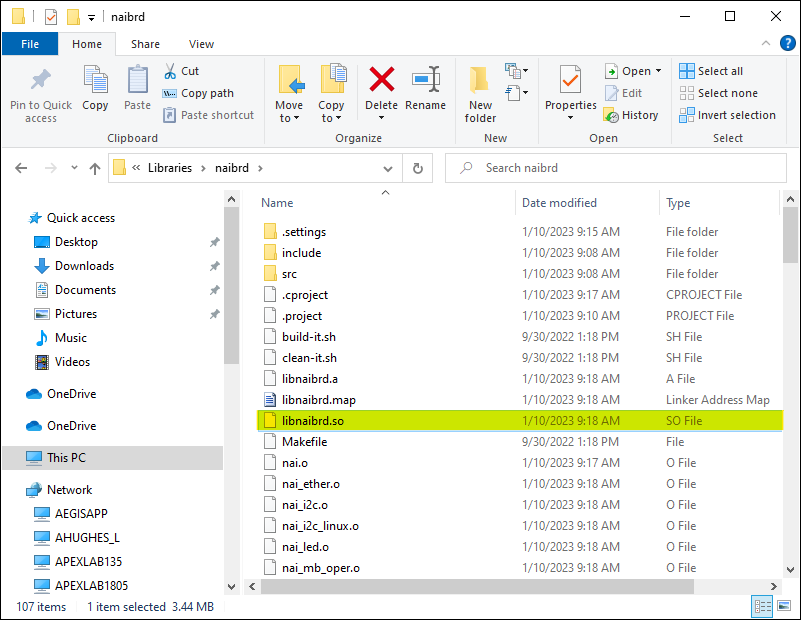
- Copy NAI library (libnaibrd.so) from
/Libraries/naibrd to /Lib/Linux_ARM.
Copy from here
Copy to here
[!note]
NAI sample application MakeFile will link with the library (.so) file in /Lib/Linux_ARM folder. Ensure the latest library file is in that folder.
- Build NAI SSK Library on Host PC to generate a (libnaiapp_common.so) file as follows:
.. Import
- Click File→Import…
- On the Import pop-up page, select the option “Existing Code as Makefile Project” under “C/C++” and then click the “Next >” button.
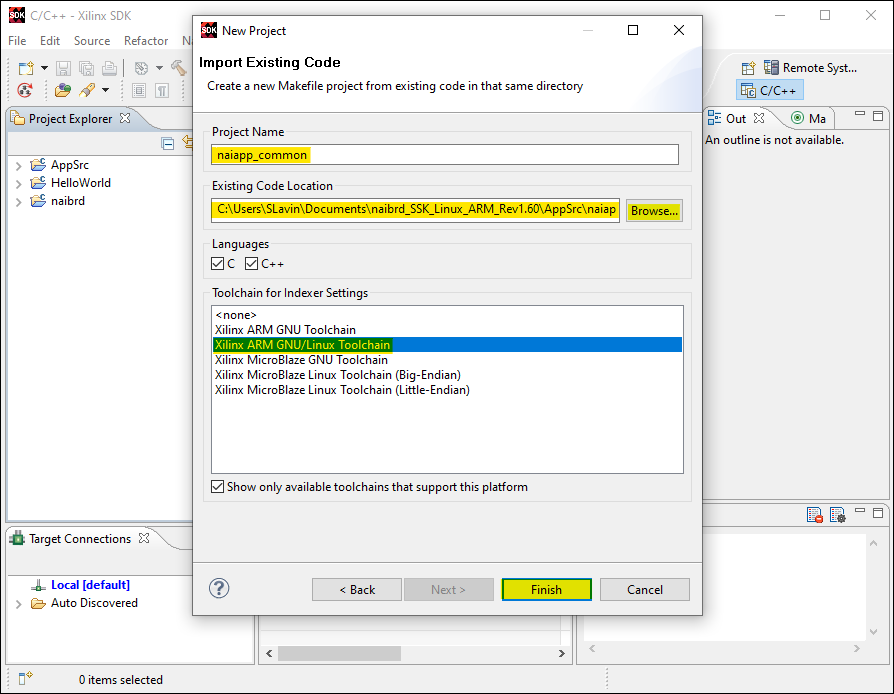
- Click “Browse…” and navigate to
\AppSrc\ naiapp_common. Once you navigate to this folder and click OK, the text box labelled “Project Name” will fill itself out with the name of the naiapp_common folder (which is “naiapp_common”). - Select “Xilinx ARM GNU/Linux Toolchain” under “Toolchain for Indexer Settings”, and then click “Finish”.
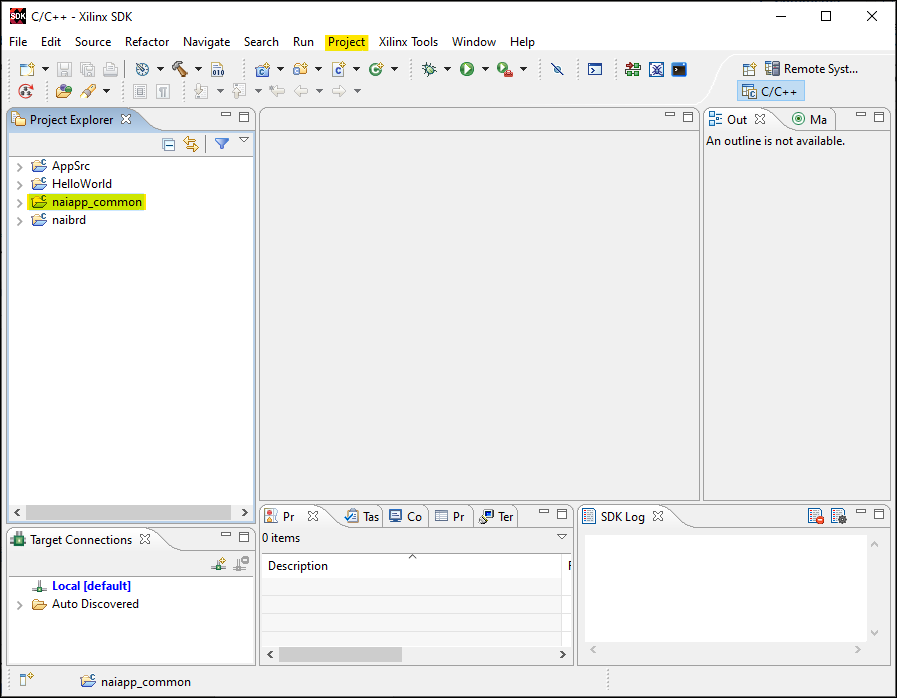
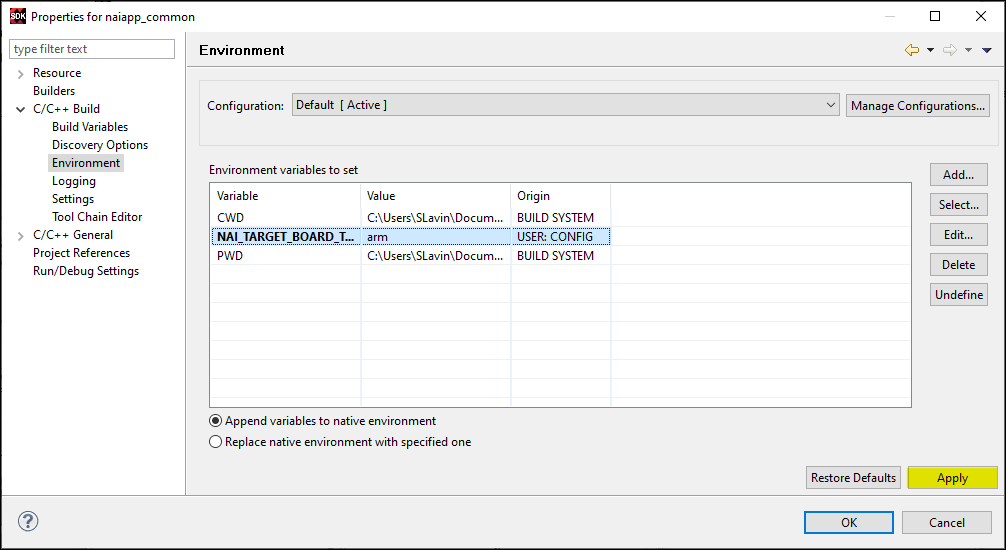
- With naiapp_common Project selected in the Project Explorer, select Project→Properties→C/C++ Build→Environment, and click the “Add…” button.
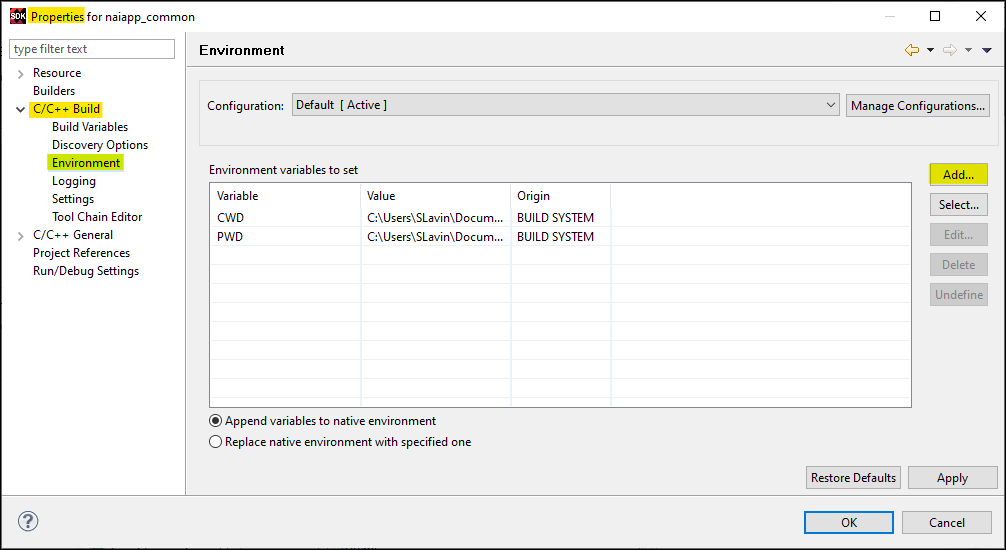
- Enter a new environment variable with Name = NAI_TARGET_BOARD_TYPE and Value = arm, and click “OK” button.
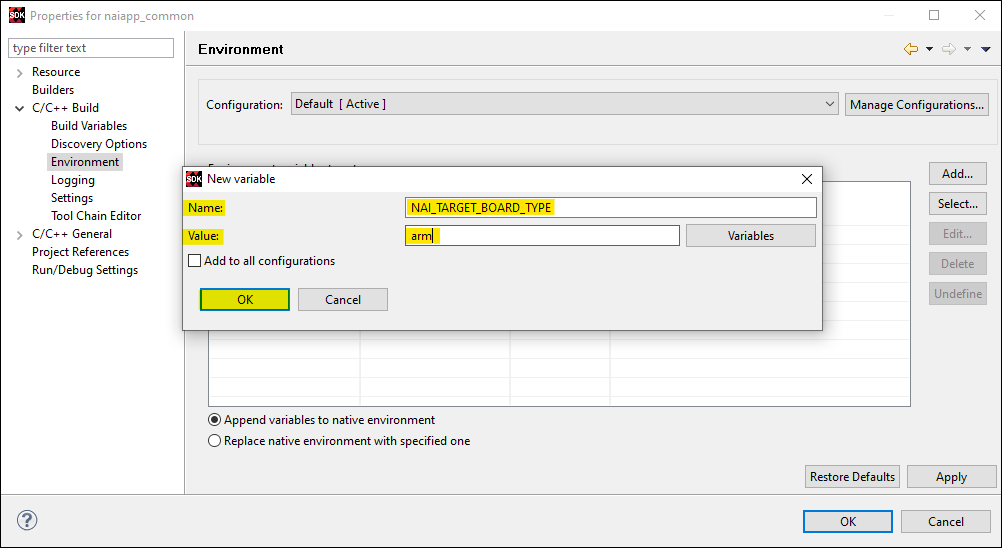
- Click Apply Button
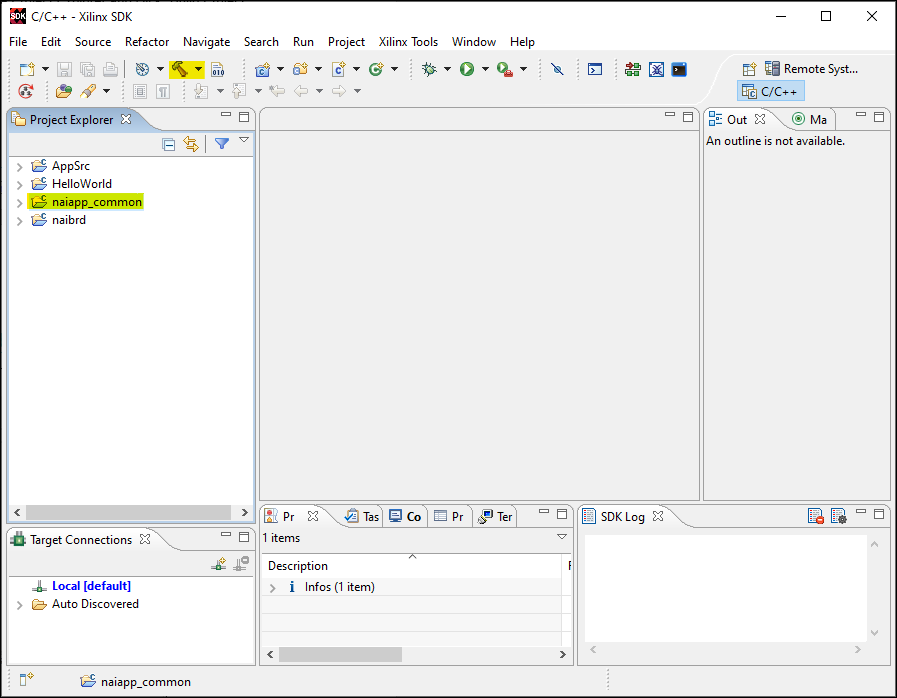
- To Clean and Build the naiapp_common project, right-click on “naiapp_common” in the Project Explorer and click “Clean Project”. Then, with “naiapp_common” selected in the Project Explorer, either click the hammer icon at the top of the page or right-click on “naiapp_common” in the Project Explorer and click “Build Project”.
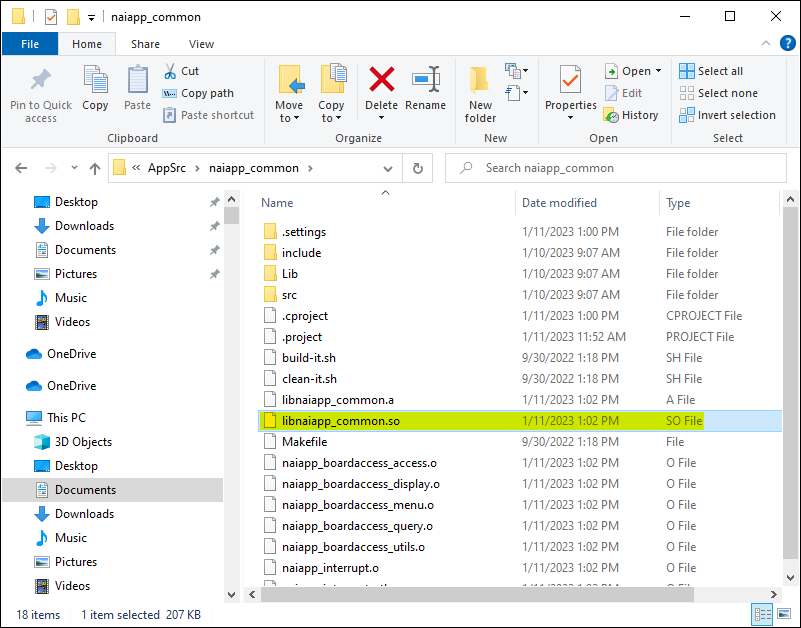
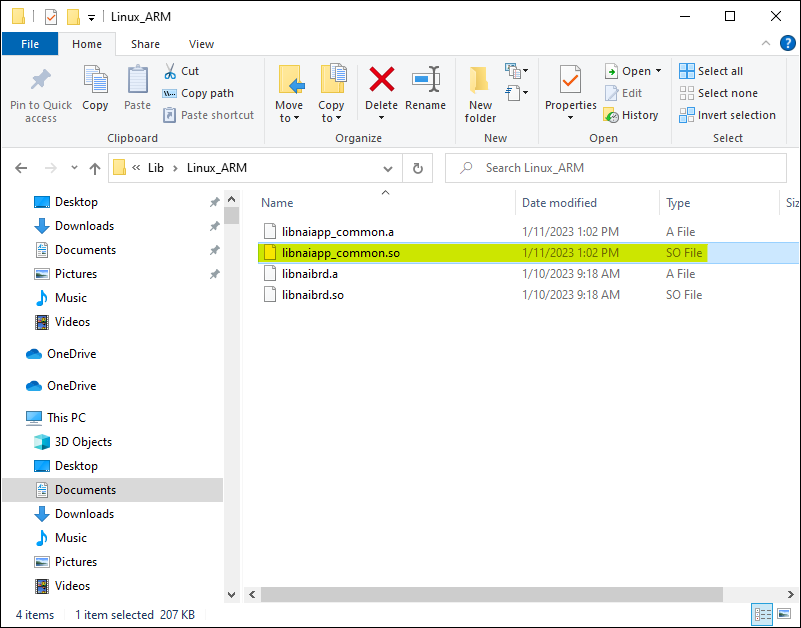
- Copy NAI library (libnaiapp_common.so) from
/AppSrc/naiapp_common to /Lib/Linux_ARM.
Copy from here
Copy to here
Building an NAI Sample Application
NAI provides prebuilt sample applications and source code. You can also rebuild the sample applications on your host PC.
Note
Cross-Compiler and PATH must be configured on Host PC. Refer to Step 18 of the Cross-Compiler subsection of Environment Setup for details.
Prerequisite: Pre-built naibrd_SSK_Linux_ARM_Rev1.63 Library including the following:
\Lib\Linux_ARM \include
- Copy naibrd_SSK_Linux_ARM_Rev1.63 Library and Sample Application package to Host PC.
- Import
\AppSrc into the Xilinx SDK.
.. Click File→Import…
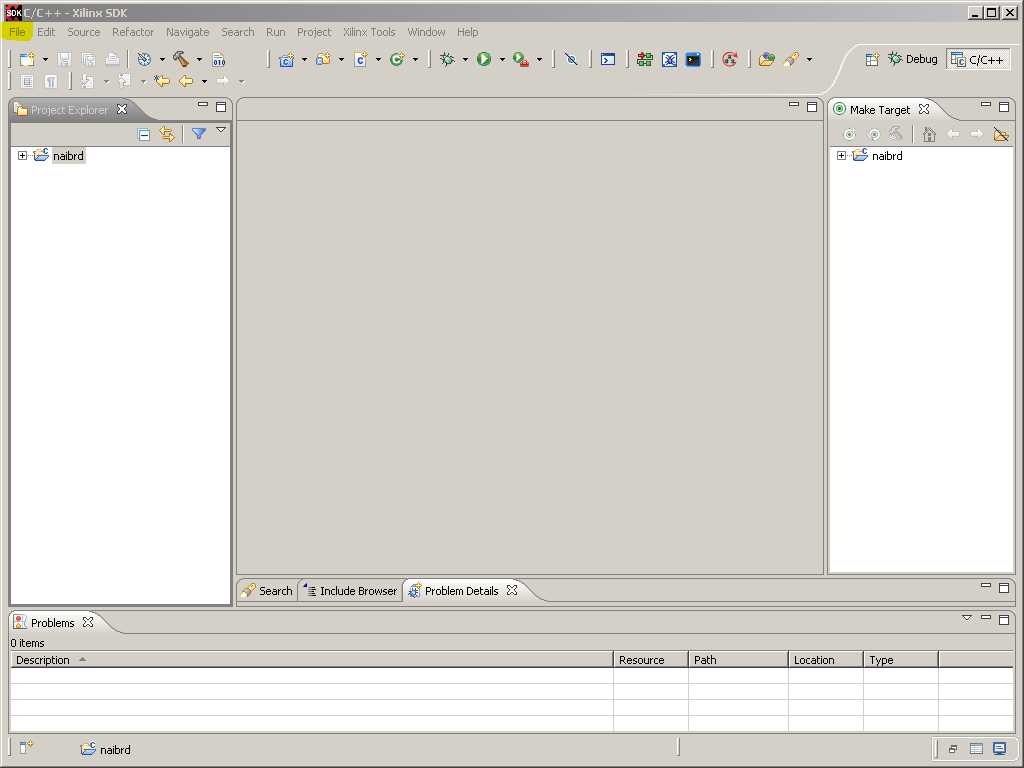
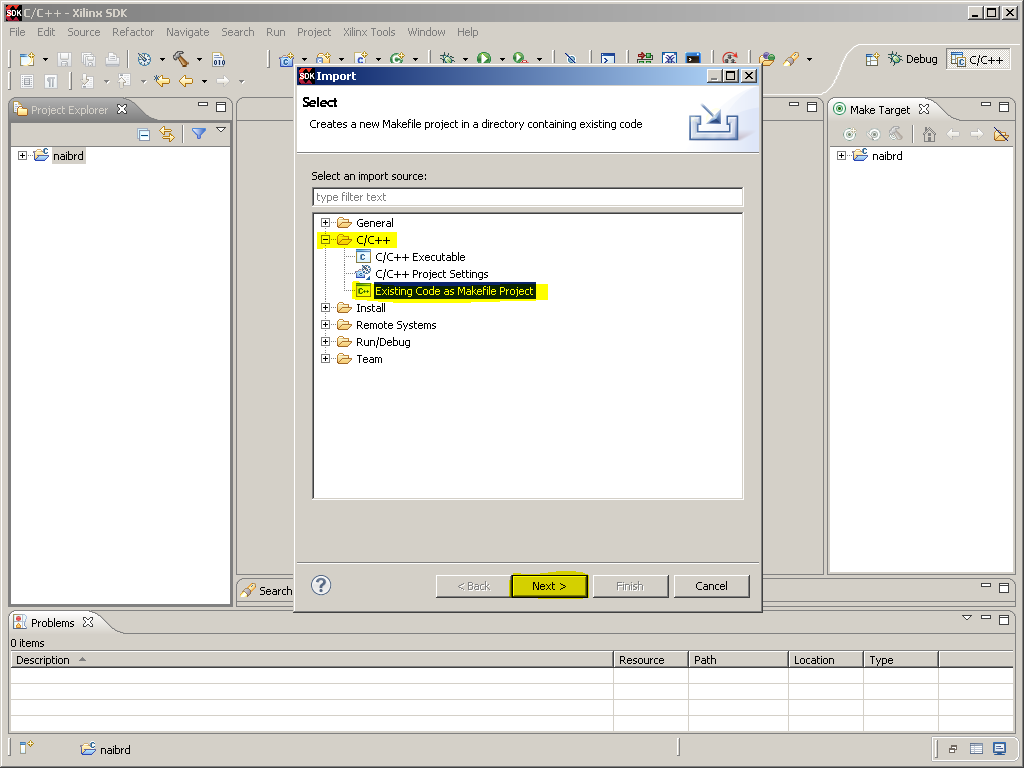
- On the Import pop-up page, select the option “Existing Code as Makefile Project” under “C/C++” and then click the “Next >” button.
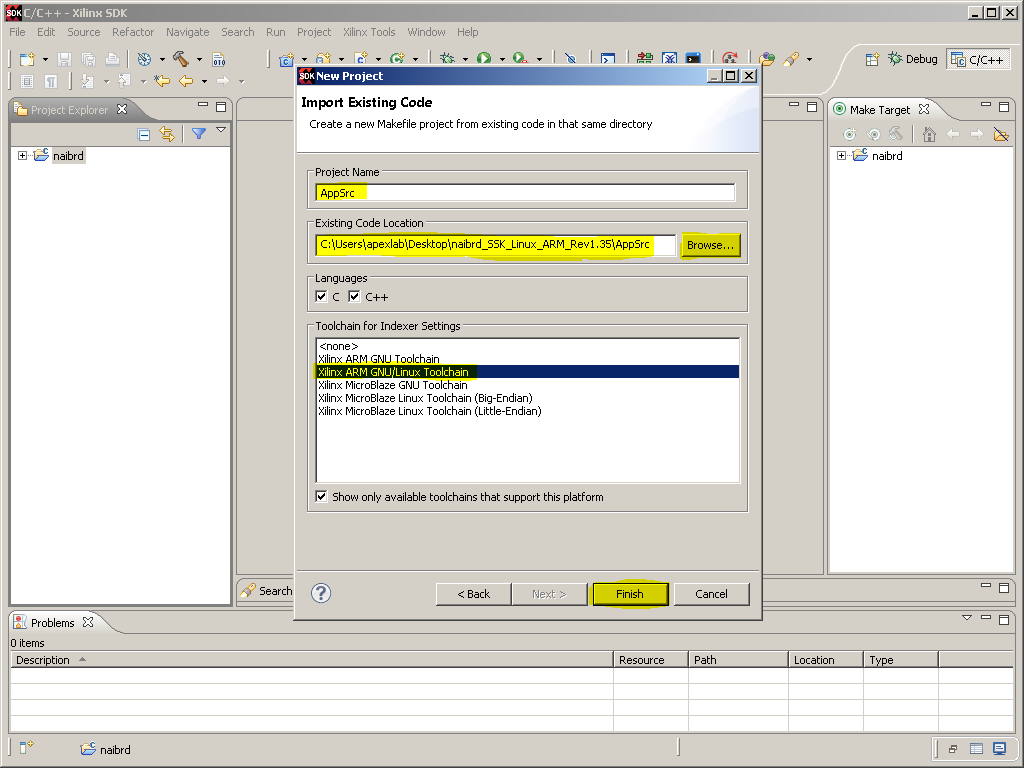
- Click “Browse…” and navigate to
\AppSrc. Once you navigate to this folder and click OK, the text box labelled “Project Name” will fill itself out with the name of the AppSrc folder (which is “AppSrc”). - Select “Xilinx ARM GNU/Linux Toolchain” under “Toolchain for Indexer Settings”, and then click “Finish”.
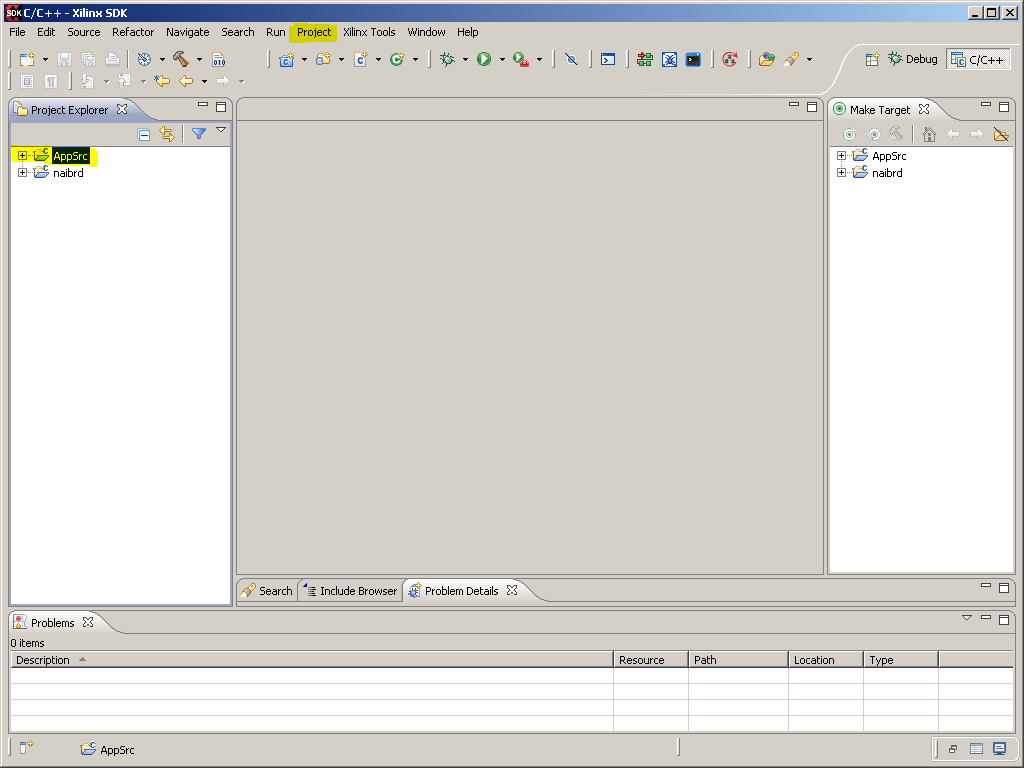
- With AppSrc Project selected in the Project Explorer, select Project→Properties→C/C++ Build→Environment, and click the “Add…” button.
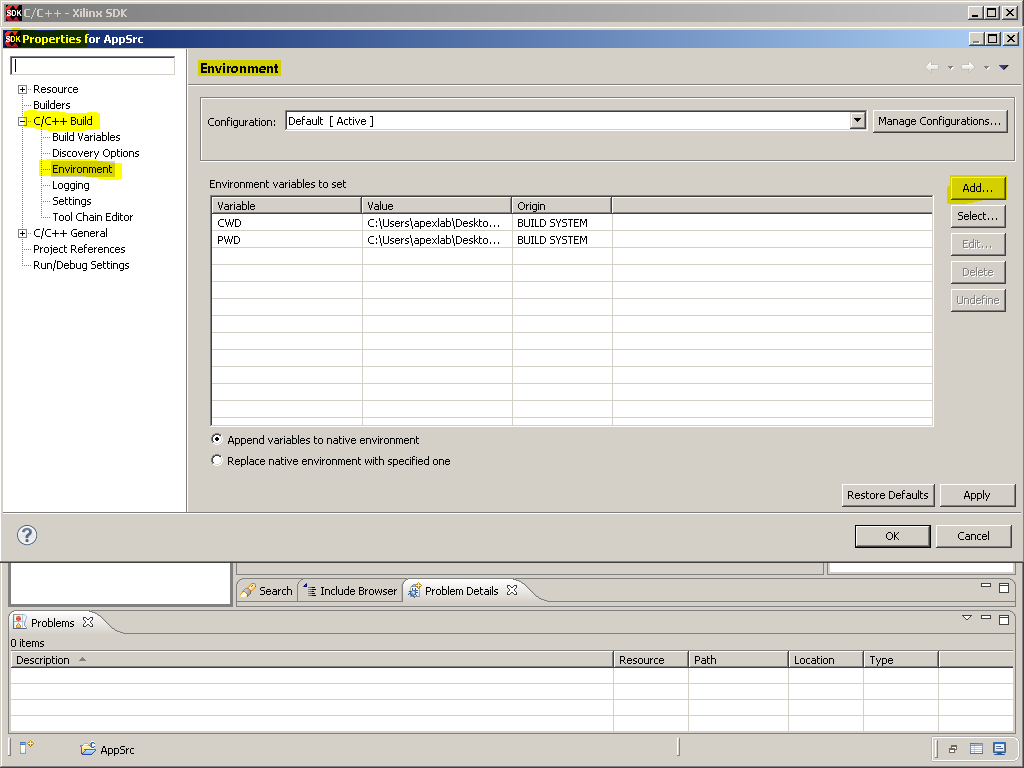
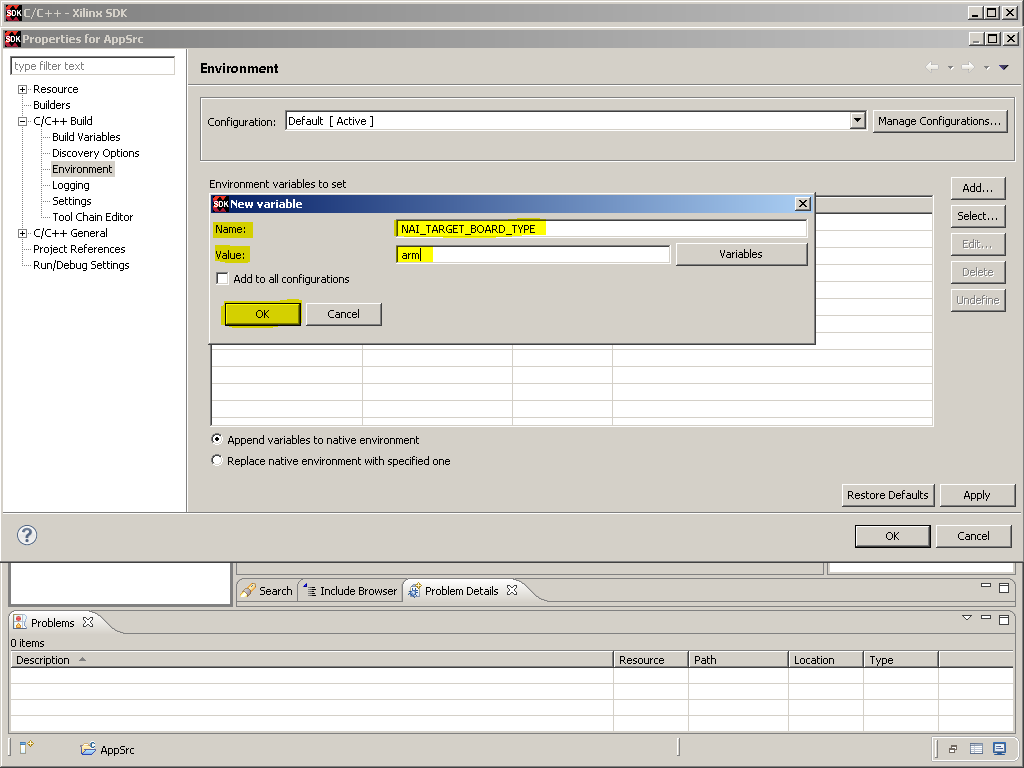
- Enter a new environment variable with Name = NAI_TARGET_BOARD_TYPE and Value = arm, and then click “OK”.
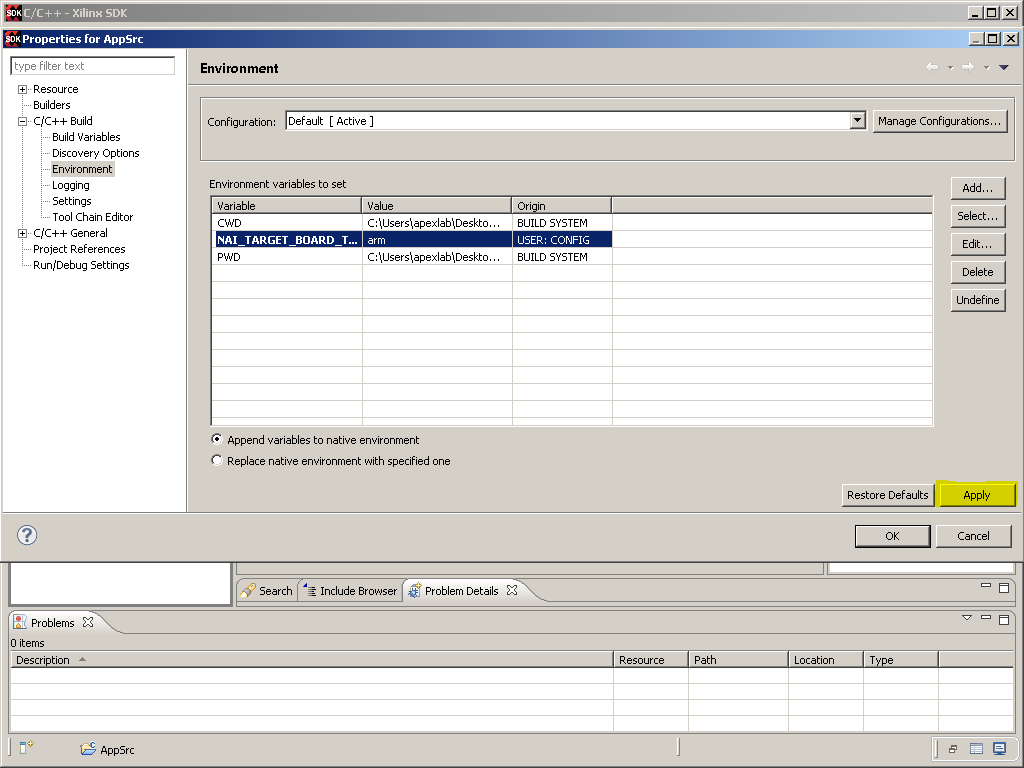
- Hit “Apply” button
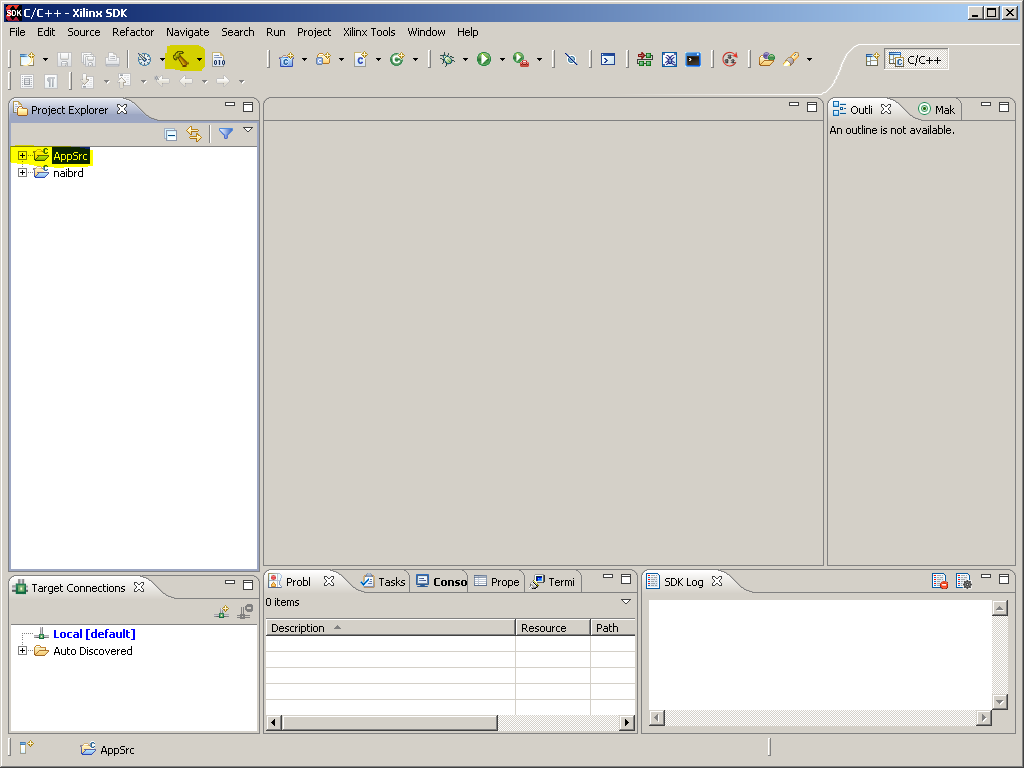
- To Clean and Build the “AppSrc” project, right-click on “AppSrc” in the Project Explorer and click “Clean Project”. Then, with the “AppSrc” project selected in the Project Explorer, either click the hammer icon at the top of the page or right-click on “AppSrc” in the Project Explorer and click “Build Project”.
Running NAI Sample Application on Target Board
- Copy naibrd_SSK_Linux_ARM_Rev1.63 to host pc if you have not done so already.
- Upload the NAI Library (libnaibrd.so) to /usr/lib on the target board from Host PC.
Note
You can do this in the Xilinx SDK. The libnaibrd.so file should be in
\Lib\Linux_ARM, and also in \Libraries\naibrd.
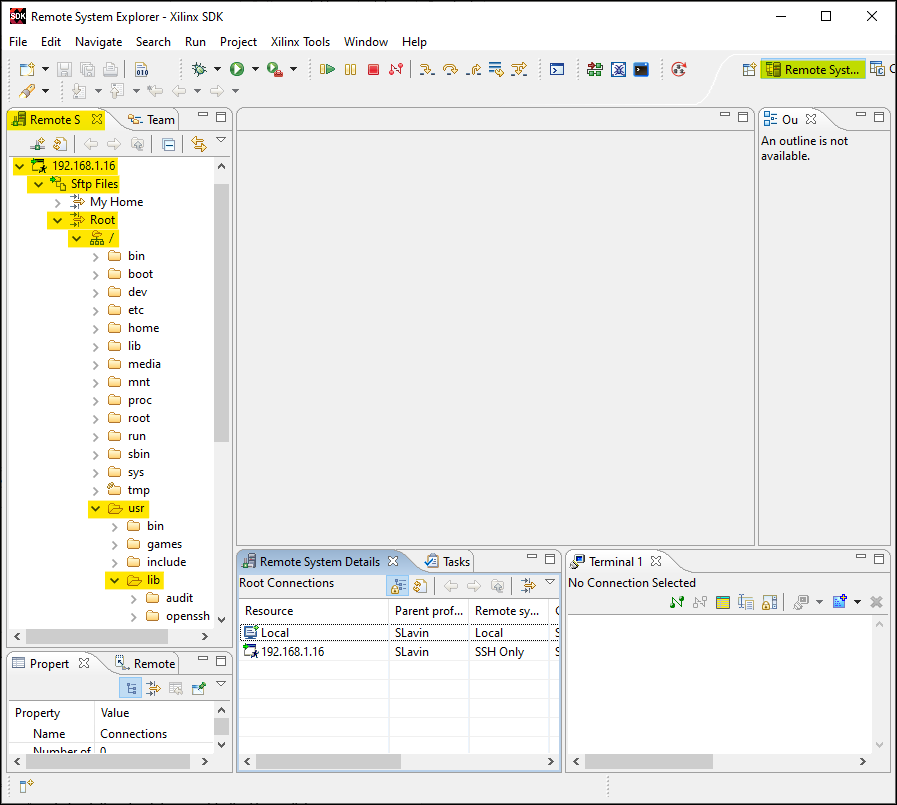
- Go to the “Remote Systems” tab in the “Remote System Explorer” perspective, right-click “lib” (
/Sftp Files/Root///usr/lib), and click “Export From Project…”.
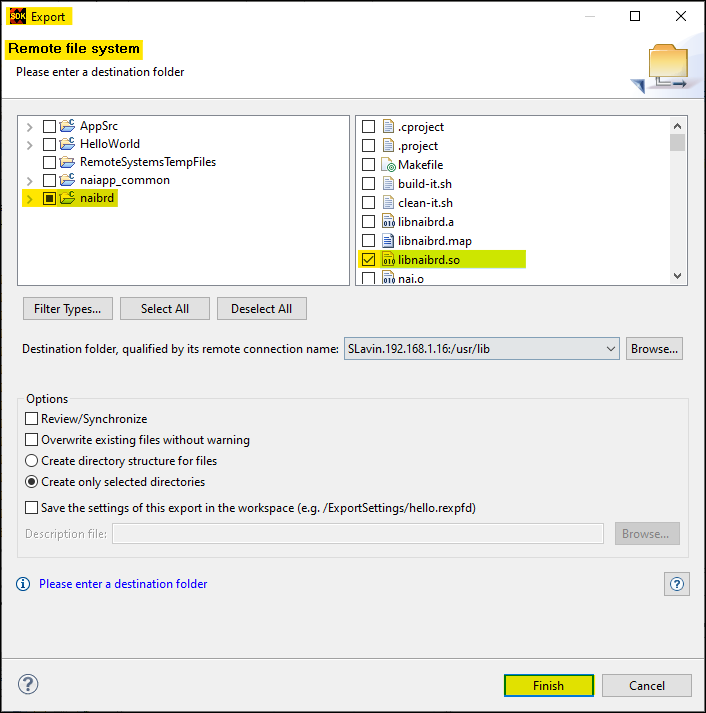
- In the “Remote file system” tab, select the “naibrd” folder (but do not check it). Then, within that folder, select “libnaibrd.so” and check the check box next to it. Then, click “Finish”.
- Upload the NAI Common Library (libnaiapp_common.so) to /usr/lib on the target board from Host PC.
Note
You can do this in the Xilinx SDK. The libnaiapp_common.so file should be in
\Lib\Linux_ARM, and also in \AppSrc\naiapp_common.
- Go to the “Remote Systems” tab in the “Remote System Explorer” perspective, right-click “lib” (
/Sftp Files/Root///usr/lib), and click “Export From Project…”.
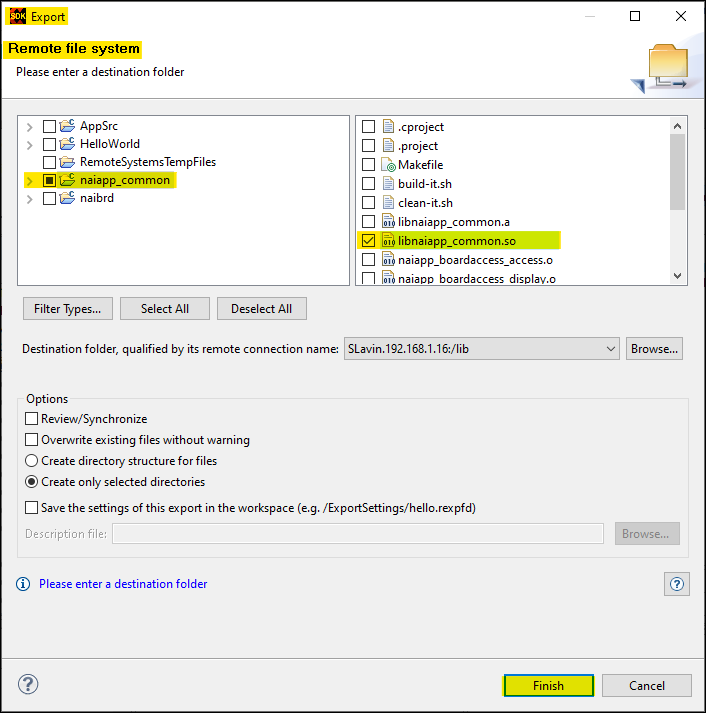
- In the “Remote file system” tab, select the “naiapp_common” folder (but do not check it). Then, within that folder, select “libnaiapp_common.so” and check the check box next to it. Then, click “Finish”.
-
Choose an executable ELF from
\AppSrc and upload it to /home/root/ on the target board. -
In the “Remote Systems” tab, right-click “root” (
/Sftp Files/Root///home/root) and click “Export From Project…”
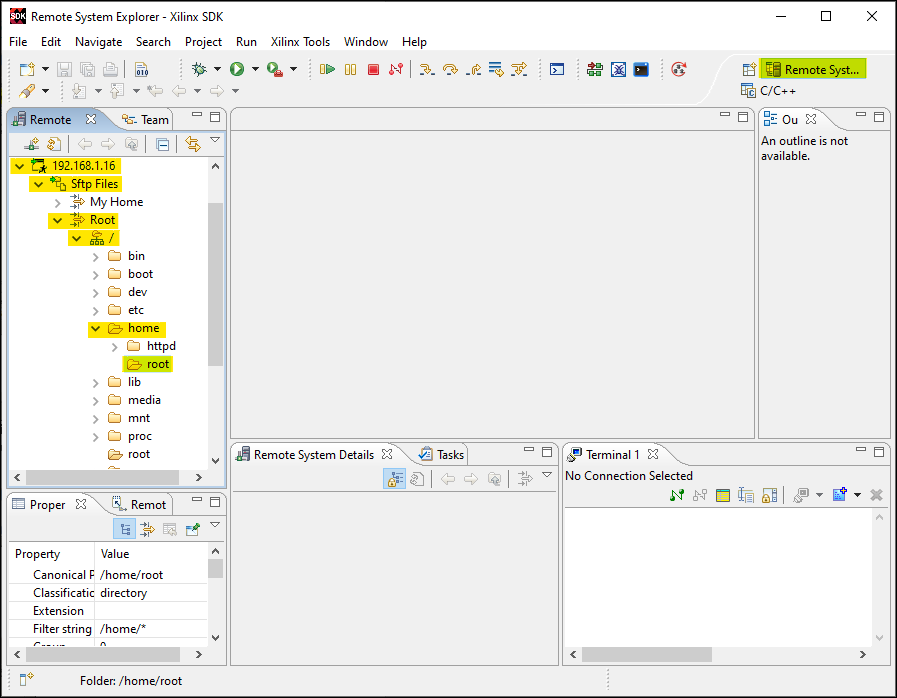
- In the “Remote file system” window, select “AppSrc” in the left box (but do not check it), and then select and check the check box next to the project you want to run from the board (in this case, “TTL_BasicOps”). Then, click “Finish”.
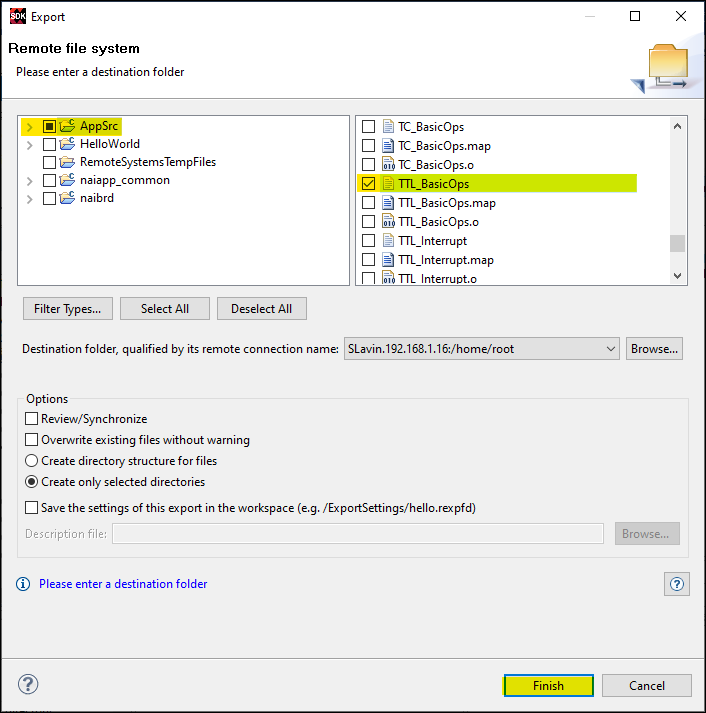
- Run the sample application executable ELF file using either the Serial Console or the Xilinx SDK.
Running NAI Sample Application on Target Board Using Serial Console (Tera Term)
- Navigate to /home/root/ on the Linux shell terminal. (See picture below Step 3)
| # cd /home/root/ |
|---|
- Give Execute permission to application: (See picture below Step 3)
| # chmod 777 |
|---|
- Execute program from Linux shell terminal (See picture)
| # ./ |
|---|
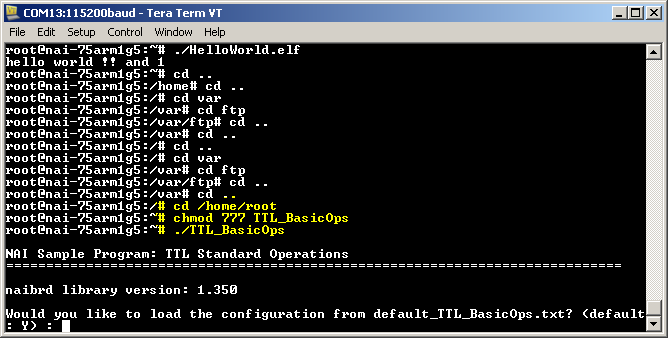
Running NAI Sample Application on Target Board Using Xilinx SDK
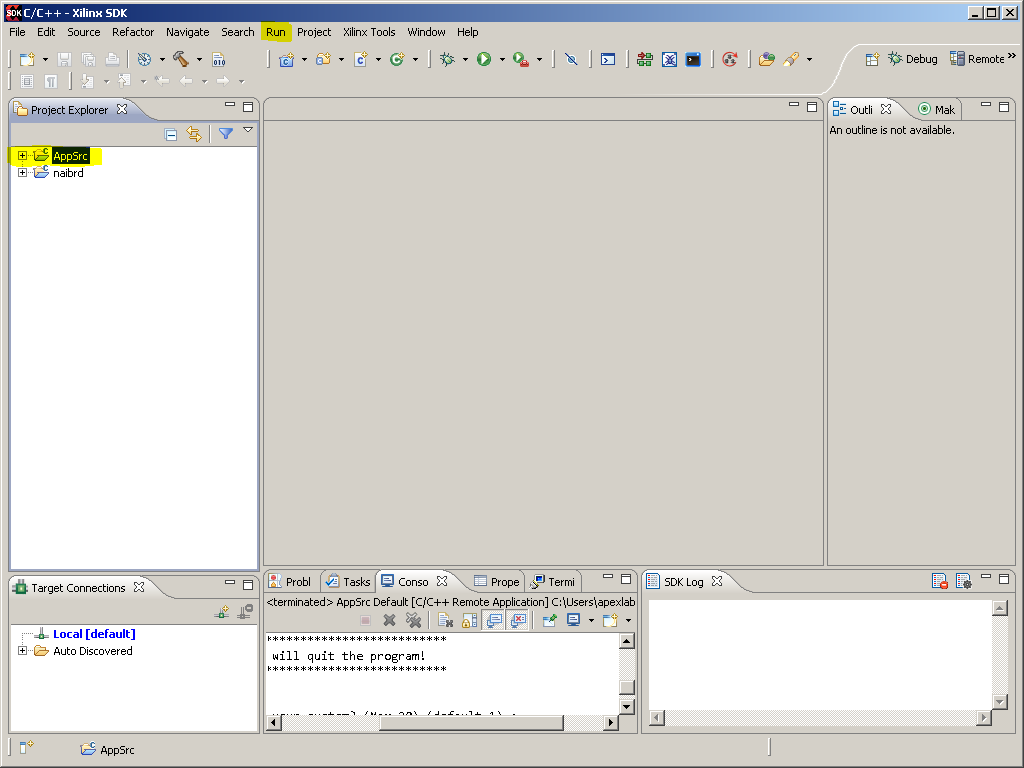
- We must create a Run Configuration for the sample program we just copied to the board. With the AppSrc project selected in the Project Explorer, go to Run→Run Configurations…
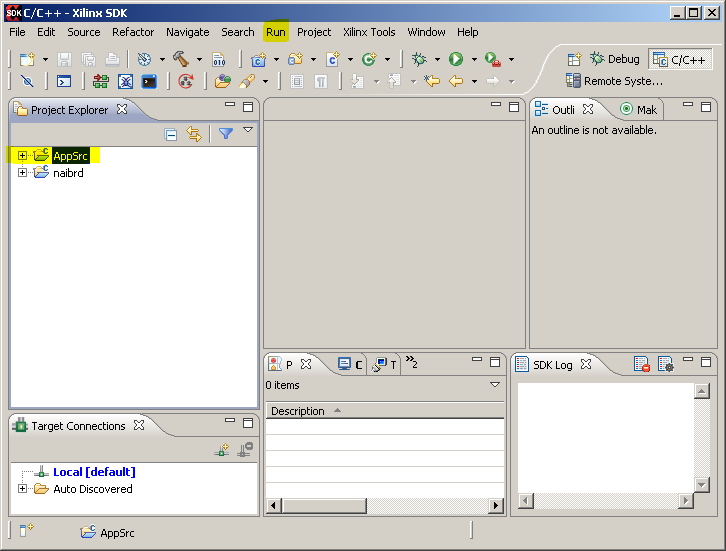
- In the “Run Configurations” window, double-click “Target Communication Framework”. This will create a new Run Configuration for the AppSrc project, called “AppSrc Default” by default.
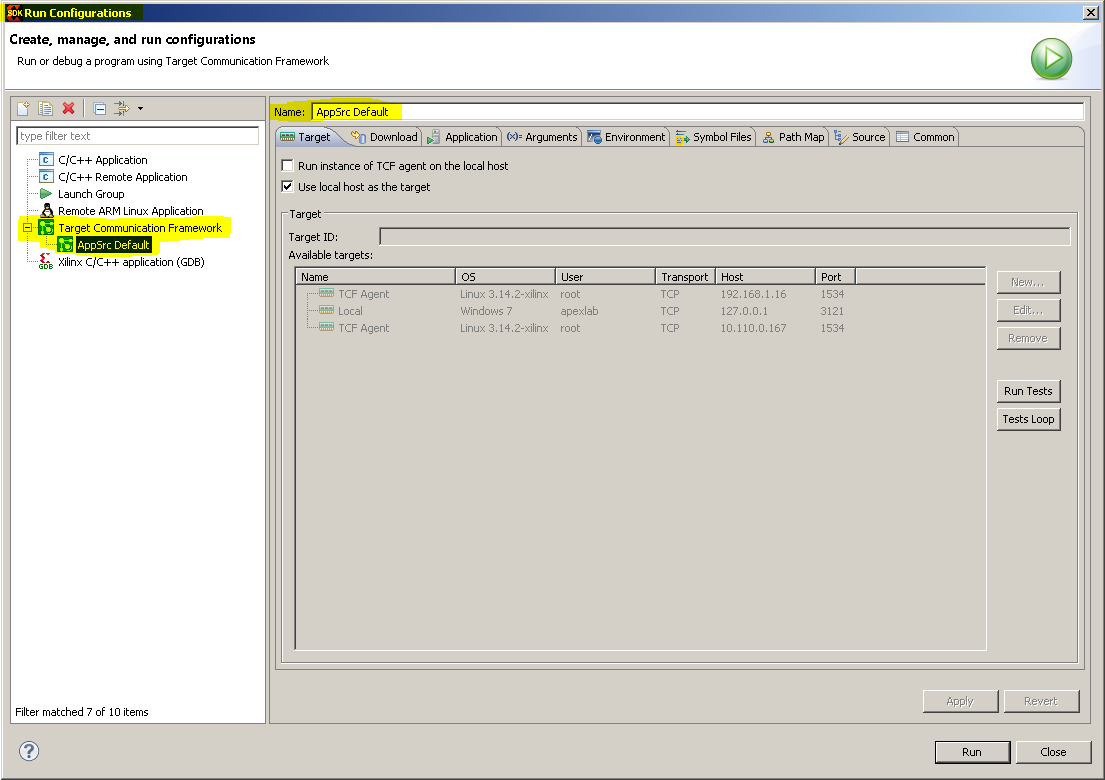
- With the “AppSrc Default” configuration selected, under the “Target” tab, uncheck the check box labelled “Use local host as the target”. Then, in the “Available Targets:” list view, select the selection that says “TCF Agent” in the “Name” column and lists the target board’s IP Address in the “Host” column. Then, verify that it says “TCP:
: ” in the “Target ID:” text box. In this case, the IP Address is 192.168.1.16, and the port is 1534.
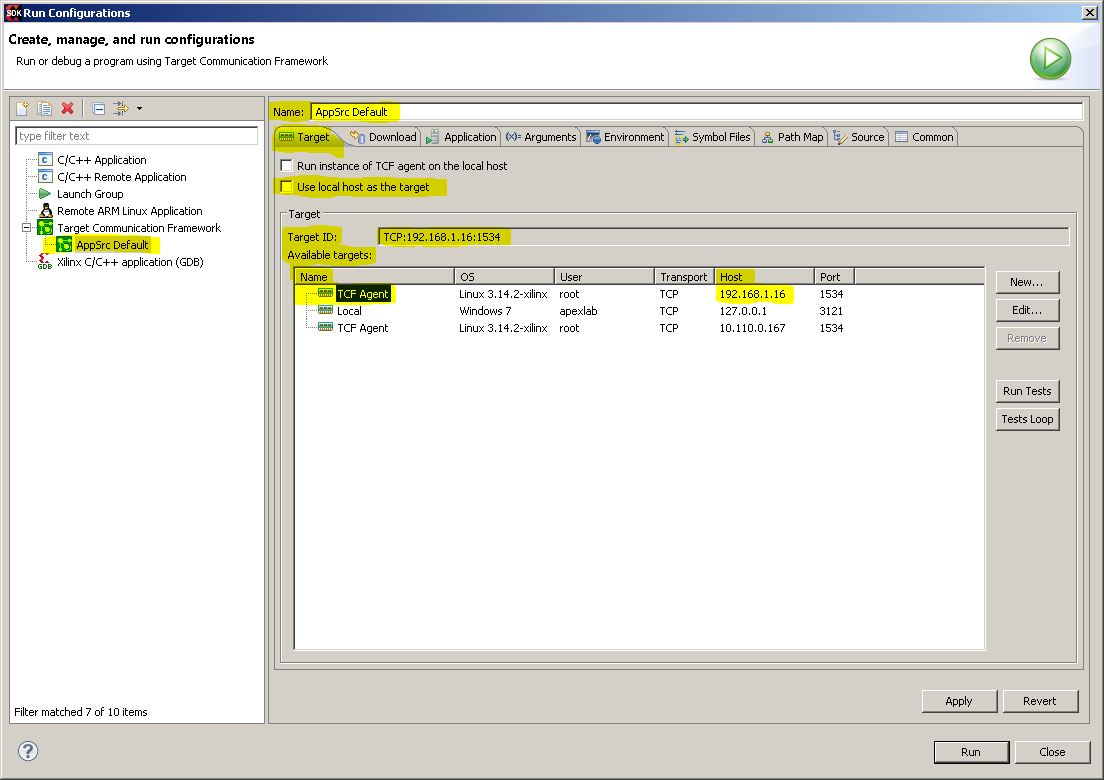
- Click the “Apply” button.
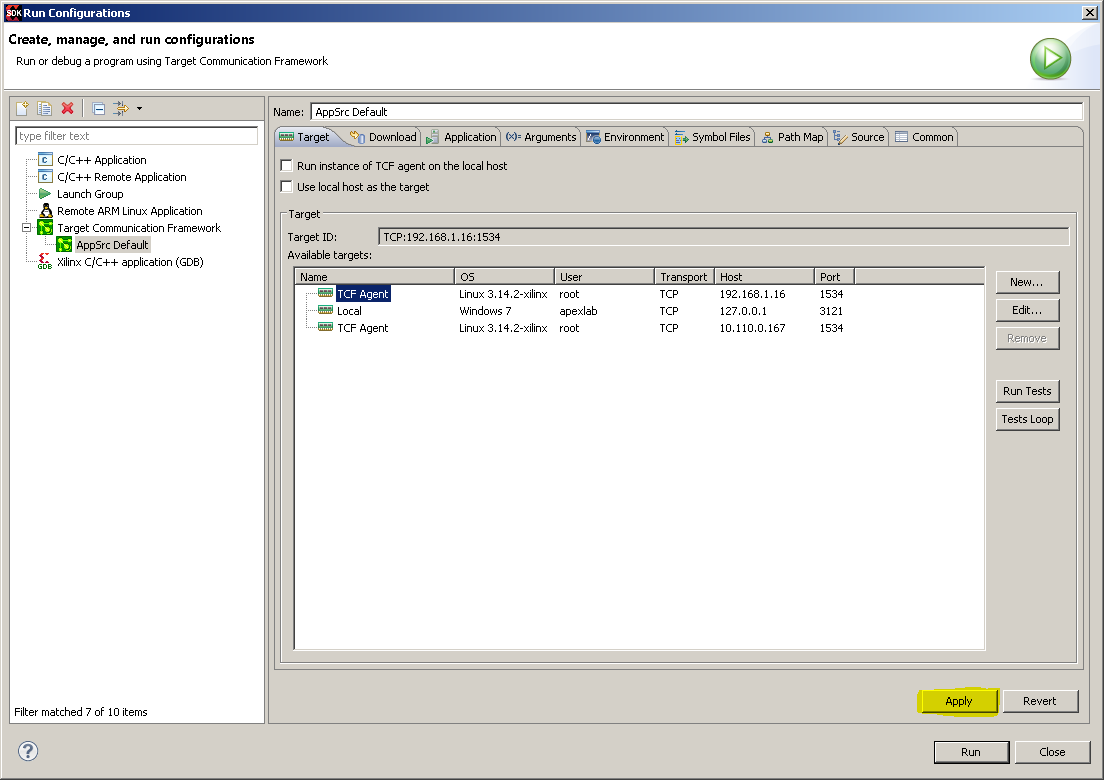
- Navigate to the “Application” tab.
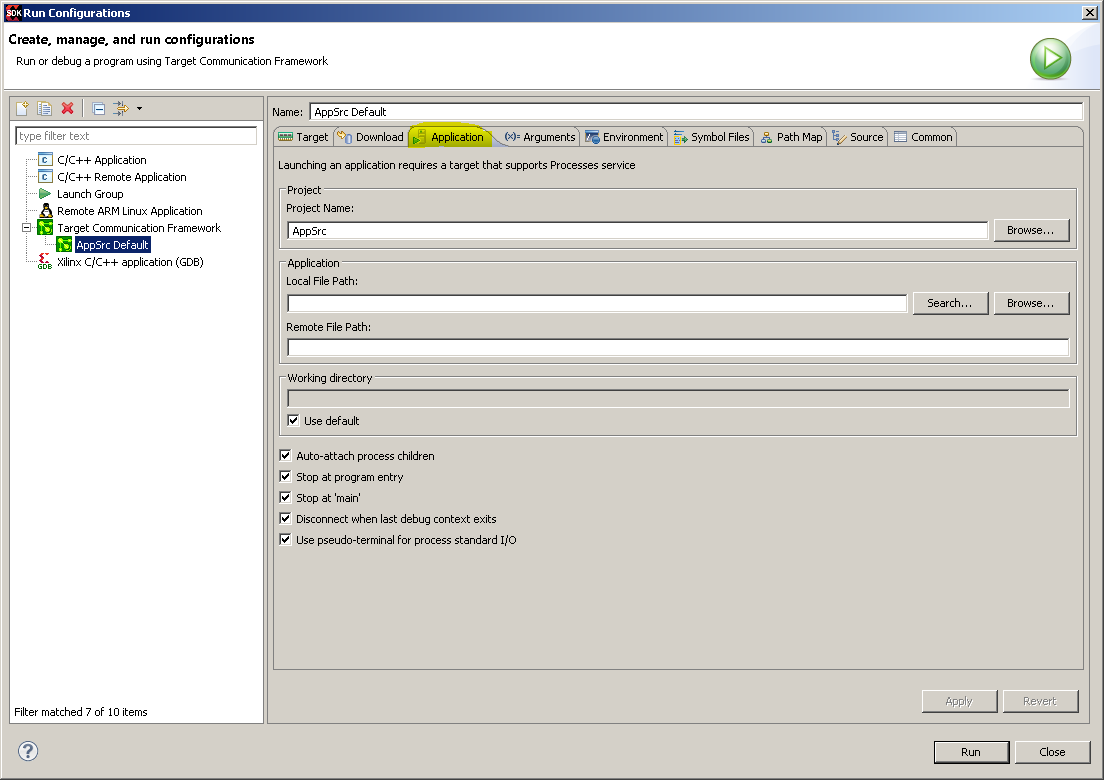
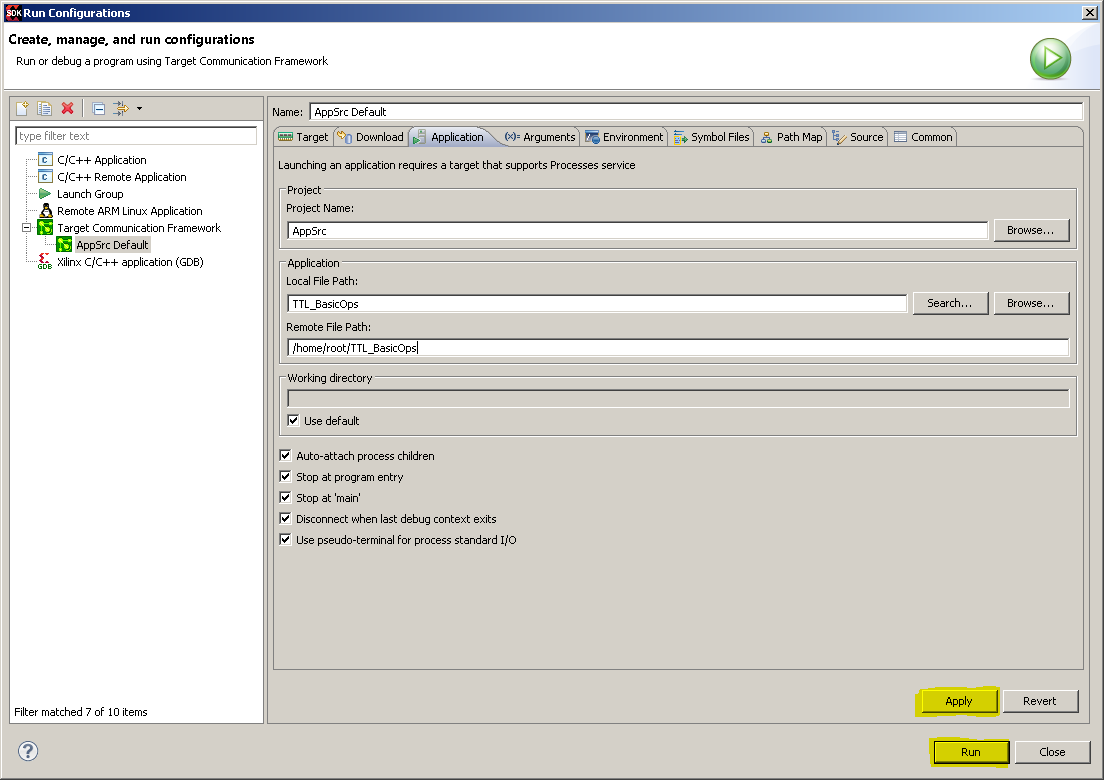
- Fill in the text boxes highlighted in the picture. For the “Project Name:” text box, you can click the “Browse…” button and select “AppSrc” from the list of projects. Then, in the “Application” group box, next to the “Local File Path:” text box, you can click the “Search…” button and select the sample application you want to run from the pop up menu (in this case, TTL_BasicOps). Then, type “/home/root/
” into the “Remote File Path:” field.
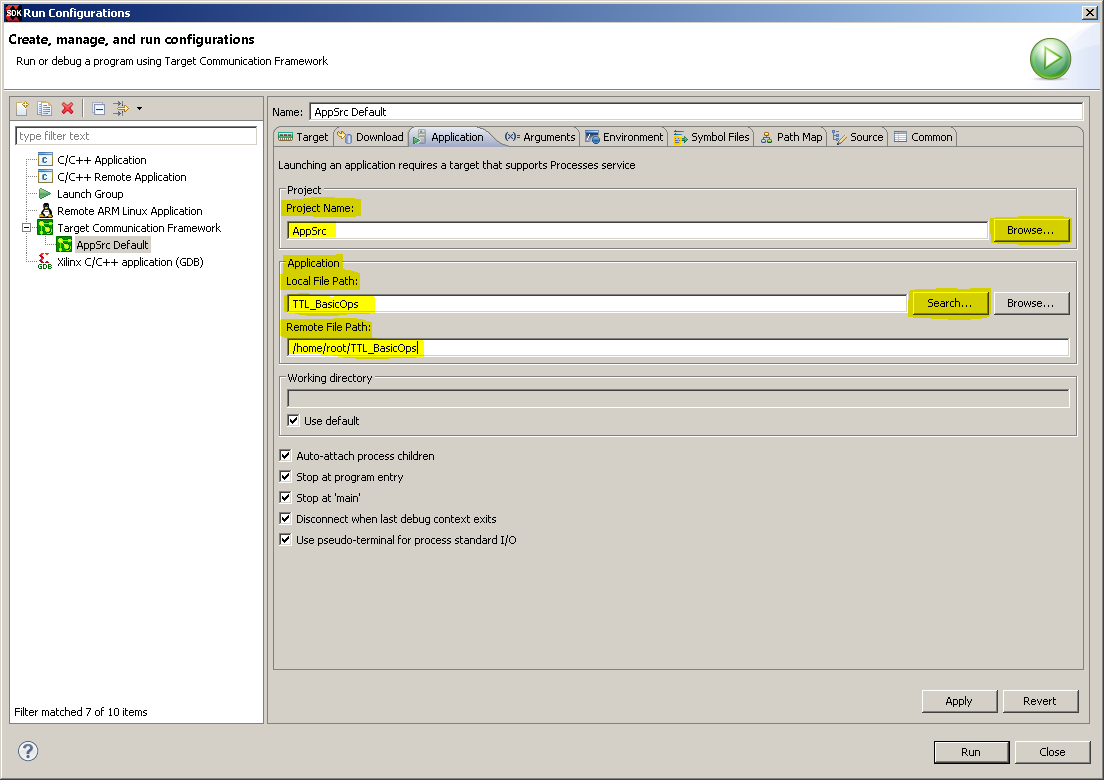
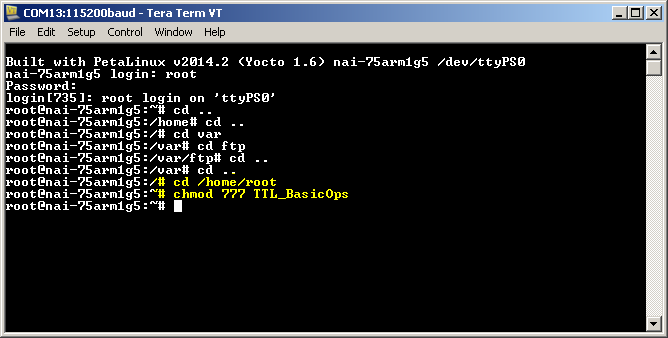
- In the Serial Console (Tera Term), navigate to the /home/root directory of the target board and type “chmod 777 <name of sample application in /home/root to run>” (ex. chmod 777 TTL_BasicOps) to give the sample application permission to run.
- Click “Apply” to save all the changes you just made, and then click “Run” to run the program on the target board using the SDK.
Debugging NAI Sample Application on Target Board Using Xilinx SDK
The process of Debugging a program via the Xilinx SDK is very similar to the process of Running a program via the Xilinx SDK.
- If it has not been done already, copy the naibrd library and naiapp library .so files (libnaibrd.so & libnaiapp_common.so) from your PC to the /usr/lib directory of the target board. This can be done via the Xilinx SDK. See step 2 of “Running NAI Sample Application on Target Board” for more details.
- If it has not been done already, copy the sample program executable ELF file you want to run on the board from your PC to the /home/root directory of the target board. This can be done via the Xilinx SDK. See step 3 of “Running NAI Sample Application on Target Board” for more details.
- If you have not done so already, create a run configuration for the sample application you want to run on the board, and use the serial console to get permission to run the sample application executable file you copied from your PC to the /home/root directory of the target board (see ”Running NAI Sample Application on Target Board Using Xilinx SDK”).
Note
The run configuration you just made for the HelloWorld project can also be used as a debug configuration.
- With “AppSrc” selected in the Project Explorer, navigate to Run→Debug Configurations…
- In the “Debug Configurations” window, under “Target Communication Framework”, select “AppSrc Default” (the run configuration we created). The configuration properties you set for “AppSrc Default” in “Running NAI Sample Application on Target Board Using Xilinx SDK” should still be there.
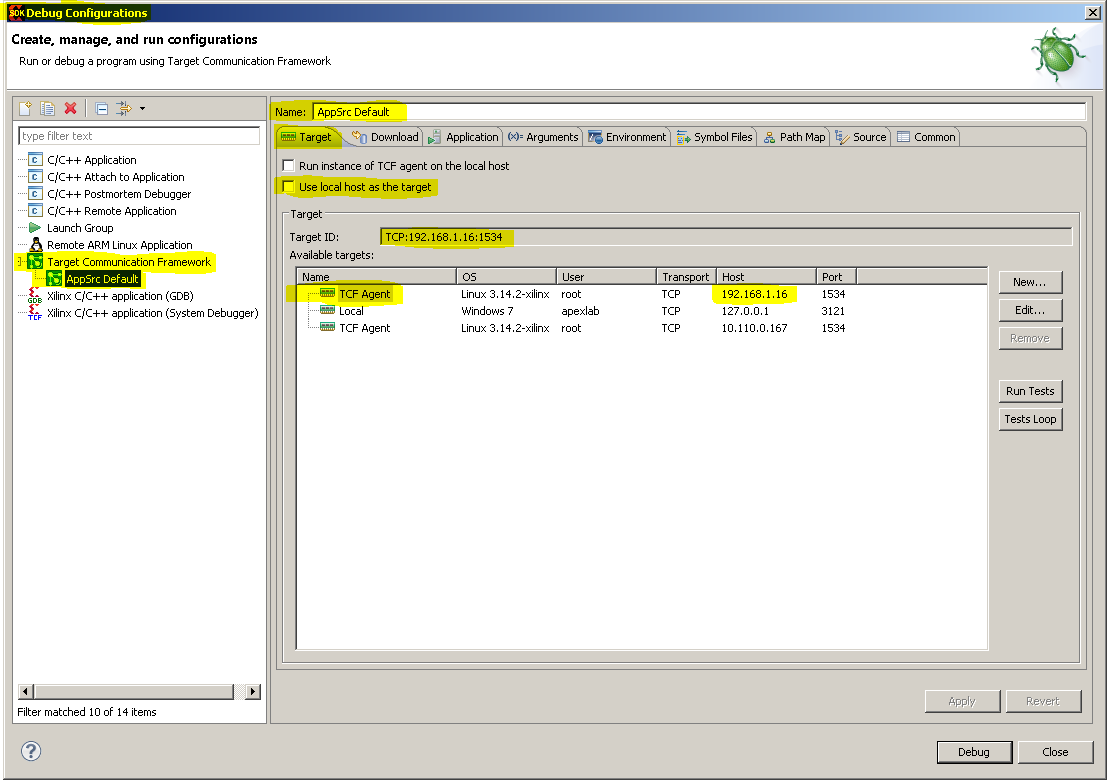
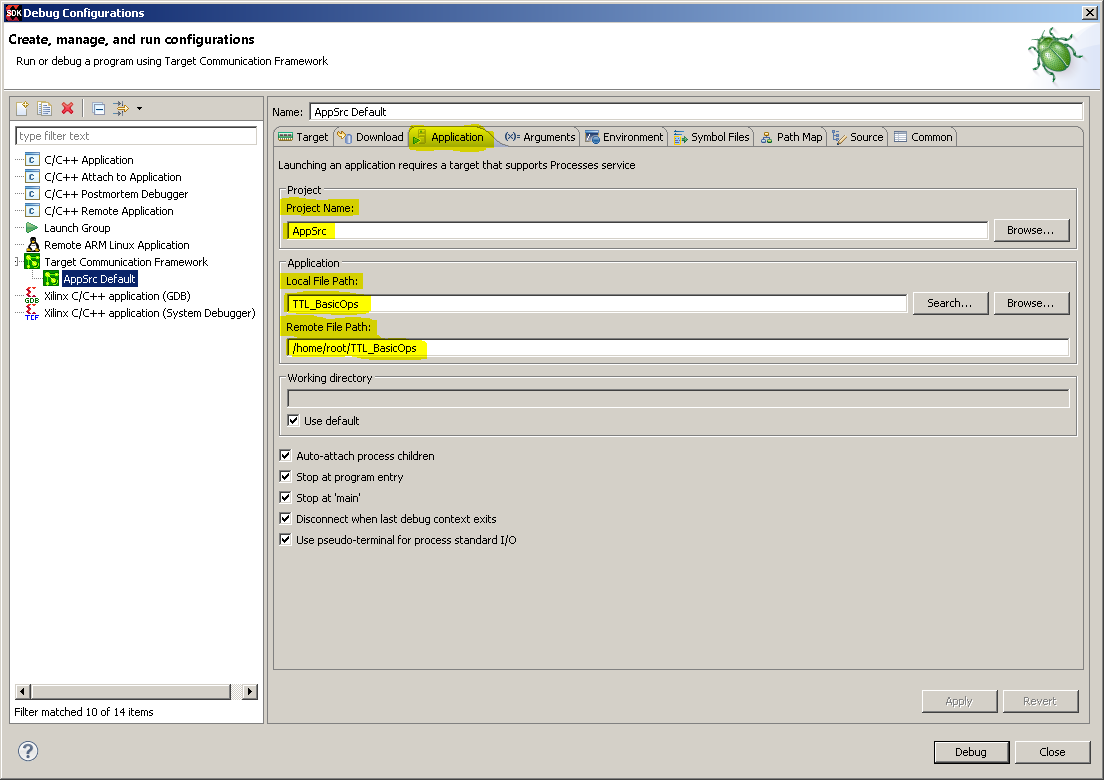
- Click “Debug” to start debugging the sample application.