
NAI VxWorks 6.9 Quick-Start Guide
Overview
This document describes how to configure the NAI Board Software Support Kit (SSK) 1.x libraries for your Single Board Computer and build and download a sample application under VxWorks 6.9 using Wind River Workbench.
Environment Setup
Configure the Board Library
Due to the portable nature of the NAI Software Support Kit some configuration is necessary to specify information about your target. If the information changes simply reconfigure the project, the code you have developed will be reuseable.
The NAI Board Software Support Kit (SSK) libraries need to be added to the VxWorks project and built for the SBC that they will be run on. There are three files that need to be modified before the project is built. Two of the files are located in the naibrd/include/advanced directory and one in the naibrd/src directory.
The file naibrd_config.h (located in naibrd\src) is used to determine how the NAI Board libraries will be configured. The files nai_pci_vxworks_adv.h and nai_vme_vxworks_adv.h (located in naibrd\include\advanced) determine how NAI Board will interface with the SBC hardware.
The following table shows which definitions need to be included or excluded for each of the NAI Single Board Computers currently available.
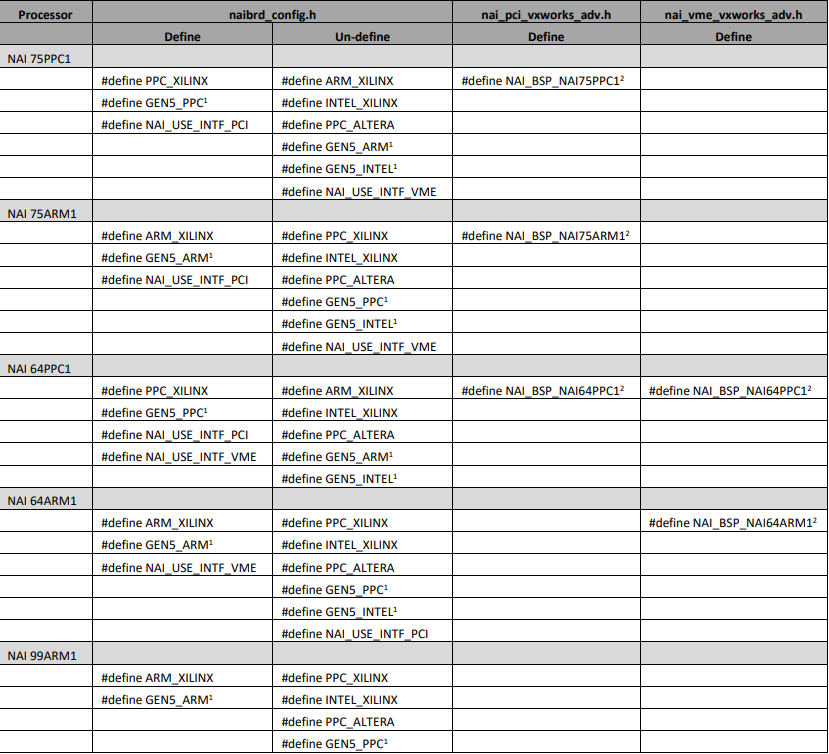
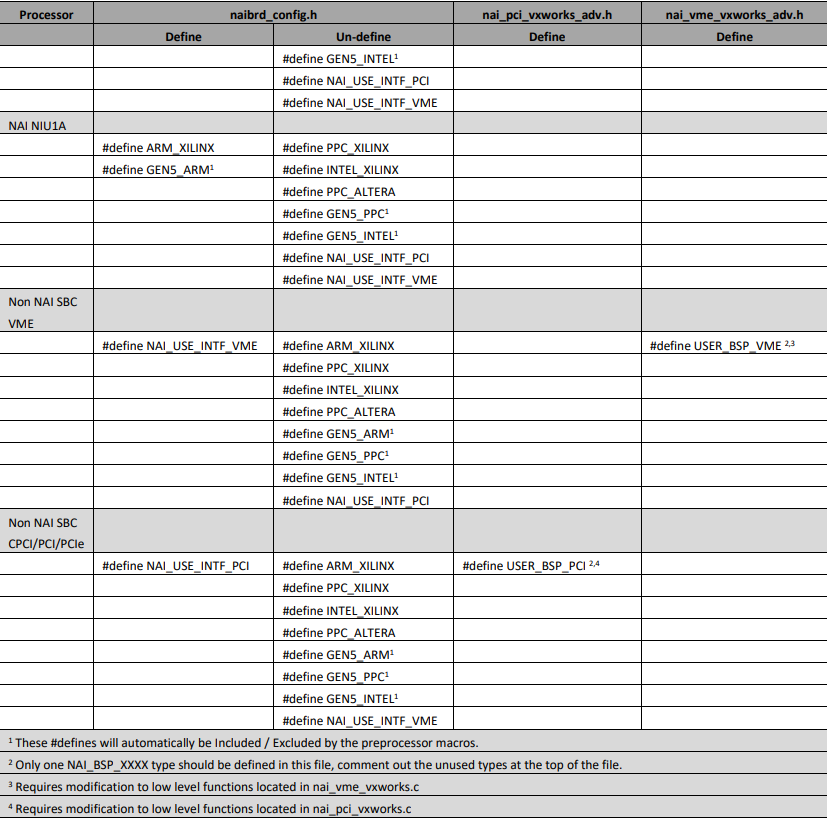
NAI 64PPC1 SBC Example of naibrd_config.h
/* Define if running on ARM Processor and a Xilinx FPGA (i.e. 64ARM1, 99ARM1, NIU1A) */
/* #define ARM_XILINX */
/* Define if running on PPC Processor and a Xilinx FPGA (i.e. 75PPC1, 64PPC1) */
#define PPC_XILINX
/* Define if running on Intel Processor and a Xilinx FPGA (i.e. 75INT2) */
/* #define INTEL_XILINX */
/* Define if running on PPC Processor and a Altera FPGA (i.e. legacy 75PPC1) */
/* #define PPC_ALTERA */
/* Define for Gen 5 processors */
#define NAI_GEN5_GENUSE_SIZE 0x4000u
#if defined(__VXWORKS__)
 #if defined(ARM_XILINX)
 #define GEN5_ARM
 #elif defined(INTEL_XILINX)
 #define GEN5_INTEL
 #elif defined(PPC_XILINX) || defined(PPC_ALTERA)
 #define GEN5_PPC
 #endif
#endif
#if defined(LINUX)
 #if defined(LINUX_ARM)
 #define GEN5_ARM
 #else
 #define GEN5_INTEL
 #endif
#endif
#if defined (WIN32) || defined(LINUX) || defined(__VXWORKS__) || defined(__INTEGRITY)
 /* Enables Ethernet communication support */
 #define NAI_USE_INTF_ETHER
#endif
#if defined (WIN32) || defined(LINUX) || defined(PROC_U2) || defined(__VXWORKS__) || defined(__INTEGRITY)
 /* Enables PCI/CPCI/PCI Express support */
 #define NAI_USE_INTF_PCI /* 75PPC1, 75INT2, 64PPC1 (on board has PCIe) */
 /* Enables VME support */
 #define NAI_USE_INTF_VME /* 64ARM1, 64PPC1 */
#endif
NAI 64PPC1 SBC Example of nai_pci_vxworks_adv.h
/*******************************************************************************************/
/* This section must be defined for the particular SBC that the Library will be running on */
/*******************************************************************************************/
#define NAI_BSP_NAI64PPC1
/* Only ONE of these definitions should be define
#define NAI_BSP_NAI75PPC1
#define NAI_BSP_NAI64PPC1
#define NAI_BSP_GE_SBC610
#define USER_BSP_PCI // Search for this value and add appropriate code for PCI/PCIe SBC being used
*/
#ifdef NAI_BSP_NAI75PPC1 /* NAI 75PPC1 SBC */
/*
* The NAI 75PPC1 only supports vxBus
* The NAI 75SBC4 does not have a rear connector
* PCI Interface but requires PCI be defined,
* so the NAI 75PPC1 setting are used.
*/
#define NAI_BSP_CPCI75PPC1
#define NAI_ENDIAN_SWAP /* PPC is Big Endian */
#define VXB_PCI_ENABLE /* VxBus PCI supported */
#define VXB_DEVICE_NAME "QorIQPciEx" /* VxBus Driver Name (from vxBusShow) */
#define NAI_SBC_DEVID 0x7584 /* Card PCI Device ID */
#endif
#ifdef NAI_BSP_NAI64PPC1 /* NAI 64PPC1 SBC */
/*
* The NAI 64PPC1 is a VME SBC but it uses PCIe
* for onboard access, so it requires PCI be defined.
*/
#define NAI_BSP_VME64PPC1
#define NAI_ENDIAN_SWAP /* PPC is Big Endian */
#define VXB_PCI_ENABLE /* VxBus PCI supported */
#define VXB_DEVICE_NAME "QorIQPciEx" /* VxBus Driver Name (from vxBusShow) */
#define NAI_SBC_DEVID 0x6484 /* Card PCI Device ID */
#endif
/*
* GE VPX SBC610 SBC
*/
#ifdef NAI_BSP_GE_SBC610
#define GE_BSP_SBC610
#define NAI_ENDIAN_SWAP
#define VXB_PCI_ENABLE
#define VXB_DEVICE_NAME "m85xxPci" /* VxBus Driver Name (from vxBusShow) */
#endif
/*
* USER PCI SBC
*/
#ifdef USER_BSP_PCI
#define USER_BSP_PCI_SBC /* SBC type/name */
#define NAI_ENDIAN_SWAP /* PPC is Big Endian, Intel & ARM is Little Endian */
#define VXB_PCI_ENABLE /* VxBus PCI supported */
#define VXB_DEVICE_NAME "xxxxxPci" /* VxBus Driver Name (from vxBusShow) */
#endif
NAI 64PPC1 SBC Example of nai_vme_vxworks_adv.h
/*******************************************************************************************/
/* This section must be defined for the particular SBC that the Library will be running on */
/*******************************************************************************************/
#define NAI_BSP_NAI64PPC1
/* Only ONE of these definitions should be define
#define NAI_BSP_NAI64PPC1
#define NAI_BSP_NAI64ARM1
#define MOT_BSP_MV6100
#define USER_BSP_VME // Search for this value and add appropriate code for VME SBC being used
*/
#ifdef NAI_BSP_NAI64PPC1 /* NAI VME 64PPC1 SBC */
/*
* The NAI 64PPC1 uses PCIe for onboard
*/
#define NAI_BSP_VME64PPC1
#define NAI_ENDIAN_SWAP /* PPC is Big Endian */
#define VXB_VME_ENABLE /* VxBus VME supported */
#define NAI_SBC_DEVID 0x6484 /* Card Device ID */
#endif
/*
* NAI VME 64ARM1 SBC
*/
#ifdef NAI_BSP_NAI64ARM1
#define NAI_BSP_VME64ARM1
// #define NAI_ENDIAN_SWAP /* ARM is Little Endian */
#define VXB_VME_ENABLE /* VxBus VME supported */
#define NAI_SBC_DEVID 0x6481 /* Card Device ID */
#endif
/*
* Motorola MV6100 SBC
*/
#ifdef MOT_BSP_MV6100
#define MOT_BSP_VME_MV6100
#define NAI_ENDIAN_SWAP
// #define VXB_VME_ENABLE /* VxBus VME supported */
#endif
/*
* USER VME SBC
*/
#ifdef USER_BSP_VME
#define USER_BSP_VME_SBC /* SBC type/name */
#define NAI_ENDIAN_SWAP /* PPC is Big Endian, Intel & ARM is Little Endian */
#define VXB_VME_ENABLE /* VxBus VME supported */
#endif
Non NAI Single Board Computer Software Modifications
PCI/CPCI/PCIe
If NAI Board is running on a non NAI SBC, there are a couple of files that will need to be modified for the libraries to work correctly. If the backplane interface is PCI, CPCI or PCIe, the files nai_pci_vxworks.h and nai_pci_vxworks.c will need to be modified.
At the top of the nai_pci_vxworks.h file the definition USER_BSP_PCI needs to be defined.
#define USER_BSP_PC1
/* Only ONE of these definitions should be define
#define NAI_BSP_NAI75PPC1
#define NAI_BSP_NAI64PPC1
#define NAI_BSP_GE_SBC610
#define USER_BSP_PCI // Search for this value and add appropriate code for PCI/PCIe SBC being used
*/
In the section where the USER_BSP_PCI definition are declared, the appropriate #defines will need to be included based on the SBC.
/*
* USER PCI SBC
*/
#ifdef USER_BSP_PCI
#define USER_BSP_PCI_SBC /* SBC type/name */
#define NAI_ENDIAN_SWAP /* PPC is Big Endian, Intel & ARM are Little Endian */
#define VXB_PCI_ENABLE /* VxBus PCI supported */
#define VXB_DEVICE_NAME "xxxxxPci" /* VxBus Driver Name (from vxBusShow) */
#endif
#define USER_BSP_PCI_SBC This can be left as is or can be renamed to better reflect the SBC type that the library is running on. If it is changed, a global search and replaced should be performed.
#define NAI_ENDIAN_SWAP This should be defined if the library is running on a Big Endian processor such as a PPC. If the library is running on a Little Endian processor such as an ARM or Intel, this should not be defined
#define VXB_PCI_ENABLE This should be defined if the library is running on a processor that has a vxBus driver for PCI/PCIe. If not, this should not be defined.
#define VXB_DEVICE_NAME ” QorIQPciEx ” If a vxBus driver is available, this should be updated to the appropriate driver name. The driver name can be obtained by running the vxBusShow command from the shell. Search the output for the PCI drive name.
-> vxBusShow
Registered Bus Types:
 USB-EHCI_Bus @ 0x0903b340
 USB-Host_Bus @ 0x003c74c4
 USB-HUB_Bus @ 0x003c74a8
 MII_Bus @ 0x003bfa64
 PCI_Bus @ 0x003bf6d4
 PLB_Bus @ 0x003bf6f0
Registered Device Drivers:
 vxbUsbBulkClass at 0x0903b480 on bus USB-HUB_Bus, funcs @ 0x003c748c
 vxbUsbHubClass at 0x003d36c0 on bus USB-HUB_Bus, funcs @ 0x003c748c
 :
 :
 QorIQQman at 0x003bebfc on bus PLB_Bus, funcs @ 0x003bebd8
 QorIQPciEx at 0x003be7d8 on bus PLB_Bus, funcs @ 0x003be75c
 QorIQBman at 0x003beac0 on bus PLB_Bus, funcs @ 0x003beaa4
 QorIQLaw at 0x003beb98 on bus PLB_Bus, funcs @ 0x003beb5c
 openPicTimer at 0x003bedf8 on bus PLB_Bus, funcs @ 0x003bedd4
 plbCtlr at 0x003bf718 on bus PLB_Bus, funcs @ 0x003bf70c
Busses and Devices Present:
 PLB_Bus @ 0x003db1b0 with bridge @ 0x003bf758
 Device Instances:
 ppcIntCtlr unit 0 on PLB_Bus @ 0x003dc170 with busInfo 0x00000000
 epic unit 0 on PLB_Bus @ 0x003dc270 with busInfo 0x00000000
 :
 :
 QorIQLaw unit 0 on PLB_Bus @ 0x003dcc70 with busInfo 0x0
 QorIQBman unit 0 on PLB_Bus @ 0x003dcd70 with busInfo 0x00000000
 QorIQQman unit 0 on PLB_Bus @ 0x003dce70 with busInfo 0x00000000
 QorIQFman unit 0 on PLB_Bus @ 0x003dcf70 with busInfo 0x00000000
 QorIQPciEx unit 0 on PLB_Bus @ 0x003dd070 with busInfo 0x00000000
 vxbPlbUsbEhci unit 1 on PLB_Bus @ 0x003ebc70 with busInfo 0x003ef270
nai_pci_vxworks.c Modifications In the file nai_pci_vxworks.c, there are two functions that will need to the modified. The first function is:
STATUS naiPciVxInstallISR(int32_t cardIndex, nai_isr_t isr, void* param)
This will need to be modified to install and enable an Interrupt Service Routine on your SBC. This can sometimes be very BSP specific and you may need to contact your SBC Vendor for help. You can use the code supplied for the NAI SBC as a starting point.
The second function is:
STATUS naiPciVxUninstallISR(int32_t cardIndex, nai_isr_t isr)
This will need to be modified to uninstall and disable an Interrupt Service Routine on your SBC. This can sometimes be very BSP specific and you may need to contact your SBC Vendor for help. You can use the code supplied for the NAI SBC as a starting point.
VME
If the backplane interface is VME, the files nai_vme_vxworks_adv.h and nai_vme_vxworks.c will need to be modified. At the top of the nai_vme_vxworks_adv.h file the definition USER_BSP_VME needs to be defined.
#define USER_BSP_VME
/* Only ONE of these definitions should be define
#define NAI_BSP_NAI64PPC1
#define NAI_BSP_NAI64ARM1
#define MOT_BSP_MV6100
#define USER_BSP_VME // Search for this value and add appropriate code for VME SBC being used
*/
In the section where the USER_BSP_VME definition are declared, the appropriate #defines will need to be included based on the SBC.
/*
* USER VME SBC
*/
#ifdef USER_BSP_VME
#define USER_BSP_VME_SBC /* SBC type/name */
#define NAI_ENDIAN_SWAP /* PPC is Big Endian, Intel & ARM are Little Endian */
#define VXB_VME_ENABLE /* VxBus VME supported */
#endif
#define USER_BSP_VME_SBC This can be left as is or can be renamed to better reflect the SBC type that the library is running on. If it is changed, a global search and replaced should be performed.
#define NAI_ENDIAN_SWAP This should be defined if the library is running on a Big Endian processor such as a PPC. If the library is running on a Little Endian processor such as an ARM or Intel, this should not be defined
#define VXB_VME_ENABLE This should be defined if the library is running on a processor that has a vxBus driver for VME. If not, this should not be defined.
nai_vme_vxworks.c Modifications
In the file nai_vme_vxworks.c, there are three functions that will need to the modified. The first function is:
STATUS naiVmeVxInstallISR(int32_t cardIndex, nai_isr_t isr, void* param)
This will need to be modified to install and enable an Interrupt Service Routine on your SBC. This can sometimes be very BSP specific and you may need to contact your SBC Vendor for help. You can use the code supplied for the NAI SBC as a starting point.
The second function is:
STATUS naiVmeVxUninstallISR(int32_t cardIndex, nai_isr_t isr)
This will need to be modified to uninstall and disable an Interrupt Service Routine on your SBC. This can sometimes be very BSP specific and you may need to contact your SBC Vendor for help. You can use the code supplied for the NAI SBC as a starting point.
The third function is:
nai_status_t naiVmeVxList(int32_t count, int32_t* numCardsFound, int32_t nSlot[],
 int8_t sCardName[][16], uint32_t unVmeStartAddr[], uint32_t unVmeEndAddr[],
 uint32_t unVmeAddrMod[])
This function is used to identify all of the cards on the VME bus. By default the information is read from the table naiSlvWindows[NAI_VME_MAX_SLOT] located at the top of the file. This table will need to be updated to reflect your system configuration.
A typical system configuration might look like the following:
/*
 * This table is used for non NAI SBCs to describe the system configuration
 * Enter information for each board in the chassis
 */
nai_slv_window_t naiSlvWindows[NAI_VME_MAX_SLOT] = {
 /* Slot Num Slot Occupied Card name AM Begin VME addr End VME addr */
 { 1, TRUE, "MV6100", 0xD, 0x00000000, 0x00800000-1},
 { 2, TRUE, "64C3", 0xD, 0x08200000, 0x08300000-1},
 { 3, TRUE, "64ARM1", 0xD, 0x09000000, 0x09800000-1},
 { 4, FALSE, "", 0xD, 0xFFFFFFFF, 0xFFFFFFFF},
 { 5, FALSE, "", 0xD, 0xFFFFFFFF, 0xFFFFFFFF},
 { 6, FALSE, "", 0xD, 0xFFFFFFFF, 0xFFFFFFFF},
 { 7, FALSE, "", 0xD, 0xFFFFFFFF, 0xFFFFFFFF},
 { 8, FALSE, "", 0xD, 0xFFFFFFFF, 0xFFFFFFFF},
 { 9, FALSE, "", 0xD, 0xFFFFFFFF, 0xFFFFFFFF},
 { 10, FALSE, "", 0xD, 0xFFFFFFFF, 0xFFFFFFFF},
 { 11, FALSE, "", 0xD, 0xFFFFFFFF, 0xFFFFFFFF},
 { 12, FALSE, "", 0xD, 0xFFFFFFFF, 0xFFFFFFFF},
 { 13, FALSE, "", 0xD, 0xFFFFFFFF, 0xFFFFFFFF},
 { 14, FALSE, "", 0xD, 0xFFFFFFFF, 0xFFFFFFFF},
 { 15, FALSE, "", 0xD, 0xFFFFFFFF, 0xFFFFFFFF},
 { 16, FALSE, "", 0xD, 0xFFFFFFFF, 0xFFFFFFFF},
 { 17, FALSE, "", 0xD, 0xFFFFFFFF, 0xFFFFFFFF},
 { 18, FALSE, "", 0xD, 0xFFFFFFFF, 0xFFFFFFFF},
 { 19, FALSE, "", 0xD, 0xFFFFFFFF, 0xFFFFFFFF},
 { 20, FALSE, "", 0xD, 0xFFFFFFFF, 0xFFFFFFFF},
 { 21, FALSE, "", 0xD, 0xFFFFFFFF, 0xFFFFFFFF}
};
Dual Port Ethernet Module
The EM1 Dual Port Ethernet Module is installed in module position 1 on the NAI PPC SBC card (i.e. 75PPC1). The Ethernet driver needs to be added to VxWorks for proper operation.
Adding EM1 Driver to the VxWorks Image
In Workbench, open the VxWorks Image Project for the processor, then open the Kernel Configuration tool.
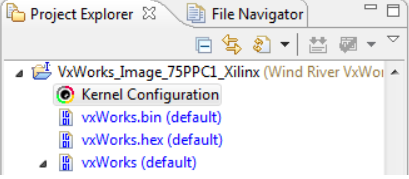
Search for INCLUDE_GEI825XX_VXB_END
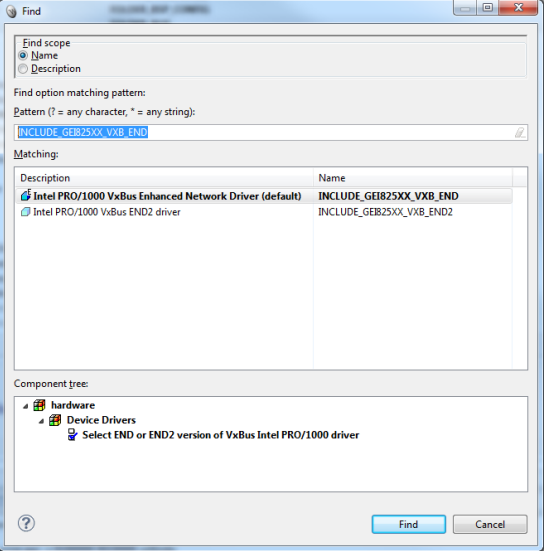
Include “INCLUDE_GEI825XX_VXB_END” in the configuration, and then rebuild the VxWork Image.
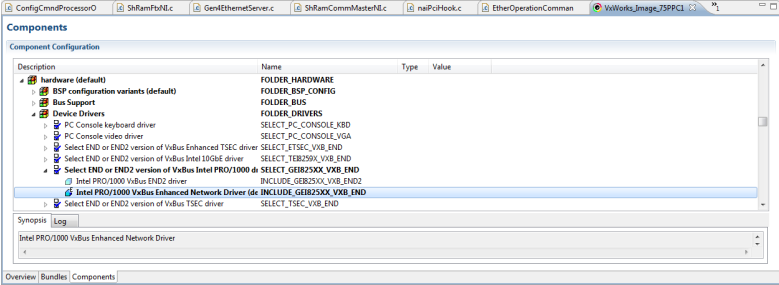
Load the new VxWorks Image on the processor. The two Ethernet port will now be available as gei0 and gei1.
Enabling the EM1 Ethernet Ports
To enable the Ethernet ports, the VxWorks commands ipAttach and ifconfig are used.
ipAttach (X,“gei”) X = device (0 or 1) ifconfig (“geiX AAA.AAA.AAA.AAA netmask MMM. MMM. MMM. MMM up”) X = device (0 or 1) AAA = IP Address MMM = subnet mask
-> ipAttach (0,"gei")
value = 0 = 0x0
-> ifconfig ("gei0 192.168.2.16 netmask 255.255.255.0 up")
value = 0 = 0x0
-> ipAttach (1,"gei")
value = 0 = 0x0
-> ifconfig ("gei1 10.0.8.123 netmask 255.0.0.0 up")
value = 0 = 0x0
-> ifconfig
lo0 Link type:Local loopback Queue:none
 inet 127.0.0.1 mask 255.255.255.255
 inet6 unicast fe80::1%lo0 prefixlen 64 automatic
 inet6 unicast ::1 prefixlen 128
 UP RUNNING LOOPBACK MULTICAST NOARP ALLMULTI
 MTU:1500 metric:1 VR:0 ifindex:1
 RX packets:3 mcast:3 errors:0 dropped:0
 TX packets:3 mcast:3 errors:0
 collisions:0 unsupported proto:0
 RX bytes:168 TX bytes:168

dtsec3 Link type:Ethernet HWaddr 00:16:c6:fe:dd:20 Queue:none
 inet 192.168.1.116 mask 255.255.255.0 broadcast 192.168.1.255
 inet6 unicast fe80::216:c6ff:fefe:dd20%dtsec3 prefixlen 64 automatic
 UP RUNNING SIMPLEX BROADCAST MULTICAST
 MTU:1500 metric:1 VR:0 ifindex:2
 RX packets:423 mcast:0 errors:0 dropped:0
 TX packets:149 mcast:8 errors:0
 collisions:0 unsupported proto:0
 RX bytes:28k TX bytes:9090

gei0 Link type:Ethernet HWaddr 00:a0:c9:00:00:02 Queue:none
 capabilities: TXCSUM TX6CSUM
 inet 192.168.2.16 mask 255.255.255.0 broadcast 192.168.2.255
 inet6 unicast fe80::2a0:c9ff:fe00:2%gei0 prefixlen 64 automatic
 UP RUNNING SIMPLEX BROADCAST MULTICAST
 MTU:1500 metric:1 VR:0 ifindex:3
 RX packets:294 mcast:0 errors:0 dropped:0
 TX packets:103 mcast:8 errors:0
 collisions:0 unsupported proto:0
 RX bytes:20k TX bytes:6330

gei1 Link type:Ethernet HWaddr 00:a0:c9:00:00:03 Queue:none
 capabilities: TXCSUM TX6CSUM
 inet 10.0.8.123 mask 255.0.0.0 broadcast 10.255.255.255
 inet6 unicast fe80::2a0:c9ff:fe00:3%gei1 prefixlen 64 tentative automatic
 UP SIMPLEX BROADCAST MULTICAST
 MTU:1500 metric:1 VR:0 ifindex:4
 RX packets:0 mcast:0 errors:0 dropped:0
 TX packets:0 mcast:0 errors:0
 collisions:0 unsupported proto:0
 RX bytes:0 TX bytes:0
value = 0 = 0x0
Building and Running a Project
Creating a Project in Workbench
- This sample project is being built for a NAI 64PPC1 SBC, it will also work for other NAI PPC based SBCs. To build the project for an ARM processor SBC such as the NAI 64ARM1, some of the build parameters will be different and they will be noted where applicable.
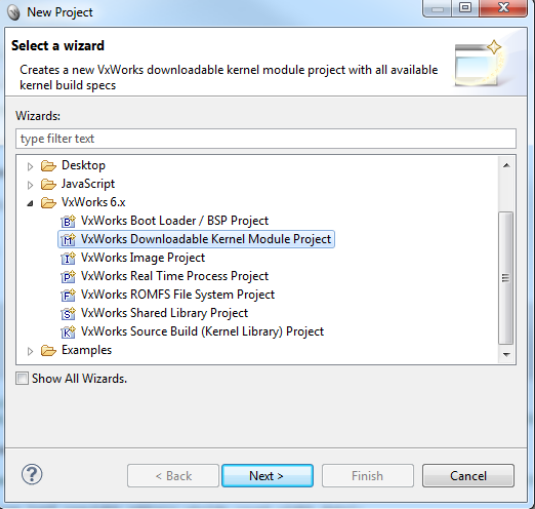
- Once Workbench has started, create a new project by selecting the menu option “File”, “New”, “Project”. In the New Project window, expand the VxWorks6.x line by clicking the arrow (►) and select “VxWorks Downloadable Kernel Module Project”. Click the Next button.
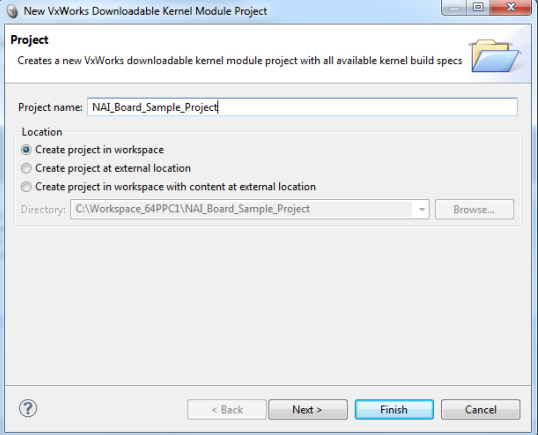
- Enter a name for the project, for this sample we will use NAI_Board_Sample_Project.
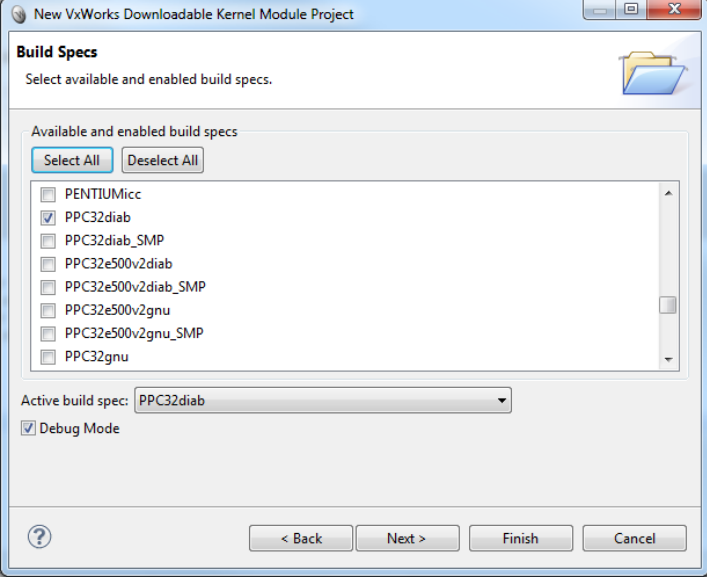
- Click the “Next” button until you get to the “Build Specs” window. Click “Deselect All”, then scroll down the list of available build specs and select “PPC32diab” (“ARMARCH7diab” for an ARM processor) for single core. To build for SMP select “PPC32diab_SMP” (“ARMARCH7diab_SMP” for an ARM processor). Click “Finish”.
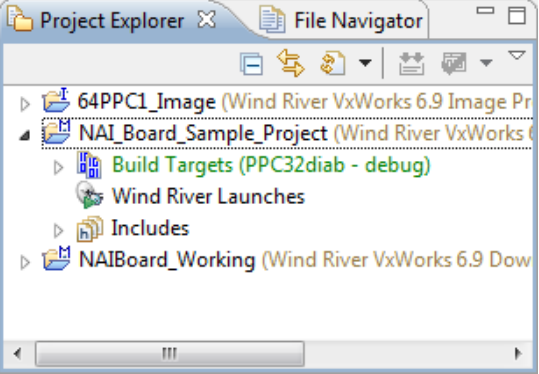
- The project will now appear in the Project Explorer window of Workbench.
Importing NAI Board SSK Files into a Project
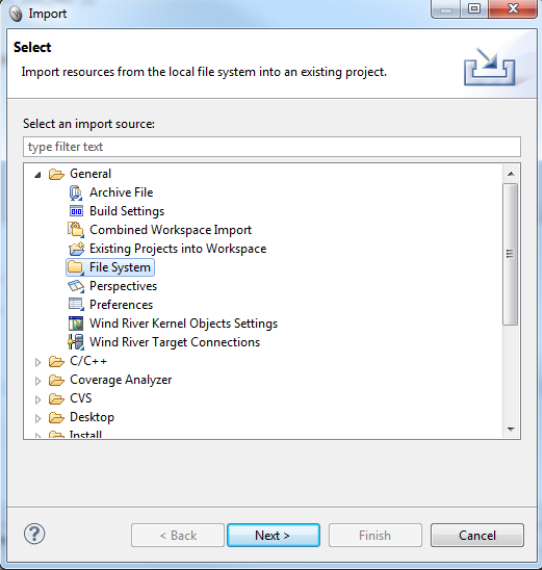
- To import the SSK files into the project, right click on the NAI_Board_Sample_Program entry in the Project Explorer window, and then select “Import”. In the Import Window, select “General”, “File System”, then click “Next”.
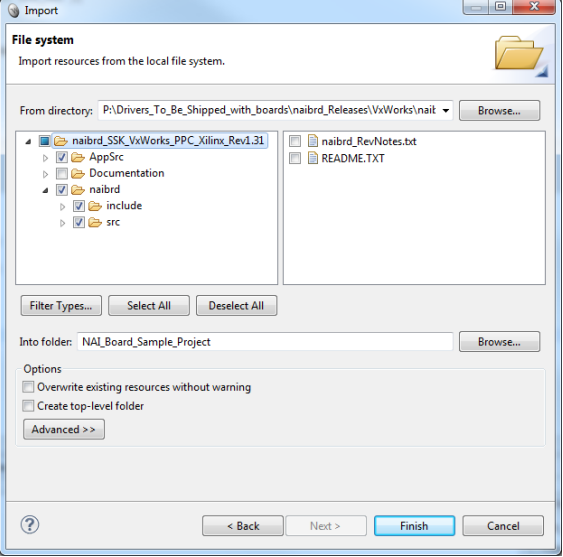
- Navigate to NAI Board SSK directory (CDROM). From the base directory, select the naibrd and AppSrc sub directories. This will include the Library and sample programs in the project. Click the “Finish” button.
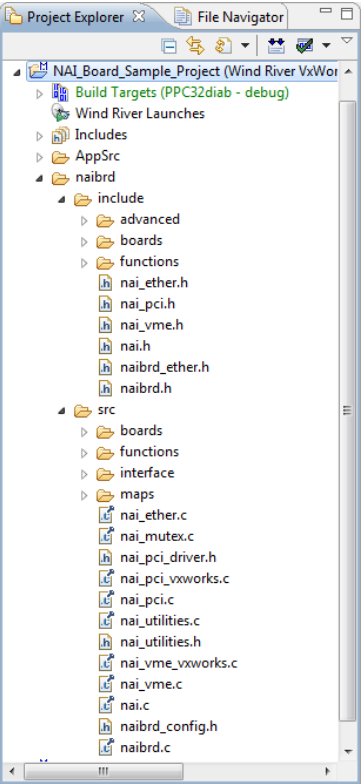
- The NAI Board library and Sample Source files are now included in the project.
- You will need to configure the NAI Board Library for the Single Board Computer that it will be running on. To do this, refer to Configure the Board Library in Environment Setup.
Building a Project
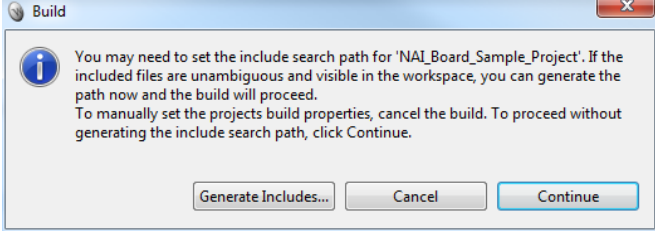
- To build the project, select on the menu, “Project”, “Build Project”. The first time the project is built, the include paths will need to be generated. Workbench will automatically add the paths for you, click the “Generate Includes…” button.
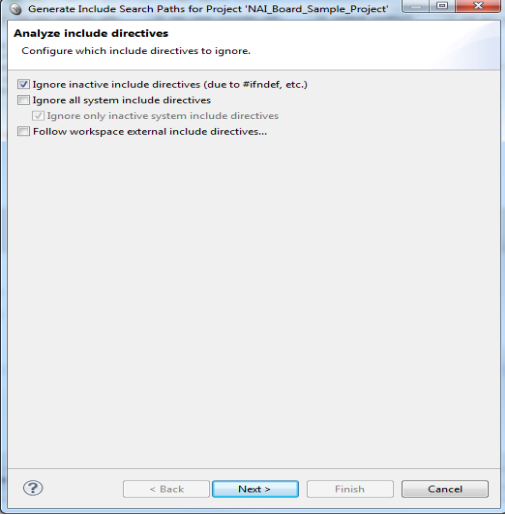
- When the “Analyses Include directives” windows appears, click “Next”
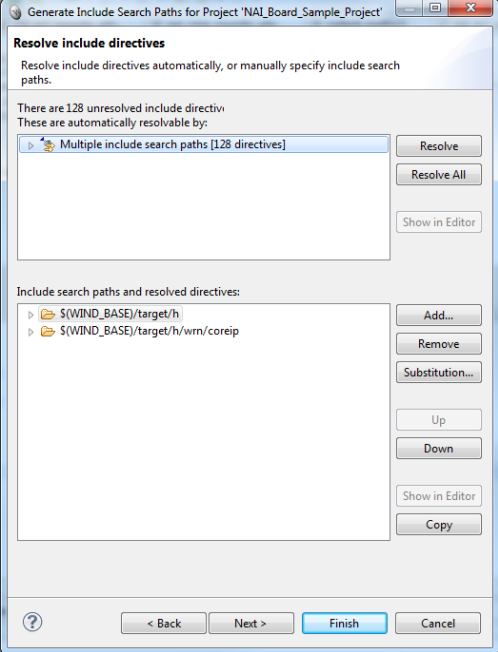
- When the “Resolve include directives” window appears, click “Resolve All”.
- If the “Resolve Ambiguous Include Directives” appears, click “OK”.
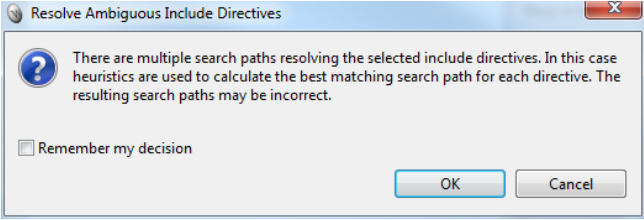
- The include paths will be added to the project.
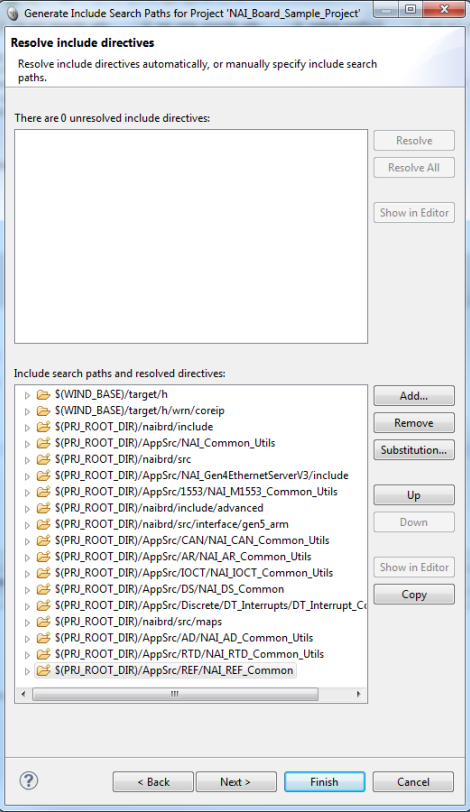
- Click the “Next” button.
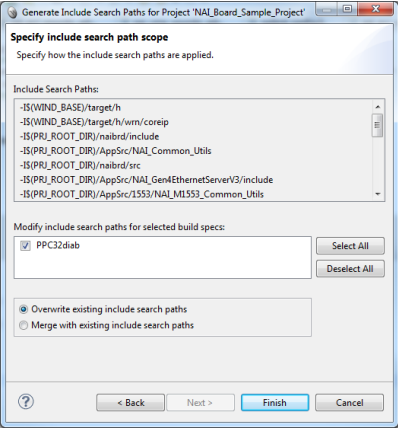
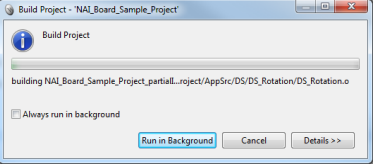
- Verify that the “PPC32diab” (“ARMARCH7diab” for an ARM processor) build spec is selected and click “Finish”. The project is now ready to be built. From the menu select “Project”, Build Project”, the project will be built and a NAI_Board_SampleProject.out file will be created.

Creating a Target Remote Server
- A target server connection is needed to download and debug your application program.
- From the menu select “Target”, “New Connection. Highlight “Wind River VxWorks 6.x Target Server Connection”, and then click Next.
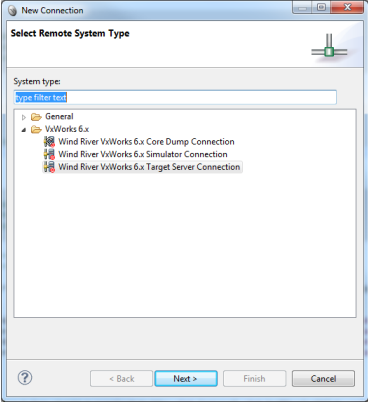
- Enter the IP address of the SBC and the location of the VxWorks Image that was downloaded to the SBC.
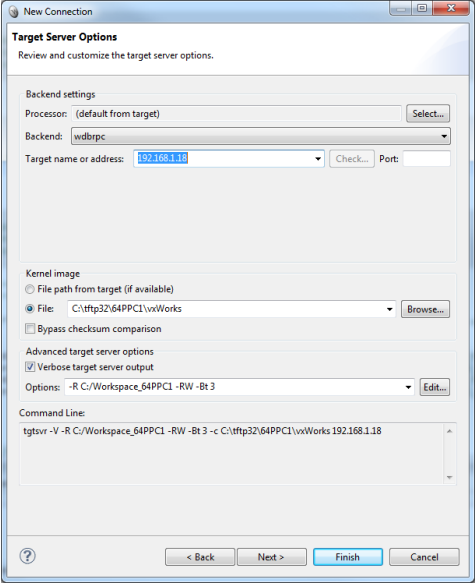
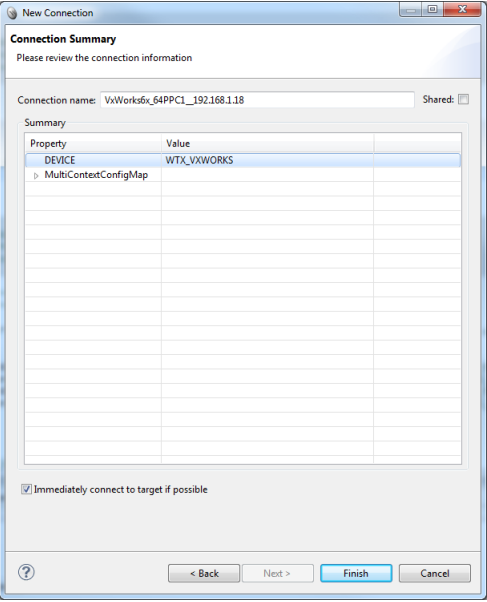
- Click the next button until you get to the Connection Summary window. Enter a Connection name for your target server and click finished.
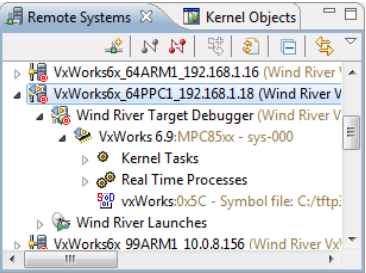
- Your new Target Server connection will appear in the Remote System tab in your Workbench project. Highlight the server, right click and select “Connect”
Downloading Application to the Single Board Computer (SBC)
- The Sample application file can now be downloaded and run on the processor.
- From the Menu select “Run”,”Download”,”Download”,”VxWorks Kernal Task”
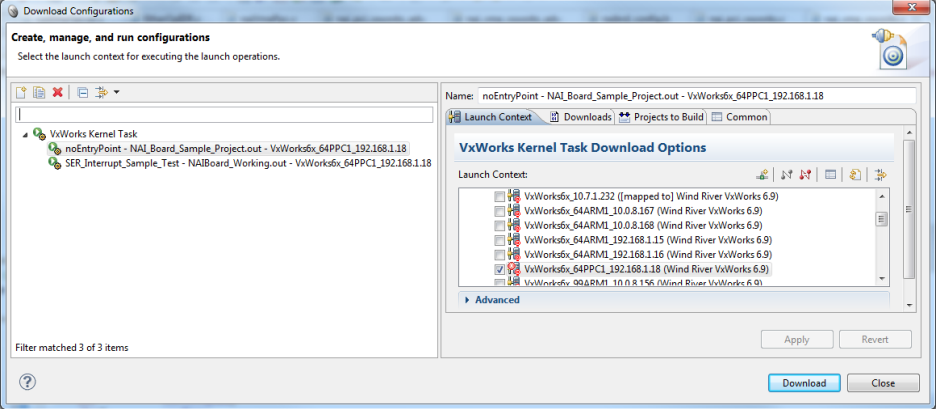
- Select “NAI_Board_Sample_Sample_Project.out”, the appropriate target processor, and click “Download”. You can now run any of the provided sample applications from the Shell.